Sony KV-32CX10 Primary User Manual - Page 13
Preparation, Automatic, Programming, Manual
 |
View all Sony KV-32CX10 manuals
Add to My Manuals
Save this manual to your list of manuals |
Page 13 highlights
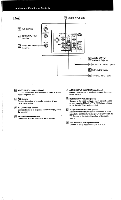
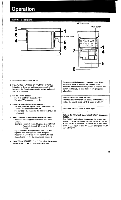
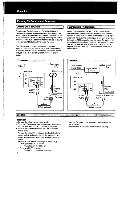
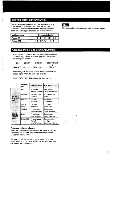
Preparation 1 Turn on the TV. 2 If the "VIDEO1", "VIDEO2", "VIDEO3", "EXT-A" indication is displayed on the screen, press the TV button so that a channel number is displayed. 3 Set the CABLE selector to the proper mode, ON for cable TV programs and OFF for VHF and UHF programs. 4 Press the ANT/AUX button as necessary. For VHF, UHF and regular cable TV channel& the "AUX" indication should be off. For pay cable TV channels, the indication should be displayed. Automatic Programming Automatic programming presets receivable channels automatically. Press AUTO PROG. "AUTO PROGRAM" is displayed on the screen and receivable channels (other than the channels already preset) will be preset in numerical sequence. The channels previously preset remain in the unit's memory. When no more channels can be found, the programming stops and the lowest numbered channel is displayed. Note Some channels may not be preset, or some unnecessary channels may be preset because of the signal strength. To add the channels that cannot be preset with automatic programming, or to erase unnecessary channels, follow the steps in "Manual Programming". While in Auto Programming mode, the screen will be dark. Manual Programming Adding channels 1 Select the channel to be added by pressing the channel number buttons and then ENTER. 2 Press ADD on the Remote Commander. "+" will appear on the left of the channel display on the screen, indicating that the channel has been added. Repeat steps 1 and 2 for other channels to be added. Erasing channels 1 Select the channel to be erased. 2 Press ERASE on the Remote Commander. -" will appear on the left of the channel display on the screen, indicating that the channel has been erased. Repeat steps 1 and 2 for other channels to be erased. Note You cannot erase a VHF or UHF channel from the memory and retain the cable TV channel which has the same number, or vice versa. If either a VHF/UHF channel or a cable TV channel with the same number is to be kept in the memory, do not erase the number. Cable TV Channel Chart* Cable TV systems use letters or numbers to designate channels. To tune in a channel, refer to this chart. Check with your local cable TV company for more complete information on the available channels. Number on this 1V 1 5 6 14 Corresponding CATV channel A-8A -7A -6 A 31 32 33 34 35 36 37 38 39 R S T U V W W+1 W+2 W+3 15 16 17 18 19 20 21 22 23 24 25 26 B CDEFGH I J K LM 93 94 95 96 97 98 99 100 101 102 W-4-57 W+58 A-5 A-4 A-3 A-2 A-1 W+59 W+60 W+61 27 28 29 30 NOPQ 123 124 125 W-4-82 W+83 W+84 *The designation of the cable TV channels conforms to the EIA/NCTA recommendation. Note 13 Pay cable TV systems use scrambled or encoded signals and require special converters (decoders) in addition to the normal cable connection.
-
 1
1 -
2
-
3
-
4
-
5
-
6
-
7
-
 8
8 -
 9
9 -
 10
10 -
 11
11 -
 12
12 -
 13
13 -
 14
14 -
 15
15 -
 16
16 -
 17
17 -
 18
18 -
19
-
20
-
21
 |
 |
