Sony LF-B20 Operating Instructions - Page 6
Identifying Parts and Controls (LF-B20 - setup
 |
UPC - 027242702974
View all Sony LF-B20 manuals
Add to My Manuals
Save this manual to your list of manuals |
Page 6 highlights
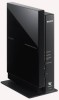
Identifying Parts and Controls (LF-B20) Identifying Parts and Controls (LF-B20) Front Rear WIRELESS NETWORK SETUP MODE/ NET AV SETUP MODE RESET IR BLASTER 1 2 LAN S VIDEO OUT IN OUT VIDEO L AUDIO R DC IN 12V IN 1 VIDEO L AUDIO R IN 2 VIDEO L AUDIO R Bottom AP WLAN CLIENT 1 WIRELESS LED Indicates the wireless function status. Amber light: Wireless network is available on the 5 GHz channel (Access Point (AP) mode.) Green light: Wireless network is available on the 2.4 GHz channel. Green blink: Attempting to connect (CLIENT mode.) 2 NETWORK LED Indicates the connection status to a network. Green blinking: Attempting to connect. Green: Connected to the network. The LED blinks quickly when data is transmitted. Off: Not connected. (in Access Point Mode) 3 SETUP MODE/NET AV LED Indicates the SETUP MODE status and the connection status with the LocationFree device. Green: Connected to the Base Station. Amber blinking: The Base Station is in Setup mode. Amber: Automatic NetAV check has failed. Off: Not connected. Red: The Base Station is being initialized. 4 SETUP MODE button Press to register LocationFree devices. 5 POWER LED (1 page 11) Green: The power is on. Red: Attempting to be turned off. Red blinking: A malfunction has occurred. Off: The power is off. 6 POWER button (1 page 11) Turns the Base Station power on and off. 7 RESET button (1 page 33) Initializes all settings on the Base Station to the factory defaults. 8 Remote sensor for the learning remote feature (1 page 19) When setting the on-screen remote control or using the learning remote feature, this sensor receives signals from the remote of devices. 9 IR BLASTER 1/2 port (1 page 15) Connect the IR Blaster (supplied). You can purchase another IR Blaster to connect to one of the ports. 0 LAN port (1 page 10) Connect a LAN cable. qa IN 1 (S-VIDEO/AUDIO/VIDEO) terminal (1 page 14) Connect audio cables and either a video or S-video cable. qs IN 2 (AUDIO/VIDEO) terminal (1 page 14) Connect audio cables and a video cable. qd DC IN jack (1 page 11) Connect the AC power adapter (supplied). qf OUT (S-VIDEO/AUDIO/VIDEO) terminal (1 page 14) Connect audio cables and either a video or S-video cable. The OUT terminal outputs the signals input from the IN 1 terminal. qg Wireless mode switch (1 page 10) Changes the Wireless mode of the Base Station. If you set the switch to AP, the Base Station works in the Access Point mode, in which the Base Station connects to a router via a LAN cable and Front works as a Wireless Access Point. If you set the switch to CLIENT, the Base Station works in the Client mode, in which the Base Station connects to a wireless router wirelessly. 6
-
 1
1 -
 2
2 -
 3
3 -
 4
4 -
 5
5 -
 6
6 -
 7
7 -
 8
8 -
 9
9 -
 10
10 -
 11
11 -
 12
12 -
13
-
14
-
15
-
16
-
17
-
18
-
19
-
20
-
21
-
22
-
23
-
24
-
25
-
26
-
27
-
28
-
29
-
30
-
31
-
32
-
33
-
34
-
35
-
36
-
37
-
38
-
39
-
40
-
41
-
42
-
43
-
44
-
45
-
46
-
47
-
48
-
49
-
50
-
51
-
52
-
53
-
54
-
55
-
56
-
57
-
58
-
59
-
60
-
61
-
62
-
63
-
64
-
65
-
66
-
67
-
68
-
69
-
70
-
71
-
72
-
73
 |
 |
