Sony MSAC-US40 Operating Instructions - Page 28
How to Use When using Macintosh
 |
UPC - 027242670853
View all Sony MSAC-US40 manuals
Add to My Manuals
Save this manual to your list of manuals |
Page 28 highlights
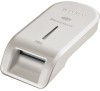
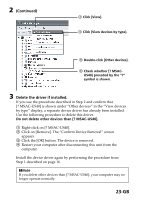
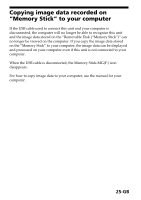
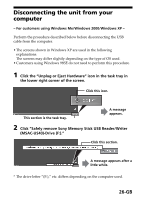
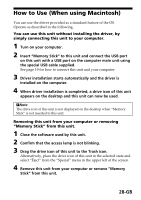
How to Use (When using Macintosh) You can use the driver provided as a standard feature of the OS. Operate as described in the following. You can use this unit without installing the driver, by simply connecting this unit to your computer. 1 Turn on your computer. 2 Insert "Memory Stick" to this unit and connect the USB port on this unit with a USB port on the computer main unit using the special USB cable supplied. See page 19 for how to connect this unit and your computer. 3 Driver installation starts automatically and the driver is installed on the computer. 4 When driver installation is completed, a drive icon of this unit appears on the desktop and this unit can now be used. PNote The drive icon of this unit is not displayed on the desktop when "Memory Stick" is not inserted to this unit. Removing this unit from your computer or removing "Memory Stick" from this unit. 1 Close the software used by this unit. 2 Confirm that the access lamp is not blinking. 3 Drag the drive icon of this unit to the Trash icon. Alternatively, place the drive icon of this unit in the selected state and select "Eject" from the "Special" menu in the upper left of the screen. 4 Remove this unit from your computer or remove "Memory Stick" from this unit. 28-GB
-
 1
1 -
2
-
3
-
4
-
5
-
6
-
7
-
8
-
9
-
10
-
11
-
12
-
13
-
14
-
15
-
16
-
17
-
18
-
19
-
20
-
21
-
22
-
 23
23 -
 24
24 -
 25
25 -
 26
26 -
 27
27 -
 28
28 -
 29
29 -
 30
30 -
 31
31 -
 32
32 -
 33
33 -
34
-
35
-
36
-
37
-
38
-
39
-
40
-
41
-
42
-
43
 |
 |
