Sony MVC-FD71 Operating Instructions (primary manual) - Page 28
Delete
 |
View all Sony MVC-FD71 manuals
Add to My Manuals
Save this manual to your list of manuals |
Page 28 highlights
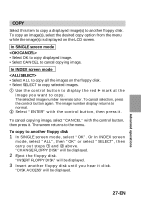
÷Changing the mode settings 4 Once copying is completed, the message "COMPLETE" is displayed. To copy images to another floppy disk, select "CONTINUE" with the control button and repeat the operations in steps 2 through 4 above. To discontinue copying, select "EXIT" with the control button. Notes • When you copy to the floppy disk which is a small remaining capacity, "DISK FULL" may appear on the LCD screen. •To discontinue copying on a floppy disk halfway (in the middle of the above steps from 1 through 4), turn off the camera. DELETE Select this item to delete a displayed image(s) To delete an image(s), select the desired delete option from the menu while the image(s) is displayed on the LCD screen. In SINGLE screen mode •Select OK to delete displayed image. •Select CANCEL to cancel deleting image. In INDEX screen mode •Select ALL to delete all the images on the floppy disk. •Select SELECT to delete selected images. 1 Use the control button to display the red " mark at the image you want to delete. The selected image number reverses color. To cancel selection, press the control button again. The image number display returns to normal. 2 Select "ENTER" with the control button, then press it. To cancel deleting image, select "CANCEL" with the control button, the press it. The screen returns to the menu screen. Notes • Once you delete an image, you cannot restore it. Check the images to delete carefully before deleting them. • Even when you select "ALL", you cannot delete the protected image. • When you select "SELECT" , you cannot select a protected image. 28-EN
-
 1
1 -
2
-
3
-
4
-
5
-
6
-
7
-
8
-
9
-
10
-
11
-
12
-
13
-
14
-
15
-
16
-
17
-
18
-
19
-
20
-
21
-
22
-
 23
23 -
 24
24 -
 25
25 -
 26
26 -
 27
27 -
 28
28 -
 29
29 -
 30
30 -
 31
31 -
 32
32 -
 33
33 -
34
-
35
-
36
-
37
-
38
-
39
-
40
-
41
-
42
-
43
-
44
-
45
-
46
-
47
-
48
-
49
-
50
-
51
-
52
-
53
-
54
-
55
-
56
-
57
-
58
-
59
-
60
-
61
-
62
-
63
-
64
-
65
-
66
-
67
-
68
-
69
-
70
-
71
-
72
-
73
-
74
-
75
-
76
-
77
-
78
-
79
-
80
 |
 |
