Sony MZ-M10 Operating Instructions - Page 57
Storing the settings for individual discs (Disc Memory), Starting the playback quickly (Quick Mode)
 |
View all Sony MZ-M10 manuals
Add to My Manuals
Save this manual to your list of manuals |
Page 57 highlights
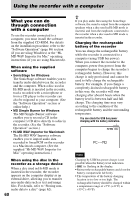
Storing the settings for individual discs (Disc Memory) The recorder is factory set to automatically store settings for each disc. The recorder automatically stores the settings for a disc and retrieves them whenever the disc is inserted. The following setting can be stored: • Bookmark • "Custom 1" and "Custom 2" settings of 6-Band Equalizer (for models except European models) You can check the setting as follows. MENU Jog dial 1 Remove the disc from the recorder, enter the menu and select "Option" "Disc Memory". 2 Turn the jog dial to select "On", and then press the jog dial to enter the selection. To set the recorder so that disc settings are not stored Select "Off" in step 2. Erasing the disc information 1 Insert the disc whose information is to be erased and verify its contents. 2 Select "1MemoryErase" in step 2. The disc information is erased. Notes • Settings for up to 64 discs can be stored. Any settings stored afterwards will replace the settings with the lowest frequency of use among the 64. The numbers of discs that can be stored depend on the numbers of tracks recorded on the discs. More tracks recorded per disc means fewer discs can be stored. • If you try to erase the disc information of a disc that have never been stored, "NO DISC MEMORY" appears in the display for a few seconds. Starting the playback quickly (Quick Mode) The recorder is factory set to quickly start playback after the playback button is pressed. You can check the setting as follows. MENU Jog dial 1 While the recorder is stopped or playing, enter the menu and select "Option" - "Quick Mode". 2 Turn the jog dial to select "On", and then press the jog dial to enter the selection. If you will not use the recorder for a long time Select "Off" in step 2. You can minimize battery drain while the recorder is not being used. Note When "Quick Mode" is set to "On", power continues to flow in the recorder even when it is not being operated. The power is automatically cut off when the batteries become drained. 57
-
 1
1 -
2
-
3
-
4
-
5
-
6
-
7
-
8
-
9
-
10
-
11
-
12
-
13
-
14
-
15
-
16
-
17
-
18
-
19
-
20
-
21
-
22
-
23
-
24
-
25
-
26
-
27
-
28
-
29
-
30
-
31
-
32
-
33
-
34
-
35
-
36
-
37
-
38
-
39
-
40
-
41
-
42
-
43
-
44
-
45
-
46
-
47
-
48
-
49
-
50
-
51
-
 52
52 -
 53
53 -
 54
54 -
 55
55 -
 56
56 -
 57
57 -
 58
58 -
 59
59 -
 60
60 -
 61
61 -
 62
62 -
63
-
64
-
65
-
66
-
67
-
68
-
69
-
70
-
71
-
72
-
73
-
74
-
75
-
76
-
77
-
78
-
79
-
80
-
81
-
82
-
83
-
84
-
85
-
86
-
87
-
88
-
89
-
90
-
91
-
92
-
93
-
94
-
95
-
96
-
97
-
98
-
99
-
100
-
101
-
102
-
103
-
104
-
105
-
106
-
107
-
108
-
109
-
110
-
111
-
112
-
113
-
114
-
115
 |
 |