Sony PCWA-A200 Access Point Help File - Page 31
same subnet as the client.
 |
View all Sony PCWA-A200 manuals
Add to My Manuals
Save this manual to your list of manuals |
Page 31 highlights
4. Ente r the te m porary IP addre s s to be allocate d as s igne d to the Acce s s Point. Allocate As s ign a s uitable IP addre s s w ith the sam e subnet as the client. The screen below show s an example w here the client IP address is 123.234.213.100 (255.255.255.0). 5. Click OK. The IP address is assigned to the Access Point and communications betw een the client and the Access Point are established. 6. Pe rform the s am e ope rations as norm al us ing the Acce s s Point Se tup Utility. Here, w e w ill explain connecting to the LAN (no DHCP server) and selecting the LAN connection mode to enable sharing of files and the printer. You can also select the Cable Modem mode if you are not going to be sharing files or the printer. Page 31
-
 1
1 -
2
-
3
-
4
-
5
-
6
-
7
-
8
-
9
-
10
-
11
-
12
-
13
-
14
-
15
-
16
-
17
-
18
-
19
-
20
-
21
-
22
-
23
-
24
-
25
-
 26
26 -
 27
27 -
 28
28 -
 29
29 -
 30
30 -
 31
31 -
 32
32 -
 33
33 -
 34
34 -
 35
35 -
 36
36 -
37
-
38
-
39
-
40
-
41
-
42
-
43
-
44
-
45
-
46
-
47
-
48
-
49
-
50
-
51
-
52
-
53
-
54
-
55
-
56
-
57
-
58
-
59
-
60
-
61
 |
 |

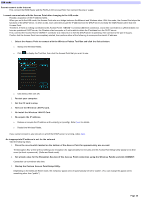
4.
Enter the temporary IP address to be allocated assigned to the Access Point. Allocate Assign a suitable IP address with the
same subnet as the client.
The screen below show s an example w here the client IP address is 123.234.213.100 (255.255.255.0).
5.
Click OK.
The IP address is assigned to the Access Point and communications betw een the client and the Access Point are established.
6.
Perform the same operations as normal using the Access Point Setup Utility.
Here, w e w ill explain connecting to the LAN (no DHCP server) and selecting the LAN connection mode to enable sharing of files and the printer.
You can also select the Cable Modem mode if you are not going to be sharing files or the printer.
Page 31