Sony RDHSK8IP Operating Instructions - Page 7
Remote RM-ANU082, VOLTAGE SELECTOR Only - batterie
 |
View all Sony RDHSK8IP manuals
Add to My Manuals
Save this manual to your list of manuals |
Page 7 highlights
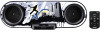
Guide to parts and controls Remote RM-ANU082 qd q; qs 8 ENTER VOL VOL qa qs A POWER (page 9, 15) Turns the unit on or off. B VOLTAGE SELECTOR (Only for models equipped with voltage selector) (page 8) C AC power cord (mains lead) (page 9) Connects to a wall outlet. D AUDIO IN jack (page 11) Connects to an optional audio component (such as portable digital music player). E Acrylic plate (page 13) Graphic sheet (page 13) F Remote sensor Receives signals from remote. G Indicator (page 9, 14) Shows the status of the unit. Indicator Lights off Lights on Flashes until the button is released Flashes 3 times in quick succession Status Power off Power on A valid button is pressed Volume is set to maximum or minimum H Unit: VOLUME +/- (page 9, 11) Remote: VOL +/-* (page 9, 11) Adjusts the volume. * The VOL + button has tactile dots. Use the tactile dots as references when operating the unit. I iPod/iPhone connector (page 8, 10) Places an optional iPod/iPhone to listen to audio contents stored in the iPod/iPhone. J iPod & iPhone NX (page 9, 10) Selects iPod & iPhone function, then starts or pauses playback. K / / / , MENU, ENTER (page 10) Selects the menu items on the iPod/ iPhone. L ./> (page 10) Selects a track on the iPod/iPhone. Fast forward or fast rewind track on the iPod/iPhone. M AUDIO IN (page 11) Selects the AUDIO IN function. Notes • Before using the remote for the first time, be sure to remove the insulation sheet attached to battery holder. • The battery is factory-installed in the remote. 7GB
-
 1
1 -
 2
2 -
 3
3 -
 4
4 -
 5
5 -
 6
6 -
 7
7 -
 8
8 -
 9
9 -
 10
10 -
 11
11 -
 12
12 -
13
-
14
-
15
-
16
-
17
-
18
-
19
-
20
 |
 |
