Sony SLV-M91HF Hookup and Setup Instructions - Page 10
A/V hookup, VCR setup
 |
View all Sony SLV-M91HF manuals
Add to My Manuals
Save this manual to your list of manuals |
Page 10 highlights
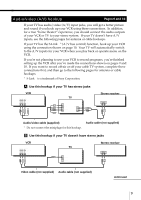
Step 3: Hookups (continued) C Use this hookup if your TV has the S-Link™ function VCR AUDIO VIDEO S-LINK LINE-1 IN LINE OUT TV IN VIDEO AUDIO AUDIO OUT S-LINK Stereo receiver AUX IN Audio/video cable (supplied) Audio cable (not supplied) Note • To play a tape in stereo, you must use the A/V connection. A/V hookup: VCR setup After you've connected your TV and completed antenna or cable hookup, use the following procedure to set up the VCR. Press MENU and select ADVANCED OPTIONS. MENU TIMER SET / CHECK TUNER PRESET CLOCK SET LANGUAGE SET VCR Plus+ CHANNELS CABLE BOX CONTROL ADVANCED OPTIONS SMARTFILE EDIT , Set AUTO ANT SEL to OFF and push the cursor stick (OK). ADVANCED OPTIONS page1 AUTO ANT SEL AUTO STEREO AUDIO MIX TUNER AUDIO SHARPNESS ON OFF ON OFF ON OFF MAIN SAP L - -H Use t o se l ec t an i t e m, t h e n p u s h For details, see page 32 of the supplied operating instructions. Caution Connections between the VCR's VHF/UHF connector and the antenna terminals of the TV receiver should be made only as shown in the following instructions. Failure to do so may result in operation that violates the regulations of the Federal Communications Commission regarding the use and operation of RF devices. Never connect the output of the VCR to an antenna or make simultaneous (parallel) antenna and VCR connections at the antenna terminals of your receiver. Note to CATV system installer (in USA) This reminder is provided to call the CATV system installer's attention to Article 82040 of the NEC that provides guidelines for proper grounding and, in particular, specifies that the cable ground shall be connected to the grounding system of the building, as close to the point of cable entry as practical. 10
-
 1
1 -
2
-
3
-
4
-
 5
5 -
 6
6 -
 7
7 -
 8
8 -
 9
9 -
 10
10 -
 11
11 -
 12
12 -
 13
13 -
 14
14 -
 15
15 -
16
-
17
-
18
-
19
-
20
-
21
-
22
-
23
-
24
-
25
-
26
-
27
-
28
-
29
-
30
-
31
-
32
-
33
-
34
-
35
-
36
-
37
-
38
-
39
-
40
-
41
-
42
-
43
-
44
-
45
-
46
-
47
-
48
-
49
-
50
-
51
-
52
-
53
-
54
-
55
-
56
-
57
-
58
-
59
-
60
-
61
-
62
-
63
-
64
-
65
-
66
-
67
-
68
 |
 |
