Sony SLV-M91HF Hookup and Setup Instructions - Page 12
VCR setup - manual
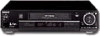 |
View all Sony SLV-M91HF manuals
Add to My Manuals
Save this manual to your list of manuals |
Page 12 highlights
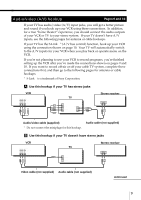
Step 3: Hookups (continued) Hookup 1: VCR setup 1 Set the RF UNIT switch to CH3 or CH4, whichever channel is not used in your area. If both are used, set the switch to either channel. For details, see page 58. If you made A/V connections (from page 9), you can skip this step. 2 Turn on your cable box. EASY SET UP 3 Press EASY SET UP on the VCR. 1 The LANGUAGE menu appears. Change the on-screen display language to Spanish (ESPAÑOL) or French (FRANÇAIS) if desired, and push the cursor stick (OK). For details, see page 35. 2 The CLOCK SET menu appears. Select AUTO and push the cursor stick (OK). For details, see page 37. RF UNIT CH3 CH4 SET UP ENGLISH ESPAÑOL FRANÇAIS LANGUAGE Use t o se l ec t Th e n p u s h OK Pu s h EASY SET UP t o q u i t SET UP CLOCK SET AUTO MANUAL 3 The SMART CH MAPPING menu appears. Move the cursor stick M/m/
-
 1
1 -
2
-
3
-
4
-
5
-
6
-
 7
7 -
 8
8 -
 9
9 -
 10
10 -
 11
11 -
 12
12 -
 13
13 -
 14
14 -
 15
15 -
 16
16 -
 17
17 -
18
-
19
-
20
-
21
-
22
-
23
-
24
-
25
-
26
-
27
-
28
-
29
-
30
-
31
-
32
-
33
-
34
-
35
-
36
-
37
-
38
-
39
-
40
-
41
-
42
-
43
-
44
-
45
-
46
-
47
-
48
-
49
-
50
-
51
-
52
-
53
-
54
-
55
-
56
-
57
-
58
-
59
-
60
-
61
-
62
-
63
-
64
-
65
-
66
-
67
-
68
 |
 |
