Sony SRR1 Product Manual (SRMASTER: SRR1 Operation Manual) - Page 28
Display Settings, Using the Backlight, Using the Screen Saver, Date Settings
 |
View all Sony SRR1 manuals
Add to My Manuals
Save this manual to your list of manuals |
Page 28 highlights
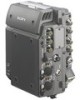
Display Settings Date Settings Chapter 3 Basic Menu Operations You can make settings for backlight use in dark locations, screen saver, etc. Using the Backlight Setting the LIGHT switch to ON turns the backlight on. LIGHT switch HOME TC VIDEO AUDIO SYSTEM dB SDI SDI SDI SDI SDI SDI SDI SDI SDI SDI SDI SDI SDI SDI SDI SDI 0 -10 -20 -30 -60 EE EMP EMP EMP EMP EMP EMP EMP EMP EMP EMP EMP EMP EMP EMP EMP EMP LR LR LR LR LR LR LR LR LR LR LR LR LR LR LR LR 1 2 3 4 5 6 7 8 9 10 11 12 13 14 15 16 STOP SR-R1 TCG KEYINHI RECINHI 00 H 00 M 00 S 00 F 16.5V REMAIN 10min ENCODE 1920x1080 SR-SQ 59.94I 10bit 4:2:2 LOCAL EE 21:46 KEY INHI OFF ON LIGHT OFF ON ADJUST EJECT Z FUNC STOP x REW m PLAY B F FWD M SELECT/ENTER BACK REC z PAUSE X Adjusting the backlight brightness Access the SYSTEM Setup menu and select LCD > BRIGHT (see page 47). The Backlight Brightness window appears, letting you adjust the setting. Turning the backlight off after a period of inactivity Access the SYSTEM Setup and select LCD > LIGHT OFF (see page 47). The Backlight Off Timer window appears, letting you adjust the backlight activation duration. The setting range is 5 seconds to 5 minutes. To disable automatic backlight deactivation, select "Disable." Default setting: Disable Using the Screen Saver Access the SYSTEM Setup menu and select LCD >SAVER (see page 47). The Screen Saver window appears, letting you adjust the wait interval until the screen saver is activated. The setting range is 1 minute to 1 hour. To disable the screen saver, select "Disable." Default setting: Disable Display the System menu and select OTHERS >SET DATE menu to set the date and time of the unit. To set the date and time (OTHERS >SET DATE menu) 1 Display the System menu, and then select and confirm "OTHERS" t select and confirm "SET DATE." 2 Set the year, month, day, local time, and UTC (Coordinated Universal Time) offset (e.g., +9:00 for Japan), and then select and confirm [SET]. Note Time information is recorded to SRMemory cards in UTC format and is displayed using the offset value as its base. 28 Display Settings / Date Settings
-
 1
1 -
2
-
3
-
4
-
5
-
6
-
7
-
8
-
9
-
10
-
11
-
12
-
13
-
14
-
15
-
16
-
17
-
18
-
19
-
20
-
21
-
22
-
 23
23 -
 24
24 -
 25
25 -
 26
26 -
 27
27 -
 28
28 -
 29
29 -
 30
30 -
 31
31 -
 32
32 -
 33
33 -
34
-
35
-
36
-
37
-
38
-
39
-
40
-
41
-
42
-
43
-
44
-
45
-
46
-
47
-
48
-
49
-
50
-
51
-
52
-
53
-
54
-
55
-
56
-
57
-
58
-
59
-
60
-
61
-
62
-
63
 |
 |
