Sony STR-KS2300 Operating Instructions - Page 25
Performing initial setup, operations, Inserting batteries into the, remote, Press, to turn off - remote code
 |
View all Sony STR-KS2300 manuals
Add to My Manuals
Save this manual to your list of manuals |
Page 25 highlights
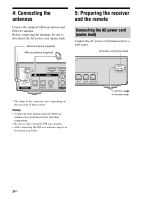
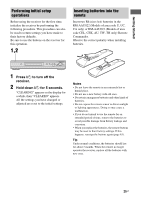
Getting Started Performing initial setup operations Before using the receiver for the first time, initialize the receiver by performing the following procedure. This procedure can also be used to return settings you have made to their factory defaults. Be sure to use the buttons on the receiver for this operation. 1,2 Inserting batteries into the remote Insert two R6 (size-AA) batteries in the RM-AAU022 (Models of area code U, UC, CA only) or RM-AAU023 (Models of area code CEL, CEK, AU, TW, TH only) Remote Commander. Observe the correct polarity when installing batteries. ?/1 ACTIVE STANDBY PRESET TUNING INPUT SELECTOR SOUND FIELD MUTING MASTER VOLUME AUTO CAL MIC 1 Press ?/1 to turn off the receiver. 2 Hold down ?/1 for 5 seconds. "CLEARING" appears on the display for a while, then "CLEARED" appears. All the settings you have changed or adjusted are reset to the initial settings. Notes • Do not leave the remote in an extremely hot or humid place. • Do not use a new battery with old ones. • Do not mix manganese batteries and other kinds of batteries. • Do not expose the remote sensor to direct sunlight or lighting apparatuses. Doing so may cause a malfunction. • If you do not intend to use the remote for an extended period of time, remove the batteries to avoid possible damage from battery leakage and corrosion. • When you replace the batteries, the remote buttons may be reset to their factory settings. If this happens, reassign the buttons again (page 63). Tip Under normal conditions, the batteries should last for about 3 months. When the remote no longer operates the receiver, replace all the batteries with new ones. 25GB
-
 1
1 -
2
-
3
-
4
-
5
-
6
-
7
-
8
-
9
-
10
-
11
-
12
-
13
-
14
-
15
-
16
-
17
-
18
-
19
-
 20
20 -
 21
21 -
 22
22 -
 23
23 -
 24
24 -
 25
25 -
 26
26 -
 27
27 -
 28
28 -
 29
29 -
 30
30 -
31
-
32
-
33
-
34
-
35
-
36
-
37
-
38
-
39
-
40
-
41
-
42
-
43
-
44
-
45
-
46
-
47
-
48
-
49
-
50
-
51
-
52
-
53
-
54
-
55
-
56
-
57
-
58
-
59
-
60
-
61
-
62
-
63
-
64
-
65
-
66
-
67
-
68
-
69
-
70
-
71
-
72
-
73
-
74
-
75
-
76
 |
 |
