Sony STR-KS2300 Operating Instructions - Page 27
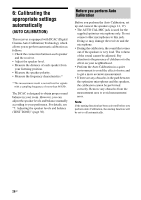
Press AMP MENU, then press, Performing Auto Calibration - auto calibration microphone
 |
View all Sony STR-KS2300 manuals
Add to My Manuals
Save this manual to your list of manuals |
Page 27 highlights
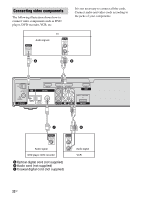
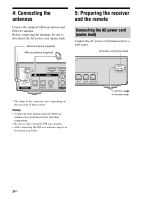
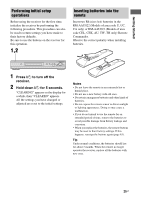
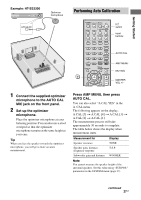
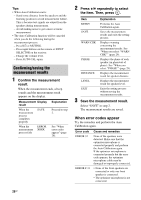
Getting Started Example: HT-SS2300 ?/1 ACTIVE STANDBY PRESET TUNING INPUT SELECTOR SOUND FIELD MUTING MASTER VOLUME AUTO CAL MIC Optimizer microphone 1 Connect the supplied optimizer microphone to the AUTO CAL MIC jack on the front panel. 2 Set up the optimizer microphone. Place the optimizer microphone at your listening position.You can also use a stool or tripod so that the optimizer microphone remains at the same height as your ears. Tip When you face the speaker towards the optimizer microphone, you will get a more accurate measurement. Performing Auto Calibration TV INPUT TV ?/1 SLEEP DMPORT AV ?/1 ?/1 SYSTEM STANDBY VIDEO1 VIDEO2 BD DVD SAT TV SA-CD/CD TUNER 2CH A.F.D. MOVIE MUSIC 1 4 7 >10 - CLEAR DISPLAY THEATRE 23 DVD/BD MENU 56 AUTO CAL D.TUNING 89 D.SKIP MEMORY AMP MENU 0/10 ENTER TOOLS/ OPTIONS MUTING TV VOL MASTER VOL O RETURN/EXIT MENU/HOME ?/1 switch Input buttons AUTO CAL AMP MENU MUTING MASTER VOL +/- Press AMP MENU, then press AUTO CAL. You can also select "A.CAL YES" in the A. CAL menu. The following appears on the display. A.CAL [5] t A.CAL [4] t A.CAL [3] t A.CAL [2] t A.CAL [1] The measurement process will take approximately 30 seconds to complete. The table below shows the display when measurement starts. Measurement for Speaker existance Speaker gain, distance, frequency response Subwoofer gain and distance Display TONE T.S.P. WOOFER Note You cannot measure the speaker height of the surround speakers. Set this value using "SUR POS." parameters in the SYSTEM menu (page 37). continued 27GB
-
 1
1 -
2
-
3
-
4
-
5
-
6
-
7
-
8
-
9
-
10
-
11
-
12
-
13
-
14
-
15
-
16
-
17
-
18
-
19
-
20
-
21
-
 22
22 -
 23
23 -
 24
24 -
 25
25 -
 26
26 -
 27
27 -
 28
28 -
 29
29 -
 30
30 -
 31
31 -
 32
32 -
33
-
34
-
35
-
36
-
37
-
38
-
39
-
40
-
41
-
42
-
43
-
44
-
45
-
46
-
47
-
48
-
49
-
50
-
51
-
52
-
53
-
54
-
55
-
56
-
57
-
58
-
59
-
60
-
61
-
62
-
63
-
64
-
65
-
66
-
67
-
68
-
69
-
70
-
71
-
72
-
73
-
74
-
75
-
76
 |
 |
