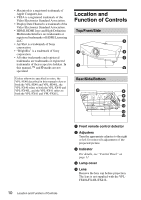
Sony VPL FX40 Operating Instructions - Page 12
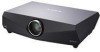
Connector Panel, SHIFT key, ZOOM key, FOCUS key, MENU key, On/Standby key, INPUT key, ENTER - center
 |
UPC - 027242693524
View all Sony VPL FX40 manuals
Add to My Manuals
Save this manual to your list of manuals |
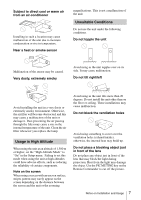
Page 12 highlights
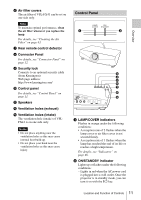
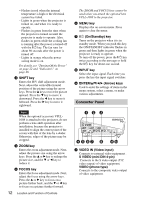
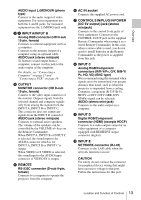
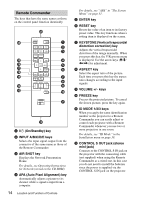
- Flashes in red when the internal temperature is high or the electrical system has failed. - Lights in green when the projector is turned on, and when it is ready to operate. - Flashes in green from the time when the projector is turned on until the projector is ready to operate. Also, flashes in green while the cooling fan is running after the power is turned off with the ?/1 key. The fan runs for about 90 seconds after the power is turned off. - Lights in orange when the power saving mode is on. For details, see "Turning Off the Power" on page 22 and "Indicators" on page 46. c SHIFT key Enters the H/V shift adjustment mode. Next, adjust the vertical/horizontal position of the picture using the arrow keys. Press the v key to move the picture upward. Press the V key to move it downward. Press the b key to move it leftward. Press the B key to move it rightward. Note When the optional accessory VPLL1008 is attached to the projector, do not perform a lens-shift operation after installation, because the projector is installed to align the center point of the screen with that of the lens by a dealer. Otherwise, edges of the picture may be cropped. d ZOOM key Enters the zoom adjustment mode. Next, adjust the picture size using the arrow keys. Press the v or B key to enlarge the picture size, and the V or b key to reduce it. e FOCUS key Enters the focus adjustment mode. Next, adjust the focus using the arrow keys. Press the v or B key to focus on a picture further back, and the V or b key to focus on a picture further forward. 12 Location and Function of Controls The ZOOM and FOCUS keys cannot be used when you attach the optional lens VPLL-1008 to the projector. f MENU key Displays the on-screen menu. Press again to clear the menu. g ?/1 (On/Standby) key Turns on the projector when it is in standby mode. When you push this key, the ON/STANDBY indicator flashes in green and then lights in green when the projector is ready to operate. To turn off the power, press the ?/1 key twice according to the message or hold the ?/1 key for about one second. h INPUT key Select the input signal. Each time you press the key the input signal switches. i ENTER/v/V/b/B (Arrow) keys Used to enter the settings of items in the menu system, select a menu, or make various adjustments. Connector Panel 12 3 4 5 67 8 90 a VIDEO IN (Video input) Connects to external video equipment . S VIDEO (mini DIN 4-pin) Connects to the S video output (Y/C video output) of video equipment. VIDEO (phono type) Connects to the composite video output of video equipment.
-
 1
1 -
2
-
3
-
4
-
5
-
6
-
 7
7 -
 8
8 -
 9
9 -
 10
10 -
 11
11 -
 12
12 -
 13
13 -
 14
14 -
 15
15 -
 16
16 -
 17
17 -
18
-
19
-
20
-
21
-
22
-
23
-
24
-
25
-
26
-
27
-
28
-
29
-
30
-
31
-
32
-
33
-
34
-
35
-
36
-
37
-
38
-
39
-
40
-
41
-
42
-
43
-
44
-
45
-
46
-
47
-
48
-
49
-
50
-
51
-
52
-
53
-
54
-
55
-
56
-
57
-
58
-
59
 |
 |
