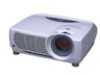
Sony VPL-PS10 Operating Instructions - Page 11
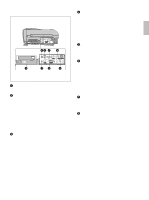
Control Panel, How to use the adjusters
 |
View all Sony VPL-PS10 manuals
Add to My Manuals
Save this manual to your list of manuals |
Page 11 highlights
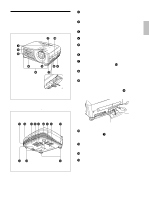
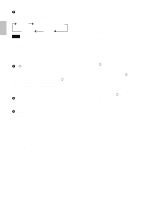
How to use the adjusters To adjust the height Adjust the height of the projector as follows: 1 Lift the projector and press the adjuster buttons. The adjusters will extend from the projector. Location and Function of Controls Control Panel LAMP/ TEMP/ POWER ON/ COVER FAN SAVING STANDBY HELP MENU VOLUME APA RESET ENTER INPUT q; 9 1 2 345678 Adjuster buttons 2 While pressing the buttons, adjust the height. Then, release the buttons. The adjusters will lock, then the height of the projector will be fixed. For fine adjustment, turn the adjusters to the right or left. Note If the adjusters have been extended to the limit and you keep turning the adjusters counterclockwise, the adjusters will stop turning and the adjuster buttons cannot be pressed. In this case, turn the adjusters clockwise, and then press the adjuster buttons again. 3 If necessary, turn the rear adjusters to the right or left to adjust the height of the projector. 1 HELP key If you need help information during an operation, press this key to display help messages. The Help menu lists error recovery techniques depending on problem type. 2 VOLUME +/- keys Adjust the volume of the built-in speakers. + : Increases the volume. - : Decreases the volume. 3 APA (Auto Pixel Alignment) key Adjusts the picture to be projected automatically to give the clearest picture possible while a signal from the computer is input. Adjusts the shift (up/down and left/right) at the same time automatically. Note Press the APA key when the full image is displayed on the screen. If there are black edges around the image, the APA function will not function properly and the image may extend beyond the screen. 4 RESET key Resets the value of an item to its factory preset value. This key functions when the menu or a setting item is displayed on the screen. 5 Arrow (M/m/
-
 1
1 -
2
-
3
-
4
-
5
-
 6
6 -
 7
7 -
 8
8 -
 9
9 -
 10
10 -
 11
11 -
 12
12 -
 13
13 -
 14
14 -
 15
15 -
 16
16 -
17
-
18
-
19
-
20
-
21
-
22
-
23
-
24
-
25
-
26
-
27
-
28
-
29
-
30
-
31
-
32
-
33
-
34
-
35
-
36
-
37
-
38
-
39
-
40
-
41
-
42
-
43
-
44
-
45
-
46
-
47
-
48
-
49
-
50
-
51
-
52
-
53
-
54
-
55
-
56
-
57
-
58
-
59
-
60
-
61
-
62
-
63
-
64
-
65
-
66
-
67
-
68
-
69
-
70
-
71
-
72
-
73
-
74
-
75
-
76
-
77
-
78
-
79
-
80
-
81
-
82
-
83
-
84
-
85
-
86
-
87
-
88
-
89
-
90
-
91
-
92
-
93
-
94
-
95
-
96
-
97
-
98
-
99
-
100
-
101
-
102
-
103
-
104
-
105
-
106
-
107
-
108
-
109
-
110
-
111
-
112
-
113
-
114
-
115
-
116
-
117
-
118
-
119
-
120
-
121
-
122
-
123
-
124
-
125
-
126
-
127
-
128
 |
 |
