Sony VRDMC6 Operating Instructions - Page 54
Copying From Video Devices, Copying All Contents, to select [DV IN]
 |
UPC - 027242767805
View all Sony VRDMC6 manuals
Add to My Manuals
Save this manual to your list of manuals |
Page 54 highlights
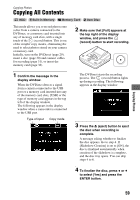
Copying From Video Devices Copying All Contents This mode allows you to record the entire video tape content onto a disc. The DVDirect automatically controls playback on the connected video device. Initially, turn on the DVDirect (page 29), insert a disc (page 30) and connect a DV (i.LINK) cable for recording (page 33). z Hint • If all the preparations are complete for copying, the DVDirect detects a signal from a camcorder connecting to the DV IN connector, and the display window in step 4 appears automatically. You can skip steps 1 to 3. 1 Press the RETURN button. The [Menu] display appears. 2 Make sure that [Video b DVD] is selected, and press the ENTER button. 4 Confirm the message in the display window. When the DVDirect detects a signal from a camera connected to the DV IN connector, [DV] appears in the top left of the display window. Type of input Copy mode 5 Make sure that [Full] appears at the top right of the display window, and press the (record) button to start recording. 3 Press V or v to select [DV IN] and press the ENTER button. The DVDirect starts recording at the same time the video device starts playback. If the video tape is not at its beginning, it will automatically rewind and the DVDirect will start recording. During recording, the message [Recording] appears in the display window, and the (record) button lights up. The following appears in the display window. 54
-
 1
1 -
2
-
3
-
4
-
5
-
6
-
7
-
8
-
9
-
10
-
11
-
12
-
13
-
14
-
15
-
16
-
17
-
18
-
19
-
20
-
21
-
22
-
23
-
24
-
25
-
26
-
27
-
28
-
29
-
30
-
31
-
32
-
33
-
34
-
35
-
36
-
37
-
38
-
39
-
40
-
41
-
42
-
43
-
44
-
45
-
46
-
47
-
48
-
 49
49 -
 50
50 -
 51
51 -
 52
52 -
 53
53 -
 54
54 -
 55
55 -
 56
56 -
 57
57 -
 58
58 -
 59
59 -
60
-
61
-
62
-
63
-
64
-
65
-
66
-
67
-
68
-
69
-
70
-
71
-
72
-
73
-
74
-
75
-
76
-
77
-
78
-
79
-
80
-
81
-
82
-
83
-
84
-
85
-
86
-
87
-
88
-
89
-
90
-
91
-
92
 |
 |
