Sony XR-65X90K Wall-Mount Bracket - Page 8
Installing the Lateral Shift, Bracket to the Wall
 |
View all Sony XR-65X90K manuals
Add to My Manuals
Save this manual to your list of manuals |
Page 8 highlights
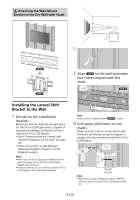
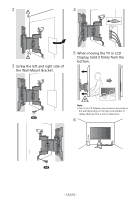
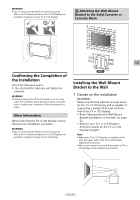
Attaching the Wall-Mount Bracket to the Dry Wall with Studs 2 WM4 3 Align WM4 to the wall and make four marks aligned with the studs. WM1 × 4 WM4 Installing the Lateral Shift Bracket to the Wall 1 Decide on the installation location. Make sure that the wall has enough space for the TV or LCD Display and is capable of supporting a weight of at least six times that of the TV or LCD Display. • Refer "Measurement for Lateral Shift Bracket installation on the wall" on page 20. • Refer to your TV's or LCD Display's Reference Guide for the TV's or LCD Display's weight. Note ˎˎWhen your TV or LCD Display is installed on the wall, the upper side of the TV or LCD Display slightly leans forward. ˎˎWe recommend you to check the position of TV or LCD Display in the viewing environment. Note ˎˎUse a level to check whether WM4 is level. 4 Drill upper pilot holes on the marks. Make sure the location on the wall to drill the holes are strong enough to support a weight of at least six times that of the TV or LCD Display. × 2 5.5 mm (7/32 inch) 75 mm (3 inch) Note ˎˎPilot holes must be drilled to a depth of 75 mm (3 inch), using a 5.5 mm (7/32 inch) diameter drill bit. − 8 (US) −
-
 1
1 -
2
-
 3
3 -
 4
4 -
 5
5 -
 6
6 -
 7
7 -
 8
8 -
 9
9 -
 10
10 -
 11
11 -
 12
12 -
 13
13 -
14
-
15
-
16
-
17
-
18
-
19
-
20
-
21
-
22
-
23
-
24
-
25
-
26
-
27
-
28
-
29
-
30
-
31
-
32
-
33
-
34
-
35
-
36
-
37
-
38
-
39
-
40
-
41
-
42
-
43
-
44
-
45
-
46
-
47
-
48
-
49
-
50
-
51
-
52
-
53
-
54
-
55
-
56
-
57
-
58
-
59
-
60
-
61
-
62
-
63
-
64
-
65
-
66
-
67
-
68
-
69
 |
 |
