Sony ZS-D5 Operation Guide - Page 25
and press DISPLAY ENTER MEMORY.
 |
View all Sony ZS-D5 manuals
Add to My Manuals
Save this manual to your list of manuals |
Page 25 highlights
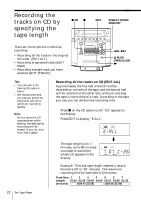
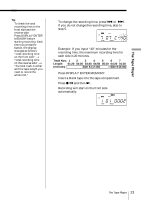
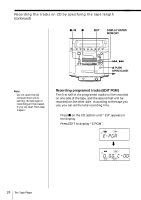
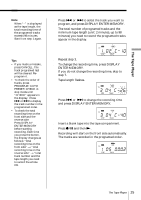
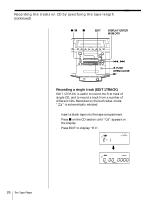
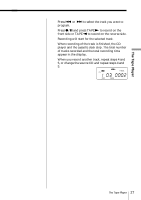
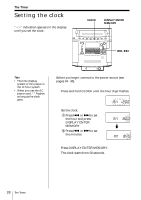
The Tape Player Note When "--" is displayed as the tape length, the total recording time of the programed tracks exceeds 98 minutes. Start from step 1 again. 3 Press = or + to select the track you want to program, and press DISPLAY ENTER MEMORY. The total number of programed tracks and the minimum tape length (unit: 2 minutes, up to 98 minutes) you need to record the programed tracks appear in the display. Tips • If you made a mistake, press CANCEL. The track programed last will be cleared. Reprogram it. • To check the order of tracks, press PROGRAM•AUTO PRESET•CHECK in stop mode until "CHECK" appears in the display. Press = or + to display the track number in the programmed order. • To check the total recording time on the front side and the reverse side: Press DISPLAY ENTER MEMORY before starting recording. Each time you press the button, the display changes as follows: "total recording time on the front side" n "total recording time on the reverse side" n "total track number and the tape length you need to record the whole CD. 4 Repeat step 3. 5 To change the recording time, press DISPLAY ENTER MEMORY. If you do not change the recording time, skip to step 7. Tape length flashes. 6 Press = or + to change the recording time and press DISPLAY ENTER MEMORY. 7 Insert a blank tape into the tape compartment. 8 Press r/P and then (. Recording will start on the front side automatically. The tracks are recorded in the programed order. The Tape Player 25
-
 1
1 -
2
-
3
-
4
-
5
-
6
-
7
-
8
-
9
-
10
-
11
-
12
-
13
-
14
-
15
-
16
-
17
-
18
-
19
-
 20
20 -
 21
21 -
 22
22 -
 23
23 -
 24
24 -
 25
25 -
 26
26 -
 27
27 -
 28
28 -
 29
29 -
 30
30 -
31
-
32
-
33
-
34
-
35
-
36
-
37
-
38
-
39
-
40
-
41
-
42
-
43
-
44
-
45
-
46
-
47
-
48
 |
 |
