Sony ZS-D5 Operation Guide - Page 37
Setting Up, Listening to TV, VCR and MiniDisc player, recorder
 |
View all Sony ZS-D5 manuals
Add to My Manuals
Save this manual to your list of manuals |
Page 37 highlights
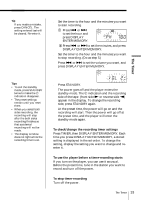
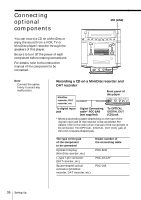
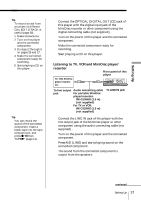
Setting Up Tip To record a track from a number of different CDs, EDIT 1TRACK is useful (page 26). 1 Make connections. 2 Turn on this player and the connected component. 3 Do steps 2 through 5 on pages 26 and 27. 4 Make the connected component ready for recording. 5 Start playing a CD on this player. Tip You can record the sound of the connected component. Insert a blank tape into the tape compartment, and press r/P then TAPE( (page 11). 1 Connect the OPTICAL DIGITAL OUT (CD) jack of this player with the digital input jack of the MiniDisc recorder or other component using the digital connecting cable (not supplied) . 2 Turn on the power of this player and the connected component. 3 Make the connected component ready for recording. 4 Start playing a CD on this player. Listening to TV, VCR and MiniDisc player/ recorder Front panel of this player TV, VCR, MiniDisc player/recorder, etc. To line output Audio connecting cable jack For portable MiniDisc player/recorder: RK-G136HG (1.5 m) (not supplied) For TV or VCR: RK-G129HG (1.5 m) (not supplied) To LINE IN jack 1 Connect the LINE IN jack of this player with the line output jack of the MiniDisc player or other component using the audio connecting cable (not supplied) . 2 Turn on the power of this player and the connected component. 3 Press MD (LINE) and start playing sound on the connected component. The sound from the connected component is output from the speakers. continued Setting Up 37
-
 1
1 -
2
-
3
-
4
-
5
-
6
-
7
-
8
-
9
-
10
-
11
-
12
-
13
-
14
-
15
-
16
-
17
-
18
-
19
-
20
-
21
-
22
-
23
-
24
-
25
-
26
-
27
-
28
-
29
-
30
-
31
-
 32
32 -
 33
33 -
 34
34 -
 35
35 -
 36
36 -
 37
37 -
 38
38 -
 39
39 -
 40
40 -
 41
41 -
 42
42 -
43
-
44
-
45
-
46
-
47
-
48
 |
 |
