Stihl BF-MM Instruction Manual - Page 13
Mounting the MultiTool
 |
View all Stihl BF-MM manuals
Add to My Manuals
Save this manual to your list of manuals |
Page 13 highlights
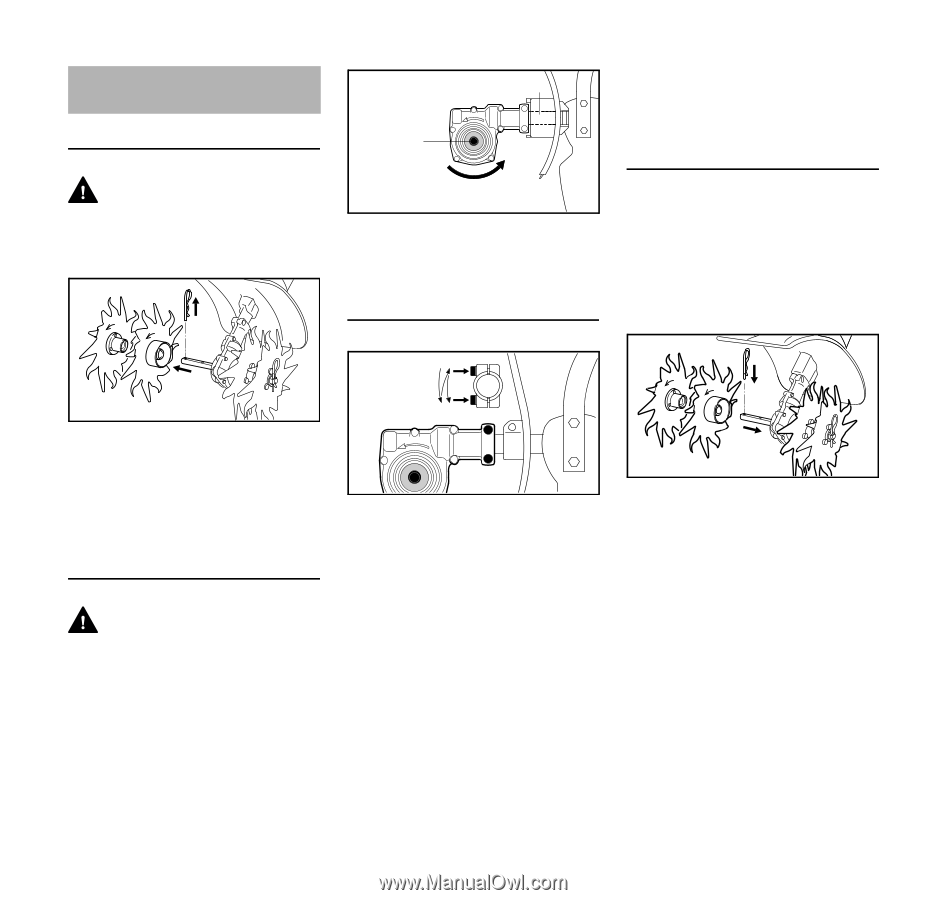
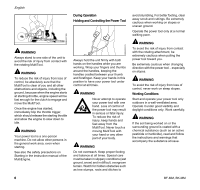
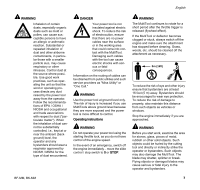
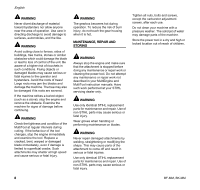
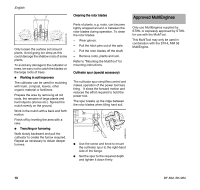
English Mounting the MultiTool Removing Existing MultiTools WARNING Wear gloves to reduce the risk of injury from contact with sharp MultiTools and/or hot surface of gearbox. 2 1 3 Gearbox output shaft (1) below the drive tube (2). Direction of rotation (3) of MultiTool. Adjusting Position of Gearbox 469BA043 KN NOTICE It must not be possible to rotate the gearbox on the drive tube. Mounting the MultiTool N Arrange the blades in the order they will be fitted on the shaft, noting the following points: Left-hand and right-hand blades are different. The direction of rotation is marked with arrows on the gearbox and blades. 6 481BA008 KN 469BA029 KN N Remove the hitch pin and pull the MultiTools (if fitted) off the shaft - see also "Mounting the MultiTool" in the instruction manual of the other MultiTool. N Clean the gearbox if necessary. Checking Position of Gearbox WARNING To reduce risk of injury from the MultiTool rotating in the wrong direction, check that position of gearbox is correct and adjust if necessary. N Loosen clamp screws on gearbox. N Turn the gearbox through 180°. N Line up the gearbox in the correct position. N Tighten down the two clamp screws on the gearbox in the following sequence: - Tighten the first screw moderately. - Tighten the second screw moderately. - Tighten down first screw firmly. - Tighten down second screw firmly. 481BA011 KN 54 N Rotate the inner right-hand blade (4) on the shaft until it can be pushed into position - check the direction of rotation again (arrows). The hub of the inner blade is larger than that of the outer blade. N Rotate the outer right-hand blade (5) on the shaft until it can be pushed into position - check the direction of rotation again (arrows). N Insert and engage the hitch pin (6) in the hole in the shaft - fold the hitch pin flat against the blade. N Use the same procedure to mount the rotor blades on the left-hand side. BF-MM, BK-MM 11
-
 1
1 -
2
-
3
-
4
-
5
-
6
-
7
-
 8
8 -
 9
9 -
 10
10 -
 11
11 -
 12
12 -
 13
13 -
 14
14 -
 15
15 -
 16
16 -
 17
17 -
 18
18 -
19
-
20
-
21
-
22
-
23
-
24
-
25
-
26
-
27
-
28
-
29
-
30
-
31
-
32
-
33
-
34
-
35
-
36
-
37
-
38
-
39
-
40
 |
 |