Stihl FS 100 RX Product Instruction Manual - Page 24
Fitting the Harness, Balancing the, Trimmer/Brushcutter - drive tube
 |
View all Stihl FS 100 RX manuals
Add to My Manuals
Save this manual to your list of manuals |
Page 24 highlights
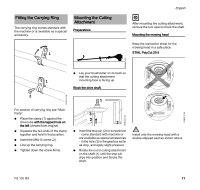
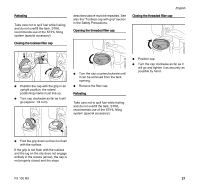
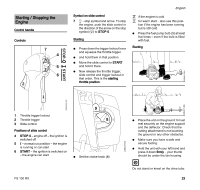
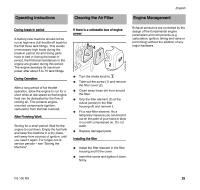
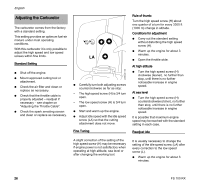
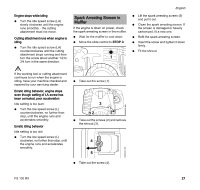
English Fitting the Harness The type and style of the harness depend on the market. The use of the harness is described in the chapter on "Approved Combinations of Cutting Attachment, Deflector, Handle and Harness". Shoulder strap 1 Balancing the Trimmer/Brushcutter Attaching the unit to the harness The type and style of the harness and carabiner (spring hook) depend on the market. 2 1 1 2 N Attach the carabiner (1) to the carrying ring (2) on the drive tube. 2 Balance the brushcutter. N Adjust the carrying ring. N Tighten the screw moderately. N Let go of the brushcutter and check to see how it is balance - the cutting tool should just touch the ground in the normal working position. N Move the carrying ring as required. When the correct floating position has been reached: N Tighten down the screw on the carrying ring firmly. Detaching the unit from the harness 259BA016 KN 002BA311 KN 002BA312 KN N Put on the shoulder strap (1). N Adjust the length of the strap so that the carabiner (2) is level with your right hip when the machine is attached. N Balance the brushcutter. N Loosen the screw (3). 22 1 1 2 2 N Press down the bar on the carabiner (1) and pull the carrying ring (2) out of the carabiner. FS 100 RX
-
 1
1 -
2
-
3
-
4
-
5
-
6
-
7
-
8
-
9
-
10
-
11
-
12
-
13
-
14
-
15
-
16
-
17
-
18
-
 19
19 -
 20
20 -
 21
21 -
 22
22 -
 23
23 -
 24
24 -
 25
25 -
 26
26 -
 27
27 -
 28
28 -
 29
29 -
30
-
31
-
32
-
33
-
34
-
35
-
36
-
37
-
38
-
39
-
40
-
41
-
42
-
43
-
44
-
45
-
46
-
47
-
48
-
49
-
50
-
51
-
52
-
53
-
54
-
55
-
56
-
57
-
58
-
59
-
60
-
61
-
62
-
63
-
64
-
65
-
66
-
67
-
68
-
69
-
70
-
71
-
72
-
73
-
74
-
75
-
76
-
77
-
78
-
79
-
80
-
81
-
82
-
83
-
84
-
85
-
86
-
87
-
88
-
89
-
90
-
91
-
92
 |
 |
