Sub-Zero 632 Built-In Installation Guide - Page 8
Electrical, Plumbing, Built-in - ice maker
 |
View all Sub-Zero 632 manuals
Add to My Manuals
Save this manual to your list of manuals |
Page 8 highlights
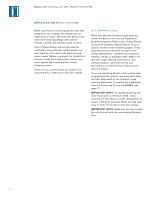
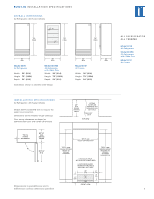
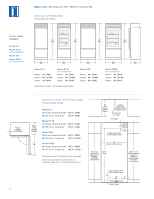
B U I LT- I N I N S TA L L A T I O N I N S T R U C T I O N S ELECTRICAL REQUIREMENTS PLUMBING REQUIREMENTS A 115 V AC, 60 Hz, 15 amp circuit breaker and electrical supply are required. A separate circuit, servicing only this appliance, is required. All Sub-Zero Built-In models are equipped with a power supply cord with a 3-prong grounding plug, which must be plugged into a mating 3-prong grounding-type wall receptacle. Follow the National Electrical Code and local codes and ordinances when installing the receptacle. For location of the electrical supply, refer to the Installation Specifications illustration for your specific model on pages 5-7. IMPORTANT NOTE: A ground fault circuit interrupter (GFCI) is not recommended and may cause interruption of operation. Do not use an extension cord or twoprong adapter. Electrical ground is required on this appliance. Do not remove the power supply cord ground prong. The outlet must be checked by a qualified electrician to be sure that it is wired with the correct polarity. Verify that the outlet provides 115 volts and is properly grounded. For Built-In models with an automatic ice maker, rough in the water supply line. Connect a 1/4" OD copper line to the house supply. Use an easily accessible shut-off valve between the water supply and the unit. This valve is usually placed about 6" (152) from the compression fitting. Do not use self-piercing valves. A saddle valve kit (part # 4200880) is available from your Sub-Zero dealer. The water line should be routed up through the floor within 1/2" (13) from the back wall and no higher than 3" (76) off the floor. If the water supply is brought in from behind the unit, route the water line through the back wall, no more than 3" (76) from the floor. Regardless of the routing, allow 3' (1 m) of excess copper tubing to remain outside the wall or floor for easy connection to the unit. For location of the water supply, refer to the Installation Specifications illustration for your specific model on pages 5-7. A line filter is required when water conditions have a high sediment content. The ice maker operates on water pressure of 20 psi (1.4 bar) to 100 psi (6.9 bar). A reverse osmosis system can be used, provided there is a consistent water pressure of 20 psi (1.4 bar) to 100 psi (6.9 bar) supplied to the water valve at all times. IMPORTANT NOTE: In some cases a reverse osmosis water filter system may not be able to maintain the minimum water pressure consistently. Good water is important for high quality ice. It is not recommended that the ice maker be connected to a softened water supply. Water softener chemicals, such as salt from a malfunctioning softener, can damage the ice maker mold and lead to poor ice quality. If a softened water supply cannot be avoided, it is important that the water softener be well maintained and operating properly. Dimensions in parentheses are in 8 millimeters unless otherwise specified.
-
 1
1 -
2
-
 3
3 -
 4
4 -
 5
5 -
 6
6 -
 7
7 -
 8
8 -
 9
9 -
 10
10 -
 11
11 -
 12
12 -
 13
13 -
14
-
15
-
16
-
17
-
18
-
19
-
20
-
21
-
22
-
23
-
24
 |
 |