Sub-Zero 685 Built-In Installation Guide - Page 10
Position, Anti-tip, Built-in - installation
 |
View all Sub-Zero 685 manuals
Add to My Manuals
Save this manual to your list of manuals |
Page 10 highlights
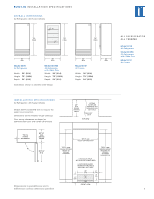
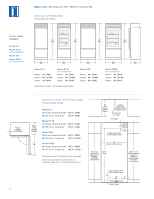
B U I LT- I N I N S TA L L A T I O N I N S T R U C T I O N S ANTI-TIP BLOCKING KIT POSITION THE UNIT To prevent the unit from tipping forward and provide a stable installation, the unit must be secured in place with an anti-tip blocking device. Protect any finished flooring before moving the unit into place. All Built-In models are equipped with rollers, so you can easily move the unit into place. If there is a solid soffit above the unit with clearance between the unit and the soffit of 1" (25) or less, you won't need to block the unit. Refer to illustration 5 below. For installations with clearances of more than 1" (25), you must block the unit with the anti-tip blocking kit (wood block and hardware) provided. Locate and mark two wall studs against the wall where the Built-in unit will be installed. Then locate the proper height to clear the unit. The space between the unit top and the bottom of the wood block must not be more than 1/4" (6). Position the wood block over the unit and use the screws and 'L' brackets to lock it in place. Make sure the screws extend a minimum of 7/8" (22) into each of the two wall studs. The wood block must be positioned securely and must extend at least 3" (76) over the unit. Refer to illustration 6 below. Shut off power to the wall outlet. Plug the power supply cord into the 15 amp grounded outlet and roll the unit into position under the wood block or soffit. Using the front and rear leveling legs, raise the unit until it makes contact with the wood block. See Level the Unit, page 11. IMPORTANT NOTE: If possible, keep door(s) closed on the unit until it is properly anchored. IMPORTANT NOTE: If for any reason the unit has been laid on its back or side, you must allow the unit to stand upright for a minimum of 24 hours before connecting power. To reduce the possibility of the unit tipping forward, the front leveling legs must be in contact with the floor. 1" (25) SOFFIT 3" WALL STUD (76) SCREW WOOD BLOCK SHROUD Illus. 5 Illus. 6 10
-
 1
1 -
2
-
3
-
4
-
 5
5 -
 6
6 -
 7
7 -
 8
8 -
 9
9 -
 10
10 -
 11
11 -
 12
12 -
 13
13 -
 14
14 -
 15
15 -
16
-
17
-
18
-
19
-
20
-
21
-
22
-
23
-
24
 |
 |
