Symphonic CWR20V5 Owner's Manual - Page 33
Timer Recording
 |
View all Symphonic CWR20V5 manuals
Add to My Manuals
Save this manual to your list of manuals |
Page 33 highlights
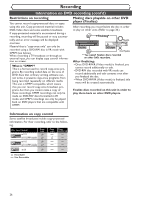
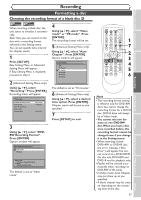
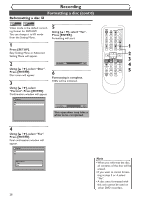
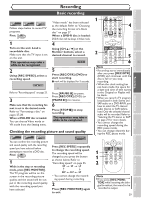
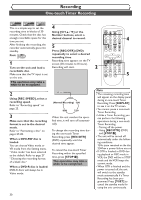
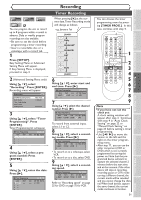
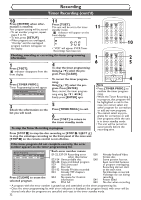
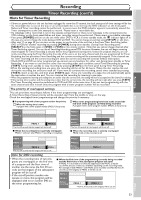
Video DVD-RW VR DVD-RW DVD-R VCR You can program the unit to record up to 8 programs within a month in advance. Daily or weekly program recordings are also available. • Be sure to set the clock before programming a timer recording. • Insert a recordable disc or a videotape with a record tab. 1 Press [SETUP]. Easy Setting Menu or Advanced Setting Menu will appear. If Easy Setting Menu is displayed, proceed to step 3. 2 (Advanced Setting Menu only) Using [K / L], select "Recording". Press [ENTER]. Recording menu will appear. Recording DVD-RW Recording Format Auto Chapter Timer Programming Auto Finalize Dubbing Mode DVD Video mode 10 minutes VCR DVD 3 Using [K / L], select "Timer Programming". Press [ENTER]. Timer Programming list will appear. Timer Programming Date 1. --2. --3. --4. --- Start End VCR DVD CH DVD VCR Speed 4 Using [K / L], select a program number. Press [ENTER]. 5 Using [K / L], enter the date. Press [B]. Timer Programming Date 1. JAN/01 2. --3. --4. --- Start --:-- End --:-- VCR DVD CH DVD VCR Speed L1 DVD Recording Timer Recording When pressing [L] at the current date,Timer Recording mode will change as follows. e.g. January 1st JAN/01 Daily MON-SAT MON-FRI SAT FRI SUN JAN/31 6 Using [K / L], enter start and end time. Press [B]. Timer Programming Date 1. JAN/01 2. --- Start End 12:57AM --:-- VCR DVD CH DVD VCR Speed L1 DVD 7 Using [K / L], select the channel number. Press [B]. Timer Programming VCR DVD Date 1. JAN/01 2. --- Start 12:57AM End 1:57AM CH DVD VCR Speed 8 DVD To record from external input, select L1 or L2. 8 Using [K / L], select a recording media. Press [B]. Timer Programming VCR DVD Date 1. JAN/01 2. --- Start 12:57AM End 1:57AM CH DVD VCR Speed 8 DVD • To record on to a videotape, select VCR. • To record on to a disc, select DVD. 9 Using [K / L], select a recording speed. Timer Programming VCR DVD Date 1. JAN/01 2. --- Start 12:57AM End 1:57AM CH DVD VCR Speed 8 DVD 1H Refer to "Recording speed" on page 25 for DVD or page 75 for VCR. You can choose the timer programming menu by pressing [TIMER PROG.]. In this case, continue with step 4. POWER OPEN/CLOSE T-SET TIMER PROG. .@/: ABC DEF 1 2 3 GHI JKL MNO CH 4 5 6 PQRS TUV WXYZ VIDEO/TV 7 8 9 DISPLAY SPACE 0 CLEAR SETUP TOP MENU MENU/LIST RETURN ENTER 1 REC/OTR VCR DVD REC/OTR REC SPEED PLAY REC MONITOR SKIP PAUSE SKIP SLOW CM SKIP STOP SEARCH DUBBING ZOOM AUDIO 2 3 4 5 6 7 8 9 Note • If you have not set the clock yet: A clock setting window will appear after step 3. Continue with step 4 in "Auto Clock Setting" on page 22 or "Manual Clock Setting" on page 23 before setting a timer programming. • Use [{ / B] to move the cursor to the left and the right on the timer programming menu. • After step 11, you can use the other component (VCR or DVD) which is not currently programmed by turning the power on. Note that the programmed device will start to capture the selected channel 2 minutes before the start time and at the moment, if the other device still stays in recording, recording pause or OTR mode turning a different channel, the current mode will be canceled and you cannot change the channel.When both devices capture the same channel, the current mode continues to function. 31 Others Changing the Setting menu VCR functions Editing Disc Playback Before you start Connections Getting started Recording
-
 1
1 -
2
-
3
-
4
-
5
-
6
-
7
-
8
-
9
-
10
-
11
-
12
-
13
-
14
-
15
-
16
-
17
-
18
-
19
-
20
-
21
-
22
-
23
-
24
-
25
-
26
-
27
-
 28
28 -
 29
29 -
 30
30 -
 31
31 -
 32
32 -
 33
33 -
 34
34 -
 35
35 -
 36
36 -
 37
37 -
 38
38 -
39
-
40
-
41
-
42
-
43
-
44
-
45
-
46
-
47
-
48
-
49
-
50
-
51
-
52
-
53
-
54
-
55
-
56
-
57
-
58
-
59
-
60
-
61
-
62
-
63
-
64
-
65
-
66
-
67
-
68
-
69
-
70
-
71
-
72
-
73
-
74
-
75
-
76
-
77
-
78
-
79
-
80
-
81
-
82
-
83
-
84
-
85
-
86
-
87
-
88
-
89
-
90
-
91
-
92
-
93
-
94
-
95
-
96
-
97
-
98
-
99
-
100
-
101
-
102
-
103
-
104
-
105
-
106
-
107
-
108
-
109
-
110
-
111
-
112
-
113
-
114
-
115
-
116
-
117
-
118
-
119
-
120
-
121
-
122
-
123
-
124
-
125
-
126
-
127
-
128
-
129
-
130
-
131
-
132
-
133
-
134
-
135
-
136
-
137
-
138
-
139
-
140
-
141
-
142
-
143
-
144
-
145
-
146
-
147
-
148
-
149
-
150
-
151
-
152
-
153
-
154
-
155
-
156
-
157
-
158
-
159
-
160
-
161
-
162
-
163
-
164
-
165
-
166
-
167
-
168
-
169
-
170
 |
 |