Symphonic SC309A Owner's Manual - Page 9
Symphonic SC309A Manual
 |
View all Symphonic SC309A manuals
Add to My Manuals
Save this manual to your list of manuals |
Page 9 highlights
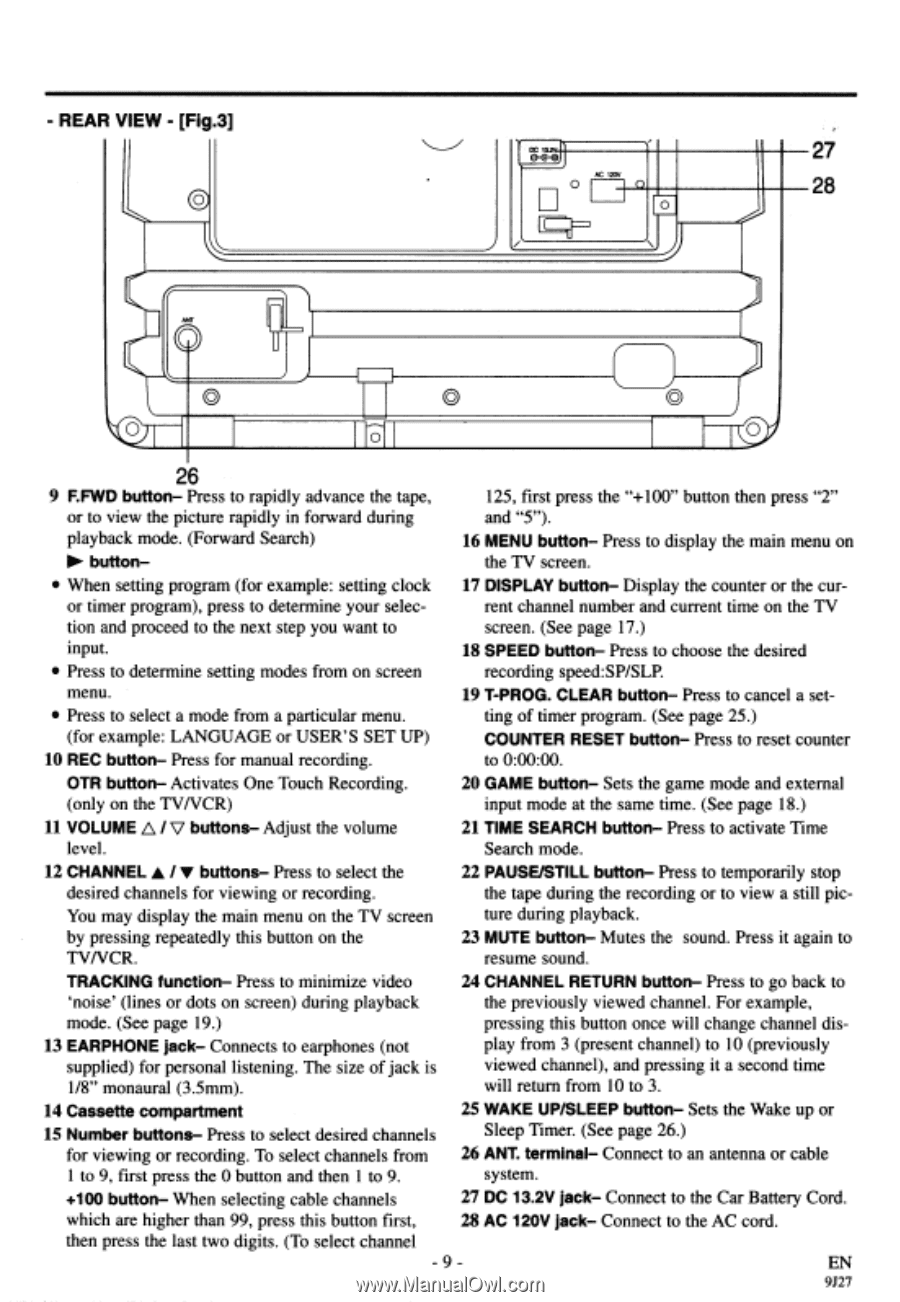
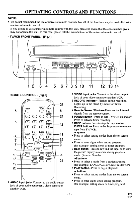
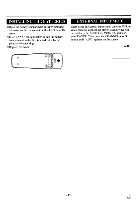
- REAR VIEW - [Fig.3] O O DeC-et -e 27 AC 120V 28 26 9 F.FWD button- Press to rapidly advance the tape, 125, first press the "+100" button then press "2" or to view the picture rapidly in forward during and "5"). playback mode. (Forward Search) 16 MENU button- Press to display the main menu on 10- button- the TV screen. • When setting program (for example: setting clock 17 DISPLAY button- Display the counter or the cur- or timer program), press to determine your selec- rent channel number and current time on the TV tion and proceed to the next step you want to screen. (See page 17.) input. 18 SPEED button- Press to choose the desired • Press to determine setting modes from on screen recording speed:SP/SLP. menu. 19 T-PROG. CLEAR button- Press to cancel a set- • Press to select a mode from a particular menu. ting of timer program. (See page 25.) (for example: LANGUAGE or USER'S SET UP) COUNTER RESET button- Press to reset counter 10 REC button- Press for manual recording. to 0:00:00. OTR button- Activates One Touch Recording. 20 GAME button- Sets the game mode and external (only on the TV/VCR) input mode at the same time. (See page 18.) 11 VOLUME p / V buttons- Adjust the volume 21 TIME SEARCH button- Press to activate Time level. Search mode. 12 CHANNEL A / V buttons- Press to select the 22 PAUSE/STILL button- Press to temporarily stop desired channels for viewing or recording. the tape during the recording or to view a still pic- You may display the main menu on the TV screen ture during playback. by pressing repeatedly this button on the 23 MUTE button- Mutes the sound. Press it again to TV/VCR. resume sound. TRACKING function- Press to minimize video 24 CHANNEL RETURN button- Press to go back to `noise' (lines or dots on screen) during playback the previously viewed channel. For example, mode. (See page 19.) pressing this button once will change channel dis- 13 EARPHONE jack- Connects to earphones (not supplied) for personal listening. The size of jack is 1/8" monaural (3.5mm). play from 3 (present channel) to 10 (previously viewed channel), and pressing it a second time will return from 10 to 3. 14 Cassette compartment 15 Number buttons- Press to select desired channels for viewing or recording. To select channels from 1 to 9, first press the 0 button and then 1 to 9. 25 WAKE UP/SLEEP button- Sets the Wake up or Sleep Timer. (See page 26.) 26 ANT. terminal- Connect to an antenna or cable system. +100 button- When selecting cable channels 27 DC 13.2V jack- Connect to the Car Battery Cord. which are higher than 99, press this button first, 28 AC 120V jack- Connect to the AC cord. then press the last two digits. (To select channel - 9 - EN 9J27
-
 1
1 -
2
-
3
-
 4
4 -
 5
5 -
 6
6 -
 7
7 -
 8
8 -
 9
9 -
 10
10 -
 11
11 -
 12
12 -
 13
13 -
 14
14 -
15
-
16
-
17
-
18
-
19
-
20
-
21
-
22
-
23
-
24
-
25
-
26
-
27
-
28
-
29
-
30
-
31
-
32
-
33
-
34
-
35
-
36
-
37
-
38
-
39
-
40
-
41
-
42
-
43
-
44
 |
 |