Symphonic SD200E Owner's Manual - Page 1

Symphonic SD200E Manual

Page 1 highlights

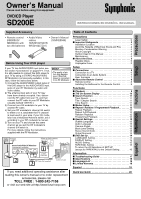
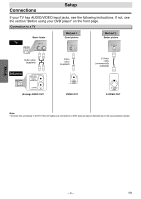
Owner's Manual Please read before using this equipment. DVD/CD Player SD200E INSTRUCCIONES EN ESPAÑOL INCLUIDAS. Precautions Setup Information Functions Supplied Accessory Table of Contents • Remote control (NB000UD/ NB050UD) with two AA batteries • Audio/Video • Owner's Manual cables (1VMN20046) (WPZ0102TM015/ WPZ0102LTE01) Owner's Manual Before Using Your DVD player If your TV has AUDIO/VIDEO input jacks, see the section "Connections" on pages 6-7. If not, it is still possible to connect this DVD player to your TV by using a STEREO AUDIO/VIDEO RF Modulator (commercially available.) In this case, follow the instructions below. 1) Connect the AUDIO/VIDEO output jacks of this DVD player to the AUDIO/VIDEO input jacks of your RF Modulator by audio and video cables. 2) The antenna input jack of your TV may have been already occupied. If so, disconnect the RF cable from your TV, and then connect the RF cable to your RF Modulator (usually marked "ANT IN".) 3) Connect your RF modulator to your TV by another RF cable. 4) Set your RF modulator's channel 3/4 switch to either 3 or 4, whichever the TV channel is least used in your area. If your RF modulator has a Modulator/Antenna switch, set it according to your RF modulator's manual. 5) Turn on your TV and choose the same channel as you set the RF modulator's channel 3/4 switch to. For more details, follow the instructions supplied with the RF Modulator. Hint • The quality of picture may become poor if this DVD player is connected to an RF Modulator. Cable Antenna Signal Stereo Audio/Video RF Modulator (commercially available) AC 120V ANT IN CHANNEL TO TV VIDEO AUDIO 3 4 RL (Back of DVD player) L AUDIO OUT DIGITAL AUDIO OUT COAXIAL R 1 VIDEO OUT S-VIDEO OUT Audio/Video Cables (Supplied) (Back of TV) 2 3 RF Cable (Not supplied) Antenna in jack If you need additional operating assistance after reading this owner's manual or to order replacement accessories, please call TOLL FREE : 1-800-242-7158 or visit our web site at http://www.funai-corp.com Precautions Laser Safety 2 ■ Important Safeguards 3 Installation Location 4 Avoid the Hazards of Electrical Shock and Fire 4 Moisture Condensation Warning 4 About Copyright 4 Symbol Used in This Manual 4 Maintenance 4 ■ About the Discs 5 Playable Discs 5 Unplayable Discs 5 Setup ■ Connections 6 Connection to a TV 6 Connection to an Audio System 7 Rear Terminals 7 ■ About the Remote Control 8 Remote Control 8 Installing the Batteries for the Remote Control 8 Functions ■ Playback 9 ■ The On-Screen Display 10 ■ Search Function 11 Track Search 11 Title / Chapter Search 11 Time Search 11 ■ Marker Setup 11 ■ Repeat / Random / Programmed Playback 12 Repeat Playback 12 Repeat A-B Playback 12 Random Playback 12 Programmed Playback 12 ■ Special Settings 13 Subtitle Language 13 Audio Language 13 Camera Angles 13 Black Level Setting 13 Stereo Sound mode 13 Virtual Surround 13 ■ DVD Set Up 14 LANGUAGE Setting 14 DISPLAY Setting 15 AUDIO Setting 15 PARENTAL Setting 16 To return the All Selections of SET UP (except for PARENTAL) to the Default Setting 16 Information ■ Troubleshooting Guide 17 ■ Specifications 18 ■ Language List 18 ■ Limited Warranty 18 Español 19 Quick Use Guide 20 Español

  • 1
  • 2
  • 3
  • 4
  • 5
  • 6
  • 7
  • 8
  • 9
  • 10
  • 11
  • 12
  • 13
  • 14
  • 15
  • 16
  • 17
  • 18
  • 19
  • 20

• Remote control
(NB000UD/
NB050UD) with
two AA batteries
• Audio/Video
cables
(WPZ0102TM015/
WPZ0102LTE01)
• Owner’s Manual
(1VMN20046)
Owner’s Manual
Please read before using this equipment.
DVD/CD Player
SD200E
INSTRUCCIONES EN ESPAÑOL INCLUIDAS.
Precautions
Functions
Setup
Information
Español
Supplied Accessory
Owner's Manual
If you need additional operating assistance after
reading this owner’s manual or to order replacement
accessories, please call
TOLL FREE : 1-800-242-7158
or visit our web site at http://www.funai-corp.com
Precautions
Laser Safety
. . . . . . . . . . . . . . . . . . . . . . . . . . . . . . . . . 2
Important Safeguards . . . . . . . . . . . . . . . . . . . . . . . . . 3
Installation Location. . . . . . . . . . . . . . . . . . . . . . . . . . . . 4
Avoid the Hazards of Electrical Shock and Fire
. . . . . . . 4
Moisture Condensation Warning
. . . . . . . . . . . . . . . . . . 4
About Copyright. . . . . . . . . . . . . . . . . . . . . . . . . . . . . . . 4
Symbol Used in This Manual . . . . . . . . . . . . . . . . . . . . . 4
Maintenance . . . . . . . . . . . . . . . . . . . . . . . . . . . . . . . . . 4
About the Discs. . . . . . . . . . . . . . . . . . . . . . . . . . . . . . 5
Playable Discs. . . . . . . . . . . . . . . . . . . . . . . . . . . . . . . . 5
Unplayable Discs. . . . . . . . . . . . . . . . . . . . . . . . . . . . . . 5
Setup
Connections
. . . . . . . . . . . . . . . . . . . . . . . . . . . . . . . . 6
Connection to a TV . . . . . . . . . . . . . . . . . . . . . . . . . . . . 6
Connection to an Audio System. . . . . . . . . . . . . . . . . . . 7
Rear Terminals
. . . . . . . . . . . . . . . . . . . . . . . . . . . . . . . 7
About the Remote Control
. . . . . . . . . . . . . . . . . . . . . 8
Remote Control . . . . . . . . . . . . . . . . . . . . . . . . . . . . . . . 8
Installing the Batteries for the Remote Control . . . . . . . . 8
Functions
Playback. . . . . . . . . . . . . . . . . . . . . . . . . . . . . . . . . . . . 9
The On-Screen Display . . . . . . . . . . . . . . . . . . . . . . . 10
Search Function
. . . . . . . . . . . . . . . . . . . . . . . . . . . . 11
Track Search . . . . . . . . . . . . . . . . . . . . . . . . . . . . . . . . 11
Title / Chapter Search . . . . . . . . . . . . . . . . . . . . . . . . . 11
Time Search . . . . . . . . . . . . . . . . . . . . . . . . . . . . . . . . 11
Marker Setup . . . . . . . . . . . . . . . . . . . . . . . . . . . . . . . 11
Repeat / Random / Programmed Playback . . . . . . . . 12
Repeat Playback . . . . . . . . . . . . . . . . . . . . . . . . . . . . . 12
Repeat A-B Playback. . . . . . . . . . . . . . . . . . . . . . . . . . 12
Random Playback . . . . . . . . . . . . . . . . . . . . . . . . . . . . 12
Programmed Playback. . . . . . . . . . . . . . . . . . . . . . . . . 12
Special Settings. . . . . . . . . . . . . . . . . . . . . . . . . . . . . 13
Subtitle Language . . . . . . . . . . . . . . . . . . . . . . . . . . . . 13
Audio Language
. . . . . . . . . . . . . . . . . . . . . . . . . . . . . 13
Camera Angles . . . . . . . . . . . . . . . . . . . . . . . . . . . . . . 13
Black Level Setting
. . . . . . . . . . . . . . . . . . . . . . . . . . . 13
Stereo Sound mode. . . . . . . . . . . . . . . . . . . . . . . . . . . 13
Virtual Surround
. . . . . . . . . . . . . . . . . . . . . . . . . . . . . 13
DVD Set Up
. . . . . . . . . . . . . . . . . . . . . . . . . . . . . . . . 14
LANGUAGE Setting. . . . . . . . . . . . . . . . . . . . . . . . . . . 14
DISPLAY Setting . . . . . . . . . . . . . . . . . . . . . . . . . . . . . 15
AUDIO Setting. . . . . . . . . . . . . . . . . . . . . . . . . . . . . . . 15
PARENTAL Setting
. . . . . . . . . . . . . . . . . . . . . . . . . . . 16
To return the All Selections of SET UP
(except for PARENTAL) to the Default Setting. . . . . . . . 16
Information
Troubleshooting Guide . . . . . . . . . . . . . . . . . . . . . . . 17
Specifications
. . . . . . . . . . . . . . . . . . . . . . . . . . . . . . 18
Language List
. . . . . . . . . . . . . . . . . . . . . . . . . . . . . . 18
Limited Warranty . . . . . . . . . . . . . . . . . . . . . . . . . . . . 18
Español
. . . . . . . . . . . . . . . . . . . . . . . . . . . . . . . . . . . .19
Quick Use Guide . . . . . . . . . . . . . . . . . . . . . . . . . . . . .20
Table of Contents
Before Using Your DVD player
If your TV has AUDIO/VIDEO input jacks, see
the section “Connections” on pages 6–7. If not,
it is still possible to connect this DVD player to
your TV by using a STEREO AUDIO/VIDEO
RF Modulator (commercially available.) In this
case, follow the instructions below.
1) Connect the AUDIO/VIDEO output jacks of
this DVD player to the AUDIO/VIDEO input
jacks of your RF Modulator by audio and
video cables.
2) The antenna input jack of your TV may
have been already occupied. If so, discon-
nect the RF cable from your TV, and then
connect the RF cable to your RF Modulator
(usually marked “ANT IN”.)
3) Connect your RF modulator to your TV by
another RF cable.
4) Set your RF modulator’s channel 3/4 switch
to either 3 or 4, whichever the TV channel
is least used in your area. If your RF modu-
lator has a Modulator/Antenna switch, set it
according to your RF modulator’s manual.
5) Turn on your TV and choose the same
channel as you set the RF modulator’s
channel 3/4 switch to.
For more details, follow the instructions
supplied with the RF Modulator.
Hint
Hint
The quality of pic-
ture may become
poor if this DVD
player is connected
to an RF Modulator.
TO TV
CHANNEL
VIDEO
AUDIO
R
L
3
4
ANT IN
AC 120V
AUDIO OUT
L
R
DIGITAL
AUDIO OUT
COAXIAL
VIDEO
OUT
S-VIDEO
OUT
Stereo Audio/Video RF Modulator
(commercially available)
(Back of TV)
Audio/Video
Cables
(Supplied)
(Back of DVD player)
RF Cable (Not supplied)
Antenna
Cable
Signal
3
2
1
Antenna in jack