Symphonic SD200E Owner's Manual - Page 7
Setup - dvd
 |
View all Symphonic SD200E manuals
Add to My Manuals
Save this manual to your list of manuals |
Page 7 highlights
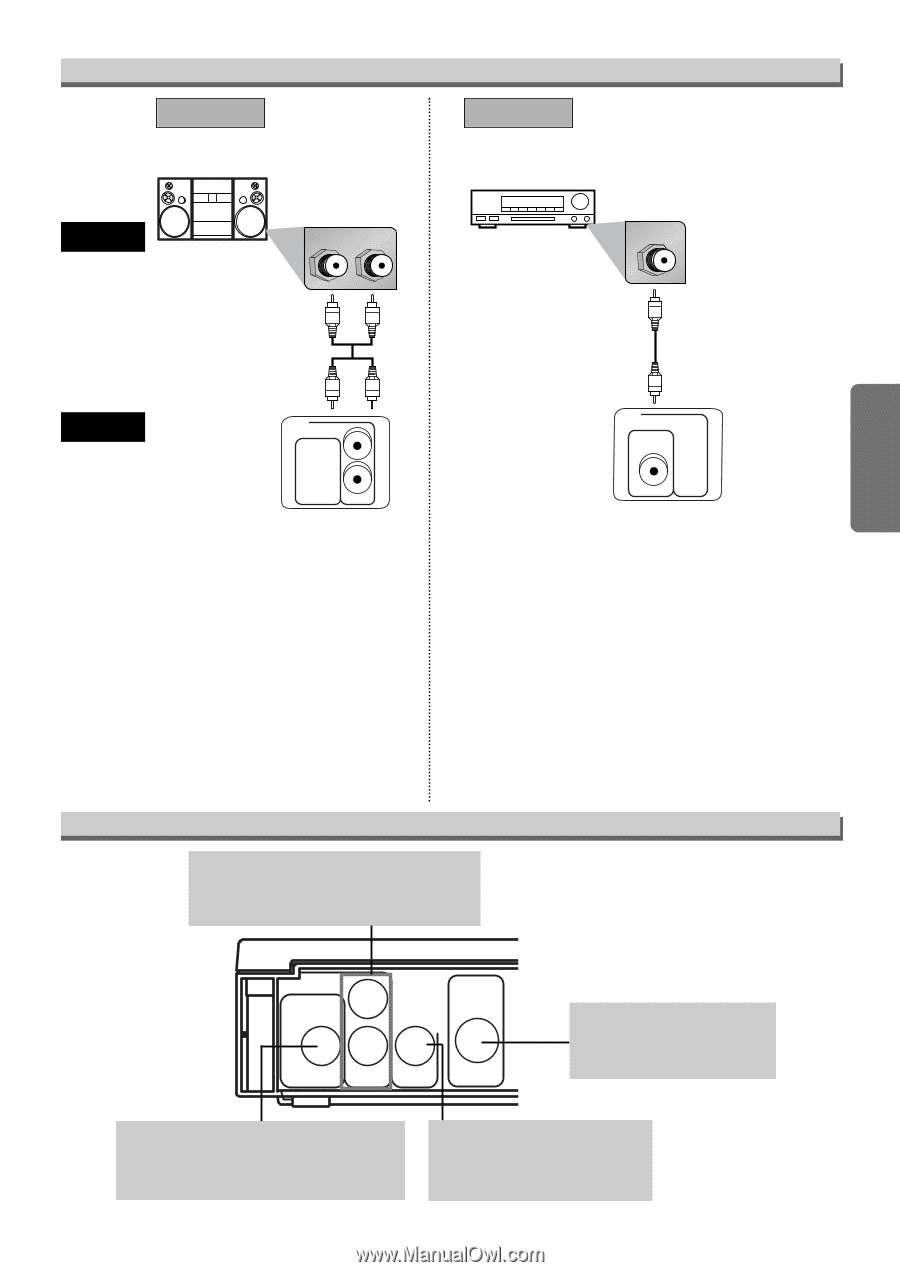
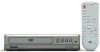
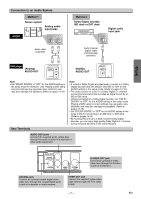
Connection to an Audio System Method 1 Stereo system Analog audio input jacks AUDIO R L Method 2 Dolby Digital decoder, MD deck or DAT deck Digital audio input jack COAXIAL Setup Audio cable (supplied) Audio Coaxial Digital cable (commercially available) DVD player (Analog) AUDIO OUT L AUDIO OUT DIGITAL AUDIO OUT COAXIAL R Note • Set "DOLBY DIGITAL" to "OFF" for the AUDIO setting in the setup mode for method 1 only. Playing a DVD using incorrect settings may generate noise distortion and may also damage the speakers. (Refer to pages 14-15) Rear Terminals DIGITAL AUDIO OUT L AUDIO OUT DIGITAL AUDIO OUT R Note • If output is Dolby Digital encoded audio, connect to a Dolby Digital decoder and set "DOLBY DIGITAL" to "ON" for the AUDIO setting in the setup mode. (Refer to pages 14-15) • The audio source on a disc in a Dolby Digital 5.1 channel surround format cannot be recorded as digital sound by an MD or DAT deck. • Unless connected to a Dolby Digital decoder, set "DOLBY DIGITAL" to "OFF" for the AUDIO setting in the setup mode. Playing a DVD using incorrect settings may generate noise distortion and may also damage the speakers. (Refer to pages 14-15) • Set "DOLBY DIGITAL" to "OFF" for the AUDIO setting in the setup mode for connecting to an MD deck or DAT deck. (Refer to pages 14-15) • By hooking this unit up to a Multi-channel Dolby Digital decoder, you can enjoy high-quality Dolby Digital 5.1 channel surround sound as heard in the movie theaters. AUDIO OUT jacks Connect the supplied audio cables here through the audio in jacks of a television or other audio equipment. L AUDIO OUT DIGITAL AUDIO OUT COAXIAL R VIDEO OUT S-VIDEO OUT S-VIDEO OUT jack Connect an optional S-Video cable here through the S-video in jack of a television. COAXIAL jack Connect an optional coaxial digital audio cable here through the coaxial digital audio in jack of a decoder or audio receiver. VIDEO OUT jack Connect the supplied yellow video cable here through the TV's video in jack. -7- EN
-
 1
1 -
 2
2 -
 3
3 -
 4
4 -
 5
5 -
 6
6 -
 7
7 -
 8
8 -
 9
9 -
 10
10 -
 11
11 -
 12
12 -
13
-
14
-
15
-
16
-
17
-
18
-
19
-
20
 |
 |