TASCAM DM-24 Application-Specific Documents DM-24 with MX2424 - Page 1
TASCAM DM-24 Manual
 |
View all TASCAM DM-24 manuals
Add to My Manuals
Save this manual to your list of manuals |
Page 1 highlights
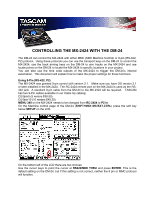
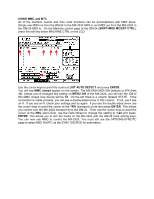
CONTROLLING THE MX-2424 WITH THE DM-24 The DM-24 can control the MX-2424 with either MMC (MIDI Machine Control) or 9-pin (RS-422, P2) protocol. Using these protocols you can use the transport keys on the DM-24 to control the MX-2424, use the track arming keys on the DM-24 to arm tracks on the MX-2424 and use locate points on the DM-24 to locate the MX-2424 to specific locations in your project. You can also use the time code outputs of the MX-2424 to trigger the DM-24's internal automation. This document will explain how to make the proper settings for these functions. Using 9-Pin (RS-422, P2) The MX-2424 was granted 9-pin control with version 2.1. Make sure you have OS version 2.1 or later installed in the MX-2424. The RC-2424 remote port on the MX-2424 is used as the RS422 jack. A standard 9-pin cable from the DM-24 to the MX-2424 will be required. TASCAM has two 9-Pin cables available in our Cable Up catalog: CU/9pin5 (5 meters $38.50) CU/9pin10 (10 meters $49.20) MENU 340 on the MX-2424 needs to be changed from RC-2424 to P2 in. On the Machine control page of the DM-24 (SHIFT+MIDI MC/EXT.CTRL) press the soft key below SETUP on the LCD. On the bottom left of the LCD there are two choices: Use the cursor keys to point the cursor at RS422/MIDI THRU and press ENTER. This is the default setting on the DM-24, but if this setting is not correct, neither the 9 pin or MMC protocol will function.
-
 1
1 -
 2
2 -
 3
3 -
 4
4
 |
 |