TASCAM DR-70D Owners Manual - Page 12
Basic operation procedures, Recording
 |
View all TASCAM DR-70D manuals
Add to My Manuals
Save this manual to your list of manuals |
Page 12 highlights
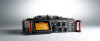
Basic operation procedures 1. Press the MENU button to open the MENU Screen. Menu structure MENU BASIC Make recording settings Recording Recording Screen MONITOR Set monitoring output 2. Turn the DATA dial to select a menu item (highlighted), and press the DATA dial to open various settings screens. 3. Turn the DATA dial to select an item (highlighted) to be set. 4. Press the DATA dial to move the cursor to (highlight) the value of the setting. 5. Turn the DATA dial to change the setting. 6. Press the DATA dial to set a different item in the same menu. This enables selection of a different item. Turn the DATA dial to select an item to be set. 7. Repeat step 3 to 6 as necessary to set other items. 8. Press the MENU button to return to the MENU screen (or OTHERSscreen). Press the 1/8 button to return to the Home Screen. INPUT RECORD SLATE Make input settings Make recording format settings Make slate tone settings MIC BROWSE OTHERS SYSTEM BATTERY Make mic settings Work with files and folders on the SD card Open the OTHERS submenu Make system settings for the unit Set the type of batteries INFORMATION View information FILE NAME Make file name settings DATE/TIME Set the date and time REMOTE Make remote control settings 1 Recorder operation status This icon shows the recorder operation status. Indicator Meaning 0 Recording 2 Elapsed recording time The elapsed recording time of the file appears as hours: minutes: seconds. 3 Monitoring mode This shows what audio is now being monitored. Indicator Meaning MIX Mix of channels 1-4 CAM IN jack sound input 4 Auto tone function status No icon: Auto tone off : Auto tone on 5 Level meters The input signal levels are shown. 12 TASCAM DR-70D
-
 1
1 -
2
-
3
-
4
-
5
-
6
-
 7
7 -
 8
8 -
 9
9 -
 10
10 -
 11
11 -
 12
12 -
 13
13 -
 14
14 -
 15
15 -
 16
16 -
 17
17 -
18
-
19
-
20
-
21
-
22
-
23
-
24
-
25
-
26
-
27
-
28
-
29
-
30
-
31
-
32
-
33
-
34
-
35
-
36
-
37
-
38
-
39
-
40
-
41
-
42
-
43
-
44
-
45
-
46
-
47
-
48
-
49
-
50
-
51
-
52
-
53
-
54
-
55
-
56
-
57
-
58
-
59
-
60
-
61
-
62
-
63
-
64
-
65
-
66
-
67
-
68
-
69
-
70
-
71
-
72
-
73
-
74
-
75
-
76
-
77
-
78
-
79
-
80
-
81
-
82
-
83
-
84
-
85
-
86
-
87
-
88
-
89
-
90
-
91
-
92
-
93
-
94
-
95
-
96
-
97
-
98
-
99
-
100
-
101
-
102
-
103
-
104
-
105
-
106
-
107
-
108
-
109
-
110
-
111
-
112
-
113
-
114
-
115
-
116
-
117
-
118
-
119
-
120
-
121
-
122
-
123
-
124
-
125
-
126
-
127
-
128
 |
 |
