TASCAM DR-70D Owners Manual - Page 13
Menu structure, Setting input destinations - phantom power
 |
View all TASCAM DR-70D manuals
Add to My Manuals
Save this manual to your list of manuals |
Page 13 highlights
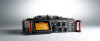
6 Phantom power status No icon: Phantom power off : Phantom power on 7 Recording status : Recording off : Recording on 8 Project name This shows the name of the project for the recorded files. 9 Remaining recording time The remaining recording time on the SD card is shown in hours: minutes: seconds according to the recording mode, sampling frequency and recording format settings. 0 Low cut filter on/off status : Low cut filter off : Low cut filter on q Limiter function status : Limiter off : Limiter on w HOLD switch status : HOLD switch off : HOLD switch on e Peak value in decibels (dB) Peak input level values are shown in decibels. Menu structure Various settings can be made using the BASICitem of the MENUscreen. BASIC RECORD PAN GAIN INPUT 1/2 INPUT 3/4 Recording setting OFF, ON Set the left-right balance (applied to stereo files during 2MIX recording and to monitoring output) LEFT 12 − CENTER − RIGHT 12 Set the input gain LOW, MID, HIGH, HI+PLUS Set for the channel 1 and 2 input connectors EXT_STEREO, EXT_POWER, XLR/TRS Set for the channel 3 and 4 input connectors MIC, XLR/TRS Setting input destinations 1. Connect external mics to the EXT IN 1/2 or 1/L, 2/R, 3/L and 4/R jacks. 2. Press the MENU button to open the MENU Screen. 3. Turn the DATA dial to select BASIC, and press the DATA dial. The BASICscreen opens. CH1 BASIC screen 4. Turn the DATA dial to select INPUT 1/2or INPUT 3/4, and press the DATA dial. 5. Turn the DATA dial to select the input desti- nation. Options INPUT 1/2: EXT_STEREO (default), EXT_ POWER, XLR/TRS INPUT 3/4: MIC (default), XLR/TRS 6. When finished, press the MENU button to return to the Home Screen. 13 TASCAM DR-70D
-
 1
1 -
2
-
3
-
4
-
5
-
6
-
7
-
 8
8 -
 9
9 -
 10
10 -
 11
11 -
 12
12 -
 13
13 -
 14
14 -
 15
15 -
 16
16 -
 17
17 -
 18
18 -
19
-
20
-
21
-
22
-
23
-
24
-
25
-
26
-
27
-
28
-
29
-
30
-
31
-
32
-
33
-
34
-
35
-
36
-
37
-
38
-
39
-
40
-
41
-
42
-
43
-
44
-
45
-
46
-
47
-
48
-
49
-
50
-
51
-
52
-
53
-
54
-
55
-
56
-
57
-
58
-
59
-
60
-
61
-
62
-
63
-
64
-
65
-
66
-
67
-
68
-
69
-
70
-
71
-
72
-
73
-
74
-
75
-
76
-
77
-
78
-
79
-
80
-
81
-
82
-
83
-
84
-
85
-
86
-
87
-
88
-
89
-
90
-
91
-
92
-
93
-
94
-
95
-
96
-
97
-
98
-
99
-
100
-
101
-
102
-
103
-
104
-
105
-
106
-
107
-
108
-
109
-
110
-
111
-
112
-
113
-
114
-
115
-
116
-
117
-
118
-
119
-
120
-
121
-
122
-
123
-
124
-
125
-
126
-
127
-
128
 |
 |
