TASCAM IF-E100 Reference Manual - Page 3
Using the TEAC Global Site
 |
View all TASCAM IF-E100 manuals
Add to My Manuals
Save this manual to your list of manuals |
Page 3 highlights
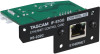
Using the TEAC Global Site You can download updates for this unit from the TEAC Global Site: http://teac-global.com/ In the TASCAM Downloads section, select the desired language to open the Downloads website page for that language. Product registration Customers in the USA, please visit the following TASCAM website to register your TASCAM product online. http://tascam.com/ About TASCAM customer support service TASCAM products are supported and warrantied only in their country/region of purchase. To receive support after purchase, on the TASCAM Distributors list page of the TEAC Global Site (http:// teac-global.com/), search for the local company or representative for the region where you purchased the product and contact that organization. When making inquiries, the address (URL) of the shop or web shop where it was purchased and the purchase date are required. Moreover, the warranty card and proof of purchase might also be necessary. Names and functions of parts This card has a RJ-45 connector that supports 100Mbps Ethernet. Use a LAN cable to connect this connector to other devices that support Ethernet or an Ethernet network. Rear panel 1 RJ-45 connector This is an Ethernet port. Use this to connect to a network and control the unit externally. 2 100Mbps link status indicator Orange indicates that a 100Mbps Ethernet link has been established. 3 Link status/activity indicator Green indicates that a link is established between the devices. Blinking indicates that signals are being transmitted between the devices. Installing the Ethernet card ATTENTION Before installing or removing the Ethernet card, disconnect the power cord from the outlet or the unit. 1. Remove the 4 screws (a) from the placeholder card installed in the CD-400U/CD−400U DAB. ATTENTION Do not remove any screws other than those indicated. 2. Gently pull the placeholder card away from and out of the unit. 3. The CD-400U/CD−400U DAB and the placeholder card are connected. Turn the placeholder card over and pull out the connector. 4. Completely insert the connector that was removed from the placeholder card into the connector receptacle on the Ethernet card. (If something seems wrong when inserting the connector, check the connector orientation.) 5. Insert the Ethernet card in the CD-400U/CD−400U DAB, and use the 4 screws a to secure it to the unit. Be careful not to over-tighten the screws. After installation, confirm that the screws are not loose or sticking out. NOTE Confirm that the CD-400U/CD−400U DAB is using the latest system firmware. Connecting to Ethernet Connect a LAN cable to the RJ−45 connector on this card and select an Ethernet network. TASCAM IF-E100 3
-
 1
1 -
 2
2 -
 3
3 -
 4
4 -
 5
5 -
 6
6 -
 7
7 -
 8
8 -
 9
9 -
10
 |
 |
