TEAC AI-501DA AI-501DA Owner's Manual - Page 14
Playing back music on a computer, Installing the driver on the computer
 |
View all TEAC AI-501DA manuals
Add to My Manuals
Save this manual to your list of manuals |
Page 14 highlights
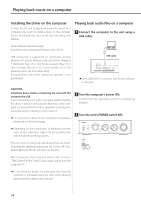
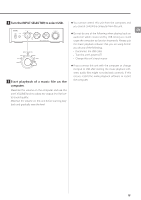
Playing back music on a computer Installing the driver on the computer In order for this unit to play back audio files stored on a computer, you must first install a driver on the computer. Please download this driver from the following web address. Playing back audio files on a computer 1 Connect the computer to the unit using a USB cable. Driver software download page http://www.teac.co.jp/audio/software_teac_e.html USB connection is supported on computers running Windows XP (32-bit), Windows Vista (32/64-bit), Windows 7 (32/64-bit), Mac OS X 10.6 (Snow Leopard) (Mac OS X 10.6.4 or later), Mac OS X 10.7 (Lion) and Mac OS X 10.8 (Mountain Lion). (As of October, 2012) Compatibility with other operating systems is not guaranteed. USB cable ooUse a cable with a connector that fits the USB port on this unit. CAUTION Install the driver before connecting the unit with the computer by USB. If you connect this unit with a computer before installing the driver, it will not work properly. Moreover, if the computer is running Windows XP, its operation could become noticeably slower, requiring it to be restarted. ooFor instructions about driver installation procedures, please see our download page. 2 Turn the computer's power ON. Confirm that the operating system has started up properly. 3 Turn the unit's POWER switch ON. ooDepending on the combination of hardware and software, proper operation might not be possible even with the above operating systems. This unit connects using high-speed asynchronous mode. Transmittable sampling frequencies are 32 kHz, 44.1 kHz, 48 kHz, 88.2 kHz, 96 kHz, 176.4 kHz and 192 kHz. When properly connected, you will be able to select "TEAC USB HS ASYNC AUDIO" as an audio output from the computer OS. ooIn asynchronous mode, the audio data sent from the computer is processed using this unit's clock, allowing data transmission jitter to the reduced. 14
-
 1
1 -
2
-
3
-
4
-
5
-
6
-
7
-
8
-
 9
9 -
 10
10 -
 11
11 -
 12
12 -
 13
13 -
 14
14 -
 15
15 -
 16
16 -
 17
17 -
 18
18 -
 19
19 -
20
-
21
-
22
-
23
-
24
-
25
-
26
-
27
-
28
-
29
-
30
-
31
-
32
-
33
-
34
-
35
-
36
-
37
-
38
-
39
-
40
-
41
-
42
-
43
-
44
-
45
-
46
-
47
-
48
-
49
-
50
-
51
-
52
 |
 |
