TEAC SR-100i SR-100i Manual - Page 9
Connections, AUX in jacks, FM ANTENNA terminal, AC - red
 |
View all TEAC SR-100i manuals
Add to My Manuals
Save this manual to your list of manuals |
Page 9 highlights
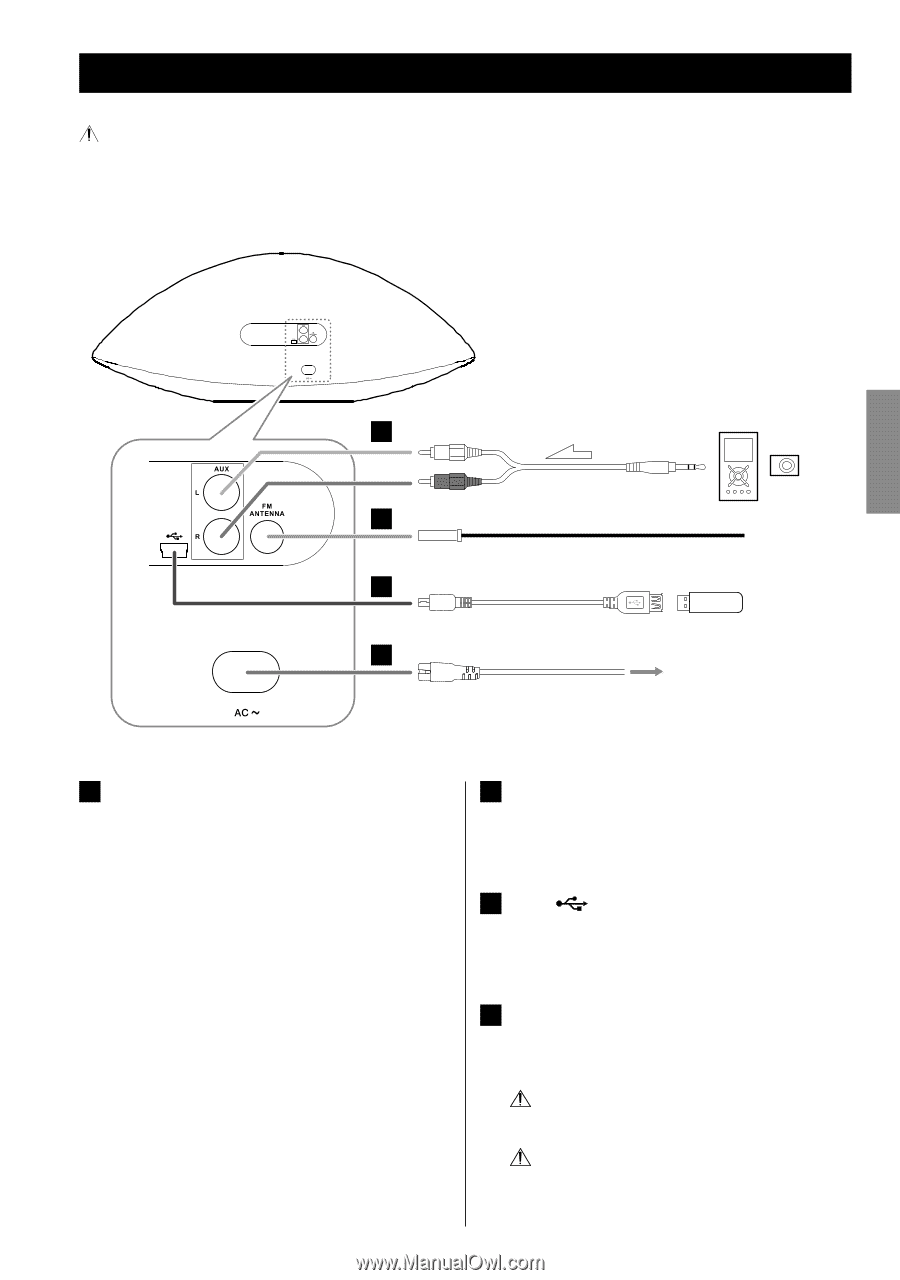
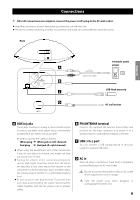
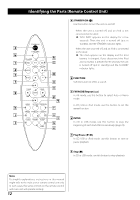
Connections After all connections are complete, connect the power cord's plug to the AC wall socket. < Read the instructions of each device that you intend to use with this unit. < Be sure to connect each plug securely. To avoid hum and noise, do not bundle the connection cords. Back ENGLISH Portable audio player A (Optional cable) B USB flash memory C D AC wall socket A AUX in jacks These jacks transmit an analog 2-channel audio signal. Connect a portable audio player using commercially available RCA pin-stereo mini plug cable. Be sure to connect the cables as follows: White plug e White jack (L: left channel) Red plug e Red jack (R: right channel) < When using the headphones jack of the component, if you do not adjust its volume, you might not hear any sound from SR-100i. < Turning the volume of the connected component up too high might cause the sound from SR-100i to be distorted. In this case, reduce the volume of the component until the distortion stops and then adjust the volume level of SR-100i to a comfortable listening level. < Be sure to insert each plug securely. To prevent hum and noise, avoid bundling the signal interconnection cables together with the AC power cord or speaker cables. B FM ANTENNA terminal Connect the supplied FM antenna. Extend fully and position for the best reception and attach it to a window frame or wall with thumbtacks or the like. C USB ( ) port You can connect a USB storage device to this port using the supplied USB cable. D AC in After all other connections have been completed, connect the plug to an AC wall socket. Be sure to connect the power cord to an AC outlet which supplies the correct voltage. Hold the power plug when plugging or unplugging the power cord. 9
-
 1
1 -
2
-
3
-
 4
4 -
 5
5 -
 6
6 -
 7
7 -
 8
8 -
 9
9 -
 10
10 -
 11
11 -
 12
12 -
 13
13 -
 14
14 -
15
-
16
-
17
-
18
-
19
-
20
-
21
-
22
-
23
-
24
-
25
-
26
-
27
-
28
-
29
-
30
-
31
-
32
-
33
-
34
-
35
-
36
-
37
-
38
-
39
-
40
-
41
-
42
-
43
-
44
-
45
-
46
-
47
-
48
-
49
-
50
-
51
-
52
-
53
-
54
-
55
-
56
-
57
-
58
-
59
-
60
-
61
-
62
-
63
-
64
-
65
-
66
-
67
-
68
-
69
-
70
-
71
-
72
-
73
-
74
-
75
-
76
-
77
-
78
-
79
-
80
-
81
-
82
-
83
-
84
-
85
-
86
-
87
-
88
-
89
-
90
-
91
-
92
-
93
-
94
-
95
-
96
 |
 |