TEAC W-790R Owners Manual - Page 6
Pitch Control
 |
View all TEAC W-790R manuals
Add to My Manuals
Save this manual to your list of manuals |
Page 6 highlights
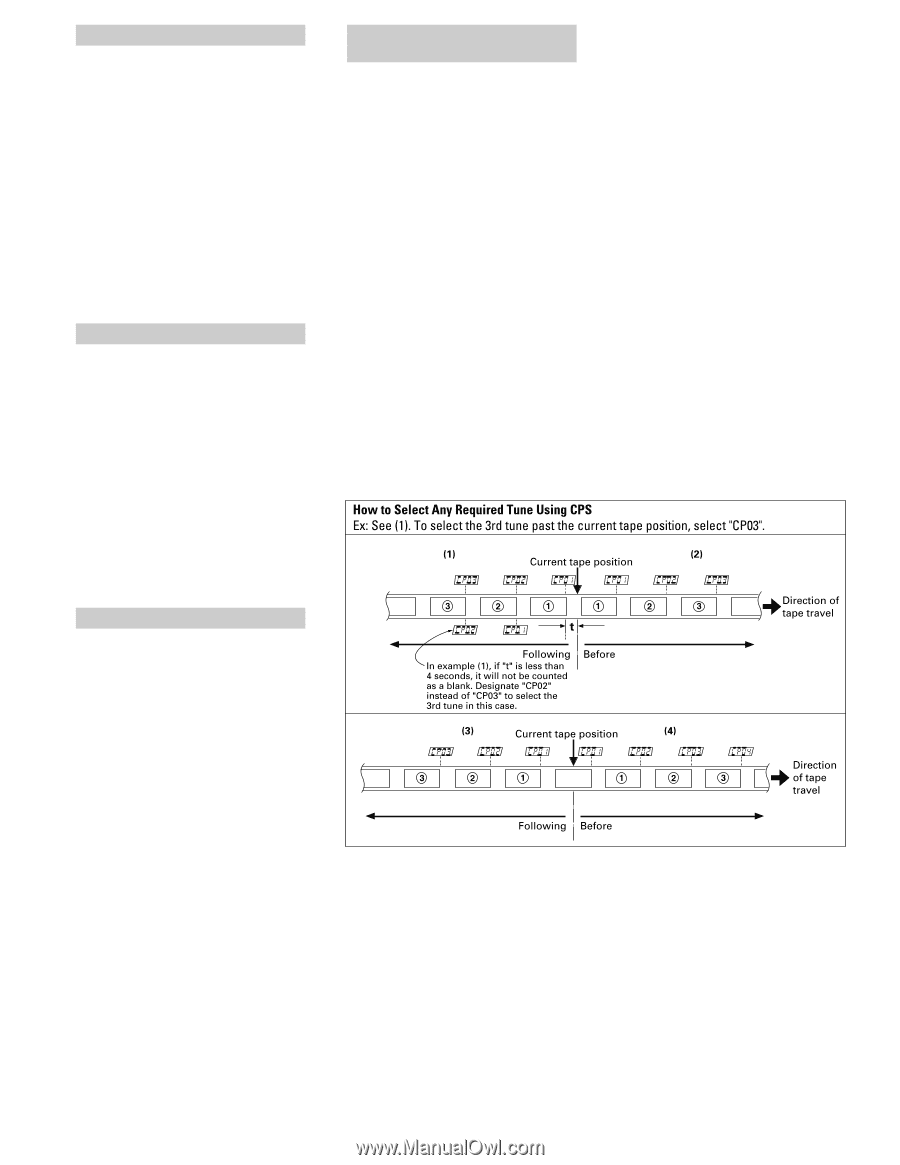
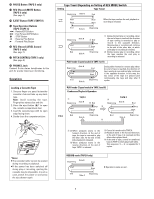
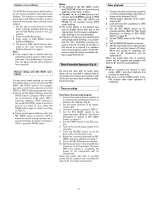
Playback with TAPE I or TAPE II 1. Press the POWER switch to ON. 2. Set the REV MODE switch to the required tape travel mode, referring to the chart "Tape Travel Depending on Setting of REV MODE Switch" on page 5. 3. Load a pre-recorded cassette in TAPE I or II. 4. Select the appropriate DOLBY NR system. 5. Press the " or ∏ button for TAPE I or II to start playback. 6. Adjust the volume with the amplifier's volume control. ● To stop playback, press the ∑ STOP button. Continuous Playback 1. Load pre-recorded cassettes in TAPE I and TAPE II. 2. Set the necessary controls and switches but not the " or ∏ button, referring to "Playback with TAPE I or TAPE II" . 3. Set the REV MODE switch to the (ø) position. 4. Press the " or ∏ button of the deck to be played back first. 5. Tapes will be played back continuously, according to the chart. (See page 5.) ● To stop continuous play before 5 cycles have been completed, press the ∑ STOP button of either deck. CPS (Computomatic Program Search) Function CPS allows the selection and playback of any tune up to 20 tunes ahead or before the one being played. This function operates by detecting blank spaces of at least 4 seconds between tunes. These blanks can be created using the REC MUTE function. Notes on CPS CPS operates by detecting and counting blanks of about 4 seconds, the standard interval between tunes. Therefore, with the following types of tapes, search functions may not work correctly. ● When the intervals between tunes cannot be detected. - Intervals of less than 4 seconds. - High levels of noise in intervals. - Long low level sections (in classical music, etc.) This problem can be corrected using the REC MUTE function. Note: In the following steps 1 and 2, to simplify the description, the explanation is given for "forward playback" (∏ direction). A similar procedure should be used for "reverse playback". 1. During forward playback, press the or Ò button repeatedly until the number of tunes to be skipped appears in the counter display. Use the Ò button for searching a tune following the current tune and button for a tune before the current tune. Refer to the chart "How to Select Any Required Tune Using CPS". ● If, by using the Ò, the required CPS number setting is exceeded, use the button to count down the CPS number until the required CPS number is displayed. ● When the Ò button is pressed, the next tune is counted as "1" and when the button is pressed, the current tune is counted as "1". 2. The tape is fast-wound to detect blanks between tunes until the required tune is reached. Then playback starts from the beginning of the designated tune. Pitch Control You can change the tape speed during playback, allowing to change the pitch of the reproduced sound (TAPE I only). By turning the PITCH CONTROL to the right, the tape speed becomes faster, resulting in higher pitch. By turning it to the left, the tape speed becomes slower, resulting in lower pitch. O At the fully clockwise position, the tape speed is approx. 10% faster . O At the fully counter clockwise position, the tape speed is approx. 10% slower. _ 6 _
-
 1
1 -
 2
2 -
 3
3 -
 4
4 -
 5
5 -
 6
6 -
 7
7 -
 8
8 -
 9
9 -
 10
10 -
 11
11 -
 12
12 -
13
-
14
-
15
-
16
-
17
-
18
-
19
-
20
-
21
-
22
-
23
-
24
-
25
-
26
-
27
-
28
-
29
-
30
-
31
-
32
-
33
-
34
-
35
-
36
-
37
-
38
-
39
-
40
-
41
-
42
 |
 |