TEAC W-790R Owners Manual - Page 8
Timer-Controlled Operation Fig. 6, Timer recording, Timer playback - manual
 |
View all TEAC W-790R manuals
Add to My Manuals
Save this manual to your list of manuals |
Page 8 highlights
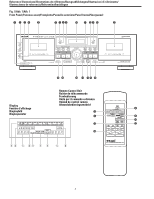
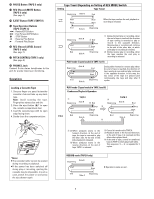
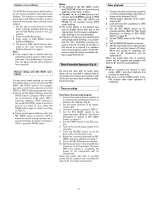
Synchro reverse dubbing The SYNC REV button allows both decks to be reversed at exactly the same time during dubbing. This function is convenient when using tapes with different lengths, to dub a tape with exactly the same contents as the original. 1. Set the tape running direction of both decks to the ∏ (forward) direction, and set the REV MODE switch to the π position. 2. Press the SYNC REV button. 3. Press either of DUB START buttons (HIGH or NORMAL). 4. The tapes in TAPE I and II travel as illustrated in the chart "Synchro Reverse Dubbing Operation" on page 7. Note: ● If the original tape is shorter than the dubbed tape, blank sections will be left at both ends of the dubbed tape. To prevent this, use tapes with the same length as far as possible. Manual editing with REC MUTE and PAUSE During normal-speed dubbing, you can edit the dubbed tape as required using the REC MUTE and PAUSE buttons. For example, you can record only the required tunes from TAPE I to TAPE II skipping unwanted tunes. ● During normal-speed dubbing, when the PAUSE button is pressed, TAPE II enters the record-pause mode while TAPE I continues playback. While listening to the sound from TAPE I, when it reaches a section you want to dub, press the PAUSE button again to restart recording on TAPE II. ● During normal-speed dubbing, when the REC MUTE button is pressed, TAPE II enters the record muting operation as in normal recording. To restart recording on TAPE II, press the PAUSE button. Notes: ● The settings of the REC LEVEL control and DOLBY NR switch are ignored during dubbing as they have no effect. ● The and Ò buttons do not function during NORMAL speed or HIGH speed dubbing. Also, REC MUTE and PAUSE do not function during HIGH speed dubbing. ● The sound quality of the dubbed tape may be slightly worse than that of the original tape. For this reason, multigeneration dubbing is not recommended. ● If there is a TV set near the cassette deck during high speed dubbing, it is possible that the TV's horizontal scanning frequency may be recorded on the tape. If this occurs or to prevent it in advance, dub at normal speed, switch off the television or keep the deck a reasonable distance away from the TV. Timer-Controlled Operation (Fig. 6) By using the deck with an audio timer, tapes can be recorded or played back at any preset time. If tapes are loaded in both decks, you can also start continuous playback in this way. Timer recording Recording a broadcasting program: 1. Connect the deck and stereo system to a commercially available audio timer as shown in the diagram. (Fig. 6) 2. Set the power switches of all components to ON. 3. Load a recordable cassette in TAPE II. 4. Set the REV MODE switch to the required position. (Refer to " Tape Travel Depending on Setting of REV MODE Switch" on page 5.) 5. Set the TIMER switch to the REC position. 6. Tune to the broadcasting station to be recorded. 7. Press the RECORD button to set the deck to the record-pause mode. 8. Adjust the recording level with the REC LEVEL control as explained on page 7. 9. Set the DOLBY NR switch as required. 10. Set the audio timer to the required start (power on ) and stop (power off) times. When this setting is completed, the power to all components will be switched off. When the preset start time is reached, power will be supplied and recording will start (to ∏ direction) automatically. Timer playback 1. Connect the deck and stereo system to a commercially available audio timer as shown in the diagram. (Fig. 6) 2. Set the power switches of all components to ON. 3. Load pre-recorded cassette(s) in TAPE I or II (or both). 4. Set the REV MODE switch to the required position. (Refer to "Tape Travel Depending on Setting of REV MODE Switch" on page 5.) 5. Set the TIMER switch to the PLAY position. 6. Set the DOLBY NR switch as desired. 7. Set the audio timer to the required start (power on) and stop (power off) times. When this setting is completed, the power to all components will be switched off. When the preset start time is reached, power will be supplied and playback will start (to ∏ direction) automatically. Notes: ● When cassettes are loaded in both decks, TAPE I will start playback first because it has priority. ● Be sure to set the TIMER switch to the OFF position after timer operation is completed. _ 8 _
-
 1
1 -
2
-
 3
3 -
 4
4 -
 5
5 -
 6
6 -
 7
7 -
 8
8 -
 9
9 -
 10
10 -
 11
11 -
 12
12 -
 13
13 -
14
-
15
-
16
-
17
-
18
-
19
-
20
-
21
-
22
-
23
-
24
-
25
-
26
-
27
-
28
-
29
-
30
-
31
-
32
-
33
-
34
-
35
-
36
-
37
-
38
-
39
-
40
-
41
-
42
 |
 |
