TEAC W-790R Owners Manual - Page 7
Erasing, Dubbing Copying from TAPE I to, TAPE II, Recording with TAPE II, Record Muting Operation
 |
View all TEAC W-790R manuals
Add to My Manuals
Save this manual to your list of manuals |
Page 7 highlights
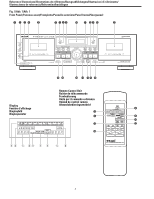
Recording with TAPE II Recording from a stereo system: 1. Press the POWER switch to ON. 2. If you want to make a bi-directional recording, set the REV MODE switch to the π position. 3. Load a recordable cassette in TAPE II. ● Check that the safety tabs on the spine of the cassette are in place. If they have been broken off, block the holes with adhesive tape. 4. Select the desired DOLBY NR system. 5. Press the RECORD button and the deck enters the record-pause mode. ( REC and ƒ indicators light.) 6. Adjust the recording level with the REC LEVEL control so that the loudest sound to be recorded just makes the meters briefly reach around the "0 dB" point (for Normal or Chrome tapes) or the "+3 dB" point (for Metal tapes). 7. Press the PAUSE button again to start recording. ● To stop recording temporarily, press the PAUSE button. To restart the tape, press it again. ● To stop recording, press the ∑ STOP button. Record Muting Operation ● Automatic spacing operation for 4-second blanks (during recording) Press the REC MUTE button during recording. The tape movement continues and a blank space of about 4 seconds is recorded (the RECORD indicator blinks). The deck then enters the record-pause mode automatically (both the RECORD and PAUSE indicators light). To restart recording, press the PAUSE button (the PAUSE indicator goes off). ● Automatic spacing operation for 4-second blanks (during record-pause) In the record-pause mode, pressing the REC MUTE button will initiate the above record-muting operation automatically. The deck then returns to the recordpause mode. ● For a blank of more than 4 seconds During recording, hold the REC MUTE button depressed for longer than 4 seconds. A blank space will be left as long as the button is pressed. Release the button to enter the record-pause mode. To restart recording, press the PAUSE button. ● For a blank of less than 4 seconds After pressing the REC MUTE button during recording, press the PAUSE button before 4 seconds has elapsed. The deck will stop and enter the record-pause mode at the point at which the PAUSE button is pressed. To restart recording, press the PAUSE button again. Note: ● During record muting operation (while the RECORD indicator is blinking), pressing the REC MUTE button again will release the record muting operation and recording will restart without stopping the tape. Erasing Anything previously recorded on the tape will automatically be erased when you make a new recording on it. It can also be erased by "recording" on it with the REC LEVEL control set to "‹". CAUTION: Recording pre-recorded tapes, records, or other published or broadcast material may infringe copyright laws. Check these laws before recording. Dubbing (Copying from TAPE I to TAPE II) To dub the entire recorded section of a pre-recorded cassette 1. Press the POWER switch to ON. 2. Load the pre-recorded cassette into TAPE I and a recordable cassette into TAPE II. 3. Fully rewind both cassettes so their tapes are taken up on their left reels. 4. Set the REV MODE switch to the desired position. " : Dubbing will be performed for one side only. π : Dubbing will be stopped after both sides have been dubbed. 5. Set both decks to the ∏ direction. 6. Press the DUB START HIGH or NORMAL button to start dubbing. The indicator corresponding to the button pressed will light. NORMAL: Dubbing is performed at nor- mal speed. HIGH: Dubbing is performed at twice normal speed. 7. The peak level meter indicates the TAPE I signal levels; the recording levels of TAPE II will be set automatically (at the same levels as TAPE I). 8. After dubbing is completed, both decks stop automatically, according to the setting of the REV MODE button. 9. To stop dubbing, press either of the ∑ STOP buttons. _ 7 _
-
 1
1 -
 2
2 -
 3
3 -
 4
4 -
 5
5 -
 6
6 -
 7
7 -
 8
8 -
 9
9 -
 10
10 -
 11
11 -
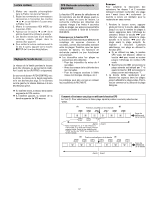 12
12 -
13
-
14
-
15
-
16
-
17
-
18
-
19
-
20
-
21
-
22
-
23
-
24
-
25
-
26
-
27
-
28
-
29
-
30
-
31
-
32
-
33
-
34
-
35
-
36
-
37
-
38
-
39
-
40
-
41
-
42
 |
 |
