TP-Link T1700X-16TS T1700X-16TSUN V1 Installation Guide
TP-Link T1700X-16TS Manual
 |
View all TP-Link T1700X-16TS manuals
Add to My Manuals
Save this manual to your list of manuals |
TP-Link T1700X-16TS manual content summary:
- TP-Link T1700X-16TS | T1700X-16TSUN V1 Installation Guide - Page 1
Business Networking Solution Installation Guide JetStream 12-Port 10GBase-T Smart Switch with 4 10G SFP+ Slots T1700X-16TS - TP-Link T1700X-16TS | T1700X-16TSUN V1 Installation Guide - Page 2
- TP-Link T1700X-16TS | T1700X-16TSUN V1 Installation Guide - Page 3
make any derivative such as translation, transformation, or adaptation without permission from TP-LINK TECHNOLOGIES CO., LTD. Copyright © 2015 TP-LINK TECHNOLOGIES CO., LTD. All rights reserved. http://www.tp-link.com FCC STATEMENT This equipment has been tested instruction manual the user's - TP-Link T1700X-16TS | T1700X-16TSUN V1 Installation Guide - Page 4
commands. Appendix A Troubleshooting. Appendix B Hardware Specifications. Audience This Installation Guide is for: Network Engineer Network Administrator Conventions Due to the similarity in structure of the 10-Gigabit Smart Switch series, in this Installation Guide we take T1700X-16TS as an - TP-Link T1700X-16TS | T1700X-16TSUN V1 Installation Guide - Page 5
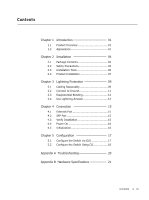
Port 15 4.2 SFP Port 15 4.3 Verify Installation 15 4.4 Power On 16 4.5 Initialization 16 Chapter 5 Configuration 17 5.1 Configure the Switch via GUI 17 5.2 Configure the Switch Using CLI 18 Appendix A Troubleshooting----------- 20 Appendix B Hardware Specifications------- 21 Contents III - TP-Link T1700X-16TS | T1700X-16TSUN V1 Installation Guide - Page 6
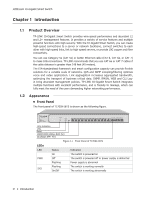
management policies. TP-LINK 10-Gigabit Smart Switch integrates multiple functions with excellent performance, and is friendly to manage, which can fully meet the need of the users demanding higher networking performance. 1.2 Appearance ■■ Front Panel The front panel of T1700X-16TS is shown as - TP-Link T1700X-16TS | T1700X-16TSUN V1 Installation Guide - Page 7
bandwidth of 100Mbps, 1000Mbps or 10Gbps. Each has two corresponding Link/Act LEDs , the left one is 10Gbps and the right one is 100/1000Mbps. SFP+ Port Designed to install the SFP module. T1700X-16TS features 4 individual SFP+ ports and supports 1G or 10G SFP module connection. ■■ Rear Panel The - TP-Link T1700X-16TS | T1700X-16TSUN V1 Installation Guide - Page 8
JetStream 10-Gigabit Smart Switch Kensington Security Slot Secure the lock (not provided) into the security slot to prevent the device from being stolen. Grounding Terminal The switch already comes with lightning protection mechanism. You can also ground the switch through the PE (Protecting Earth) - TP-Link T1700X-16TS | T1700X-16TSUN V1 Installation Guide - Page 9
JetStream 10-Gigabit Smart Switch Chapter 2 Installation 2.1 Package Contents Make sure that the package contains the following items. If any of the listed items is damaged or missing, please contact your distributor. One Switch One Power Cord This Installation Guide Two Mounting Brackets and - TP-Link T1700X-16TS | T1700X-16TSUN V1 Installation Guide - Page 10
JetStream 10-Gigabit Smart Switch ■■ Site Requirements Temperature/ insulation materials and can thus significantly shorten the service life of the device. For normal temperature and and impedance coupling. To decrease the interferences, please make sure to take the following measures: ■■ Use the - TP-Link T1700X-16TS | T1700X-16TSUN V1 Installation Guide - Page 11
JetStream 10-Gigabit Smart Switch taken. ■■ Ensure the rack and device are well earthed. ■■ Make sure the power socket has a good contact with the ground. items: ■■ The rack or workbench is flat and stable, and sturdy enough to support the weight of 5.5kg at least. ■■ The rack or workbench has a good - TP-Link T1700X-16TS | T1700X-16TSUN V1 Installation Guide - Page 12
JetStream 10-Gigabit Smart Switch 2.4 Product Installation ■■ Desktop Installation To install the device on the desktop, please follow the steps: 1. Set the device on a flat surface strong enough to support -sized, 19-inch rack, follow the instructions described below: 1. Check the grounding and - TP-Link T1700X-16TS | T1700X-16TSUN V1 Installation Guide - Page 13
JetStream 10-Gigabit Smart Switch Rack Figure 2-3 Rack Installation Caution: ■■ Please set 5~10cm gaps around the device for air circulation. ■■ Please avoid any heavy thing placed on the device. ■■ Please - TP-Link T1700X-16TS | T1700X-16TSUN V1 Installation Guide - Page 14
JetStream 10-Gigabit Smart Switch Chapter 3 Lightning Protection 3.1 Cabling Reasonably In the actual network environment, you may need cable outdoors and indoors, and the requirements for cabling outdoors and indoors - TP-Link T1700X-16TS | T1700X-16TSUN V1 Installation Guide - Page 15
JetStream 10-Gigabit Smart Switch ■■ Requirements for Cabling Indoors When cabling indoors, keep a Ethernet cable and other pipelines are shown in the table. Other Pipelines Down-conductor PE Service pipe Compressed air pipe Thermal pipe (not wrapped) Thermal pipe (wrapped) Gas pipe Ethernet - TP-Link T1700X-16TS | T1700X-16TSUN V1 Installation Guide - Page 16
JetStream 10-Gigabit Smart Switch Cable Pave Way 2~5kVA powerline >5kVA powerline Parallel from electric shock. In different environments, the device may be grounded differently. The following will instruct you to connect the device to the ground in two ways, connecting to the grounding bar or - TP-Link T1700X-16TS | T1700X-16TSUN V1 Installation Guide - Page 17
JetStream 10-Gigabit Smart Switch Note: The grounding bar and the ground cable are not provided the device to the ground via the PE (Protecting Earth) cable of AC power cord, please make sure the PE (Protecting Earth) cable in the electrical outlet is well grounded in advance. 3.3 Equipotential - TP-Link T1700X-16TS | T1700X-16TSUN V1 Installation Guide - Page 18
JetStream 10-Gigabit Smart Switch Grounding Terminal Ground Cable Equipotential Bonding Cable Grounding Bar Figure 3-3 Equipotential Bonding When equipotential bonding, please note that the cable should be copper conductor with a - TP-Link T1700X-16TS | T1700X-16TSUN V1 Installation Guide - Page 19
JetStream 10-Gigabit Smart Switch When purchasing or using a signal lightning arrester, please observe the following rules: ■■ The port rate of the signal lightning arrester should match the rate of the desired port on the device. If it is not matched, this signal lighting arrester will not work. - TP-Link T1700X-16TS | T1700X-16TSUN V1 Installation Guide - Page 20
JetStream 10-Gigabit Smart Switch Chapter 4 Connection 4.1 Ethernet Port Connect an Ethernet port of the switch to the computer by RJ45 cable as the following figure shown. RJ45 Port RJ45 Cable Figure 4-1 Connecting the RJ45 Port 4.2 SFP+ Port Connect the SFP+ - TP-Link T1700X-16TS | T1700X-16TSUN V1 Installation Guide - Page 21
JetStream 10-Gigabit Smart Switch 4.4 Power On Plug in the negative connector of the above. 4.5 Initialization After the device is powered on, it begins the Power-On Self-Test. A series of tests run automatically to ensure the device functions properly. During this time, its LED indicators will - TP-Link T1700X-16TS | T1700X-16TSUN V1 Installation Guide - Page 22
should be set in the same subnet addresses of the switch. The IP address is 192.168.0.x ("x" is any number from 2 to 254), Subnet Mask is 255.255.255.0. For the detailed instructions as to how to do this, please refer to the User Guide on the Resource CD. 2. Enter admin for the default - TP-Link T1700X-16TS | T1700X-16TSUN V1 Installation Guide - Page 23
JetStream 10-Gigabit Smart Switch Figure 5-3 Main Page of the Switch 5.2 Configure the Switch Using CLI You can log on to the switch and access the CLI by Logging on to the switch remotely by a Telnet connection through an Ethernet port. To log on to the switch by a Telnet connection, please take - TP-Link T1700X-16TS | T1700X-16TSUN V1 Installation Guide - Page 24
JetStream 10-Gigabit Smart Switch 4. Type the User name and Password (the factory default value for both of them is admin) and press the Enter button, then you can use the CLI now, which is shown as Figure 5-6. Figure 5-6 Log in the Switch For detailed CLI configuration instructions, please refer to - TP-Link T1700X-16TS | T1700X-16TSUN V1 Installation Guide - Page 25
JetStream 10-Gigabit Smart Switch Appendix A Troubleshooting Q1. What could I do if I forgot the username and password of the switch? Press the RESET button for at least 5 seconds to reset the system. The system will be reset to the factory default settings, and the default login user name and - TP-Link T1700X-16TS | T1700X-16TSUN V1 Installation Guide - Page 26
JetStream 10-Gigabit Smart Switch Appendix B Hardware Specifications Item Standards Transmission Medium LEDs Operating Temperature ) 10GBASE-SR/LR: MMF or SMF SFP Module (Optional) PWR, SYS, FAN, Link/Act 0℃~40℃ -40℃~70℃ 10%~90%RH Non-condensing 5%~90%RH Non-condensing 21 Hardware Specifications - TP-Link T1700X-16TS | T1700X-16TSUN V1 Installation Guide - Page 27
- TP-Link T1700X-16TS | T1700X-16TSUN V1 Installation Guide - Page 28
Website: http://www.tp-link.com E-mail: [email protected] 7106505763 REV1.0.0
-
 1
1 -
 2
2 -
 3
3 -
 4
4 -
 5
5 -
 6
6 -
 7
7 -
8
-
9
-
10
-
11
-
12
-
13
-
14
-
15
-
16
-
17
-
18
-
19
-
20
-
21
-
22
-
23
-
24
-
25
-
26
-
27
-
28
 |
 |

Installation Guide
JetStream 12-Port 10GBase-T Smart Switch
with 4 10G SFP+ Slots
T1700X-16TS
Business Networking Solution