TP-Link TL-PA101 User Guide - Page 13
Using The Management Utility - 85mbps powerline ethernet homeplug adapter
 |
UPC - 845973031084
View all TP-Link TL-PA101 manuals
Add to My Manuals
Save this manual to your list of manuals |
Page 13 highlights
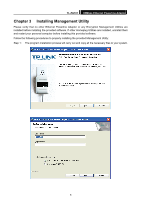
TL-PA101 85Mbps Ethernet Powerline Adapter Chapter 4 Using The Management Utility After you'd successfully installed the Ethernet Powerline Adapter hardware and Management Utility software, you can setup or configure the devices according to your need. This Ethernet Powerline Adapter Configuration Utility enables the users to identify HomePlug devices on the powerline network, measures data rate performance, ensures privacy and performs diagnostics by setting user defined secure powerline networks. Double click on the "TL-PA101 Powerline Utility" from your windows desktop, the following screen display. This Management Utility consists of a set of four property sheets, viz., "Main", "Privacy", and "Diagnostics" and "About". 4.1 Main The Main tab shows all the Ethernet Powerline Adapter that are logically connected to the current computer where the Management Utility is running. ¾ Local Device(s) on your computer: This shows all local Ethernet Powerline Adapter found connected to the computer's LAN card. In most cases, only one device will display in this panel. Click and select the local device shown on the screen then click "Connect" tab to manage the Ethernet Powerline Adapter. The status message will be shown above the "Connect" button indicates that your PC is connected to the same device. Once the chosen Ethernet Powerline Adapter is properly connected, this Management Utility will automatically scan the power line periodically for any other existing powerline devices. ¾ "x" Powerline Devices detected: This display all the Ethernet Powerline Adapter found on the current logical network. "x" shows the number of remote Ethernet Powerline Adapter discovered by this Management Utility. ¾ Network Type: Displayed the type of logical network: "Public" or "Private". ¾ Autoscan: Shows the scanning status (Default is "ON"). y Device Name: Shows the default device name. One may redefine or change the name by clicking on the name and editing in place or by clicking the "Rename" button. 9
-
 1
1 -
2
-
3
-
4
-
5
-
6
-
7
-
 8
8 -
 9
9 -
 10
10 -
 11
11 -
 12
12 -
 13
13 -
 14
14 -
 15
15 -
 16
16 -
 17
17 -
 18
18 -
19
-
20
 |
 |
