TP-Link TL-PS310U Quick Installation Guide - Page 3
Server Configurations, MFP and Storage Server, X 192.168.0.10., new icon, double-click the icon - print server
 |
UPC - 845973031060
View all TP-Link TL-PS310U manuals
Add to My Manuals
Save this manual to your list of manuals |
Page 3 highlights
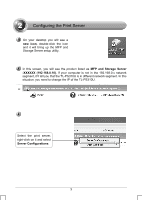
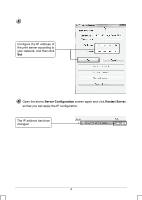
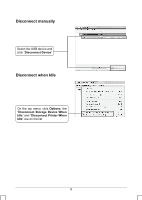
On your desktop you will see a new icon, double-click the icon and it will bring up the MFP and Storage Server setup utility. In this screen, you will see the product listed as MFP and Storage Server -XXXXXX (192.168.0.10). If your computer is not in the 192.168.0.x network segment, it'll tell you that the TL-PS310U is in different network segment. In this situation, you need to change the IP of the TL-PS310U. Select the print server, right-click on it and select Server Configurations 3
-
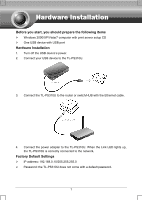 1
1 -
 2
2 -
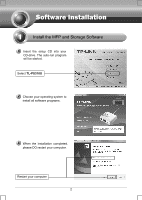
 3
3 -
 4
4 -
 5
5 -
 6
6 -
 7
7 -
 8
8 -
 9
9
 |
 |

3
Select the print server,
right-click on it and select
Server Configurations
In this screen, you will see the product listed as
MFP and Storage Server
-XXXXXX (192.168.0.10).
If your computer is not in the 192.168.0.x network
segment, it’ll tell you that the TL-PS310U is in different network segment. In this
situation, you need to change the IP of the TL-PS310U.
On your desktop you will see a
new icon
, double-click the icon
and it will bring up the MFP and
Storage Server setup utility.