TP-Link TL-WN951N User Guide - Page 44
Enter the PIN from your AP device
 |
UPC - 813120012910
View all TP-Link TL-WN951N manuals
Add to My Manuals
Save this manual to your list of manuals |
Page 44 highlights
TL-WN951N 300Mbps Wireless N PCI Adapter Figure 4-7 2. Open the Router's Web-based Utility and click QSS link on the left of the main menu. Then Figure 4-8 will appear. Figure 4-8 3. Click Add device, then you can see Figure 4-9. Select Enter the new device's PIN and enter the PIN value of the adapter shown in Figure 4-7, click Connect. Figure 4-9 4. When Figure 4-6 appears, the QSS configuration is complete. 4.2.2 Enter the PIN from your AP device 1. Open the QSS Utility and you will see Figure 4-4. Click Next to continue. Then Figure 4-5 will appear. Select the third option and enter the PIN value which is labeled on the bottom of the Router. Click Next. 38
-
 1
1 -
2
-
3
-
4
-
5
-
6
-
7
-
8
-
9
-
10
-
11
-
12
-
13
-
14
-
15
-
16
-
17
-
18
-
19
-
20
-
21
-
22
-
23
-
24
-
25
-
26
-
27
-
28
-
29
-
30
-
31
-
32
-
33
-
34
-
35
-
36
-
37
-
38
-
 39
39 -
 40
40 -
 41
41 -
 42
42 -
 43
43 -
 44
44 -
 45
45 -
 46
46 -
 47
47 -
 48
48
 |
 |

TL-WN951N
300Mbps Wireless N PCI Adapter
38
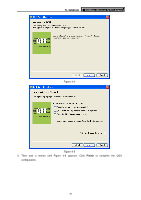
Figure 4-7
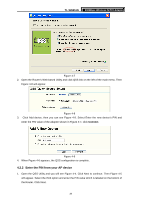
2.
Open the Router’s Web-based Utility and click QSS link on the left of the main menu. Then
Figure 4-8 will appear.
Figure 4-8
3.
Click Add device, then you can see Figure 4-9. Select Enter the new device’s PIN and
enter the PIN value of the adapter shown in Figure 4-7, click
Connect
.
Figure 4-9
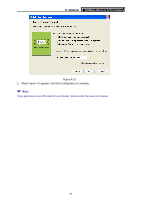
4.
When Figure 4-6 appears, the QSS configuration is complete.
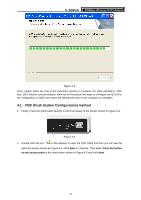
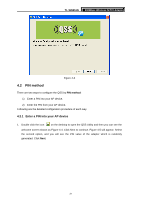
4.2.2 Enter the PIN from your AP device
1.
Open the QSS Utility and you will see Figure 4-4. Click Next to continue. Then Figure 4-5
will appear. Select the third option and enter the PIN value which is labeled on the bottom of
the Router. Click Next.