TRENDnet N300 Quick Installation Guide - Page 9
Wi-Fi Protected Setup WPS Push Button Setup - router setup
 |
View all TRENDnet N300 manuals
Add to My Manuals
Save this manual to your list of manuals |
Page 9 highlights
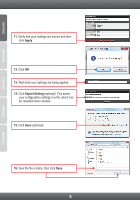
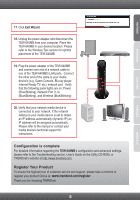
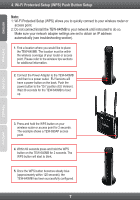
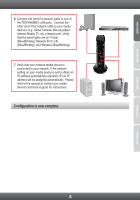
4. Wi-Fi Protected Setup (WPS) Push Button Setup Note: 1: Wi-Fi Protected Setup (WPS) allows you to quickly connect to your wireless router or access point. 2: Do not connect/install the TEW-640MB to your network until instructed to do so. Make sure your network adapter settings are set to obtain an IP address automatically (see troubleshooting section). 1. Find a location where you would like to place the TEW-640MB. The location must be within the wireless coverage of your router or access point. Please refer to the wireless tips sections for additional information. 2. Connect the Power Adapter to the TEW-640MB and then to a power outlet. EU Versions will have a power button on the back. Push the power button to the "On" position (EU Version). Wait 30 seconds for the TEW-640MB to boot up. 3. Press and hold the WPS button on your wireless router or access point for 2 seconds. The example shows a TEW-690AP access point. 4. Within 60 seconds press and hold the WPS button on the TEW-640MB for 2 seconds. The WPS button will start to blink. 5. Once the WPS button becomes steady blue (approximately within 120 seconds), the TEW-640MB has been successfully configured. 7
-
 1
1 -
2
-
3
-
 4
4 -
 5
5 -
 6
6 -
 7
7 -
 8
8 -
 9
9 -
 10
10 -
 11
11 -
 12
12 -
 13
13 -
 14
14 -
15
-
16
-
17
-
18
-
19
-
20
 |
 |
