TRENDnet TPL-402E2K User's Guide - Page 9
Initial Installation
 |
UPC - 710931506341
View all TRENDnet TPL-402E2K manuals
Add to My Manuals
Save this manual to your list of manuals |
Page 9 highlights
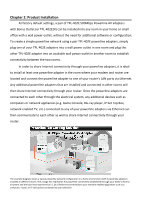
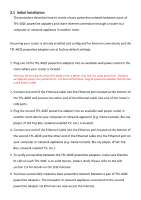
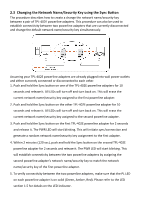
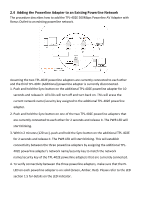
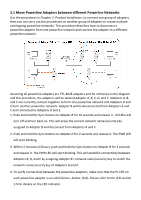
2.1 Initial Installation The procedure describes how to create a basic powerline network between a pair of TPL-402E powerline adapters and share Internet connection through a router to a computer or network appliance in another room. Assuming your router is already installed and configured for Internet connectivity and the TPL-402E powerline adapters are at factory default settings. 1. Plug one of the TPL-402E powerline adapters into an available wall power outlet in the room where your router is located. Warning: Do not plug the powerline adapter into a power strip that has surge protection. Doing so will degrade power line performance. For best performance, plug all powerline adapters directly into a wall power outlet. 2. Connect one end of the Ethernet Cable into the Ethernet port located at the bottom of the TPL-402E and connect the other end of the Ethernet cable into one of the router's LAN ports. 3. Plug the second TPL-402E powerline adapter into an available wall power outlet in another room where your computer or network appliance (e.g. Game Console, Blu-ray player, IP Set Top Box, network enabled TV, etc.) is located. 4. Connect one end of the Ethernet Cable into the Ethernet port located at the bottom of the second TPL-402E and the other end of the Ethernet cable into the Ethernet port on your computer or network appliance (e.g. Game Console, Blu-ray player, IP Set Top Box, network enabled TV, etc.). 5. To verify connectivity between the TPL-402E powerline adapters, make sure that the PL LED on each TPL-402E is on solid (Green, Amber, Red). Please refer to the LED section 1.5 for details on the LED indicator. 6. You have successfully created a basic powerline network between a pair of TPL-402E powerline adapters. The computer or network appliance connected to the second powerline adapter via Ethernet can now access the Internet.
-
 1
1 -
2
-
3
-
 4
4 -
 5
5 -
 6
6 -
 7
7 -
 8
8 -
 9
9 -
 10
10 -
 11
11 -
 12
12 -
 13
13 -
 14
14 -
15
-
16
-
17
-
18
-
19
-
20
-
21
-
22
-
23
-
24
-
25
-
26
-
27
-
28
-
29
 |
 |
