TRENDnet TV-IP340PI Users Guide
TRENDnet TV-IP340PI Manual
 |
View all TRENDnet TV-IP340PI manuals
Add to My Manuals
Save this manual to your list of manuals |
TRENDnet TV-IP340PI manual content summary:
- TRENDnet TV-IP340PI | Users Guide - Page 1
- TRENDnet TV-IP340PI | Users Guide - Page 2
TRENDnet User's Guide TV-IP340PI Contents Product Overview 4 Features ...4 Hardware ...4 Package Contents ...5 Hardware ...6 Warnings PPPoE...35 SNMP ...35 802.1X...37 IP Address Filter...37 Quality of Service (QoS 38 UPnP ...38 Video Settings 39 Video Format ...39 Display Settings...40 On - TRENDnet TV-IP340PI | Users Guide - Page 3
TRENDnet User's Guide Events 45 Motion Detection 45 Video Tampering 47 Notification ...48 Snapshot ...48 Email ...49 Alarm Input Interference Statement 56 RoHS ...56 Europe - EU Declaration of Conformity 57 Limited Warranty 58 © Copyright 2016 TRENDnet. All Rights Reserved. TV-IP340PI 3 - TRENDnet TV-IP340PI | Users Guide - Page 4
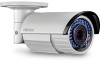
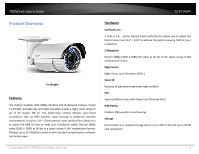
TRENDnet User's Guide TV-IP340PI Product Overview TV‐IP340PI Features The Indoor/ Outdoor 2MP 1080p Varifocal PoE IR Network Camera, model TV‐IP340PI to 32 TRENDnet cameras with included complimentary software and mobile apps. Hardware Varifocal Lens A built‐in 2.8 - 12mm manual zoom varifocal - TRENDnet TV-IP340PI | Users Guide - Page 5
TRENDnet User's Guide TV-IP340PI Advanced Playback Advanced in‐camera archived video review functionality Motion Detection Create schedules using continuous (24/7) and/or event based recording modes. Audio Support Audio input/output for third party microphone and speaker (sold separately) Input - TRENDnet TV-IP340PI | Users Guide - Page 6
TRENDnet User's Guide Hardware 1 8 6 5 4 9 23 7 10 15 © Copyright 2016 TRENDnet. All Rights Reserved. 11 12 1413 TV-IP340PI No. Description 1 Sun Shield 2 Front Cover 3 Zoom and Focus Lever 4 IR LED 5 Lens 6 Air Vent 7 Video Output Interface 8 Bracket 9 Reset Button 10 - TRENDnet TV-IP340PI | Users Guide - Page 7
TRENDnet User's Guide TV-IP340PI Warnings Serious injury or death may be caused if any expose this product to rain or water. • The installation should be done by a qualified service person and should conform to all construction and electric regulations and other local codes. Cautions Injury or - TRENDnet TV-IP340PI | Users Guide - Page 8
TRENDnet User's Guide Plan for Installation There are number of factors involved in a successful camera installation. Follow the suggested installation steps and go through the check lists. This guide will help you make your camera installation smoothly and easily. Viewing angle The TV‐IP340PI is a - TRENDnet TV-IP340PI | Users Guide - Page 9
TRENDnet User's Guide Hardware Installation Memory Card Installation 1. Rotate the lock screw counterclockwise to loosen it. Slide the sun shield according to the arrow direction as shown in below and remove the sun shield. Lock Screw TV-IP340PI 4. Insert the Memory Card 5. Rotate the front cover - TRENDnet TV-IP340PI | Users Guide - Page 10
TRENDnet User's Guide Mounting 1. Attach the drill template (supplied) to the wall or the ceiling where the camera is to be mounted. 2. Drill screw holes in the wall or ceiling according to the Hole 1 on the drill template. Drill Template TV-IP340PI Drill Template 2 Ceiling Mounting 1 1 2 1: - TRENDnet TV-IP340PI | Users Guide - Page 11
TRENDnet User's Guide Rotation Adjustment 1). Loosen the lock screw 3. 2). Rotate to 100° Tilting Rotation 0° to 360° 7. (Optional) Install the water‐proof jacket for network connector. TV-IP340PI Zoom and Focus You can use the zoom lever and focus lever to adjust the zoom and focus level. Follow - TRENDnet TV-IP340PI | Users Guide - Page 12
Next to finish the installation TV-IP340PI 2. Install the Camera Utility as instructed. 4. This will also require you to install WinPcap program if you don't have this installed before, please follow the on screen instruction to install it. © Copyright 2016 TRENDnet. All Rights Reserved. 12 - TRENDnet TV-IP340PI | Users Guide - Page 13
TRENDnet User's Guide 5. Restart the computer after the installations. TV-IP340PI 7. Find the camera you would like to access and configure then double click on the Access your Camera with the Web Browser for detail configurations of the camera. © Copyright 2016 TRENDnet. All Rights Reserved. 13 - TRENDnet TV-IP340PI | Users Guide - Page 14
TRENDnet User's Guide TV-IP340PI Access your Camera with the Web Browser do not have the CD with you, you can go to http://www.TRENDnet.com/support enter the model number "TV‐IP340PI" and download the software. System Default Management IP Administrator name Administrator password Dynamic - TRENDnet TV-IP340PI | Users Guide - Page 15
TRENDnet User's Guide TV-IP340PI 3. The camera management page will detect if you installed the camera video streaming plug‐in or not. Click the link to download the plug‐in from the TV‐IP340PI camera. 5. Permission request may show up depends on the Internet security settings on your computer. - TRENDnet TV-IP340PI | Users Guide - Page 16
TRENDnet User's Guide 7. Click Finish to finish the installation. TV-IP340PI 10. Enter the user name admin and 9. (Go to step 11 if you already changed your password with the setup CD). The TV‐IP340PI will ask you to change your password from default setting. Please enter the new password twice and - TRENDnet TV-IP340PI | Users Guide - Page 17
TRENDnet User's Guide TV-IP340PI Logging‐in to the Camera for the First Time (OS X) 1. Open the the camera video streaming plug‐in or not. Click the link to download the plug‐in from the TV‐IP340PI camera. Note: Internet connection is required to download the plug‐in. If you do not have Internet - TRENDnet TV-IP340PI | Users Guide - Page 18
TRENDnet User's Guide 4. Quit your browser completely by command‐Click on the browser icon and then click Quit before installing the plug‐in. 6. Click Open to start installation. TV-IP340PI 5. Go to the Finder and navigate to the Download folder. Command‐Click the WebComponents.pkg and then - TRENDnet TV-IP340PI | Users Guide - Page 19
TRENDnet User's Guide 8. Select a destination to install the plug‐in. Then click Continue. 10. Enter your password and click Install Software TV-IP340PI 9. Use the default location and click Install. 11. Installation will process automatically. © Copyright 2016 TRENDnet. All Rights Reserved. - TRENDnet TV-IP340PI | Users Guide - Page 20
TRENDnet User's Guide 12. Click Close to exit the installation. TV-IP340PI 15. Click Trust (You'll have to do this 192.168.10.30 or the IP that was dynamically assigned by your router. 16. The TV‐IP340PI will ask you to change your password from the default setting. Please enter the new password - TRENDnet TV-IP340PI | Users Guide - Page 21
TRENDnet User's Guide 17. Enter the user name admin and new password again to start secured session. 18. The Live View page shows up and the video starts to stream. © Copyright 2016 TRENDnet. All Rights Reserved. TV-IP340PI 21 - TRENDnet TV-IP340PI | Users Guide - Page 22
TRENDnet User's Guide TV-IP340PI Live View After you log‐in into the camera management to stop recording. The status bar will indicate if it is in recording state or not. Video Stream TV‐IP340PI has two video streams: H.264 and MJPEG. Switch to view the different video streams by clicking this - TRENDnet TV-IP340PI | Users Guide - Page 23
TRENDnet User's Guide TV-IP340PI Playback You can playback the video recording on the network range of searching. Click Search to start searching. Click and drag the time line to move your time manually. Click this button to zoom in the scale Click this button to zoom out of the scale Click this - TRENDnet TV-IP340PI | Users Guide - Page 24
TRENDnet User's Guide Playback Use playback controls to play back the video recording. TV-IP340PI Slice images from video playback You can take snapshots from playback video or make to your computer. See Live View Settings on page 31 for details. © Copyright 2016 TRENDnet. All Rights Reserved. 24 - TRENDnet TV-IP340PI | Users Guide - Page 25
TRENDnet User's Guide Download sections of video To save complete video sections or snapshots, you can download the files directly. Download snapshots Click button to list snapshots to download TV-IP340PI Click button to download video sections. Check the time of the recording, select the - TRENDnet TV-IP340PI | Users Guide - Page 26
TRENDnet User's Guide TV-IP340PI Log The log of the TV‐IP340PI will be saved on the network storage. You can search the relevant records and save to your local will be saved to your computer. See Live View Settings on page 31 for details. © Copyright 2016 TRENDnet. All Rights Reserved. 26 - TRENDnet TV-IP340PI | Users Guide - Page 27
TRENDnet User's Guide System Information System Information page shows the TV‐IP340PI's basic information. Click System then click System Info to show the page. TV-IP340PI Network Information IP Address: IP address of the TV‐IP340PI Subnet Mask: Network range of IP address Default Gateway: The - TRENDnet TV-IP340PI | Users Guide - Page 28
Guide System Configuration Device Settings Setup your camera name and location for easy identification. This camera name will also be recognized by other network camera software as the name of this camera. OSD, On Screen Display, camera name is referring to this setting as well. TV-IP340PI Names - TRENDnet TV-IP340PI | Users Guide - Page 29
TRENDnet User's Guide TV-IP340PI User Accounts You can setup up to 16 user accounts to access the camera's video stream with a web browser or real time video stream (RTSP). Only one administrator account can be setup to configure the TV‐IP340PI and cannot be deleted. Time Settings The accuracy of - TRENDnet TV-IP340PI | Users Guide - Page 30
TRENDnet User's Guide Daylight Savings Setup daylight savings. TV-IP340PI Manual Time Sync Device Time: The system time of this camera. Set Time: Click the calendar icon and manually select the date. Check the Sync. with computer time to copy the time from your computer. Click Save to save the - TRENDnet TV-IP340PI | Users Guide - Page 31
TRENDnet User's Guide Live View Settings Setup the live view video quality, file is delayed from the time happening. Medium size can have moderate video stream smoothness and time delay. TV-IP340PI Record File Settings Record file size: This size of live view video recording. You can choose 256MB, - TRENDnet TV-IP340PI | Users Guide - Page 32
the link. http://www.trendnet.com/downloads/ 1. If a firmware upgrade is available, download the firmware to your computer. 2. Unzip the file to a folder on your computer. 3. Read the firmware upgrade instruction for specific version update information. 4. Log into the TV‐IP340PI. 5. Getting to this - TRENDnet TV-IP340PI | Users Guide - Page 33
TRENDnet User's Guide Network Settings TCP/IP Setup your basic IPv4 and IPv6 network settings on this page. © Copyright 2016 TRENDnet. All Rights Reserved. TV-IP340PI going further from TV‐IP340PI IPv4 subnet IPv6 IPv6 Mode: IPv6 Address: Prefix Length: Default Gateway: Choose Manual, DHCP, or - TRENDnet TV-IP340PI | Users Guide - Page 34
TRENDnet User's Guide TV-IP340PI Port You can change the service port numbers of TV‐IP340PI and enable/disable RTSP or HTTPS services. DDNS Dynamic Domain Name Service, DDNS, allows you to find your camera from the Internet with an easy to remember domain name. Port Numbers HTTP Port: RTSP Port: - TRENDnet TV-IP340PI | Users Guide - Page 35
TRENDnet User's Guide TV-IP340PI PPPoE Setup PPPoE (ADSL) connection to connect your camera with your ISP, Internet Service Provider. SNMP SNMP Settings allows you to assign the contact details, location, community name and trap settings of SNMP. This is a networking management protocol used - TRENDnet TV-IP340PI | Users Guide - Page 36
TRENDnet User's Guide SNMP V1/V2 Enable SNMPv1: one of the security levels. © Copyright 2016 TRENDnet. All Rights Reserved. TV-IP340PI Authentication Algorithm: Authentication Password: Private‐key Algorithm: Other Settings SNMP Port: SNMP service port number. Click Save to save the changes 36 - TRENDnet TV-IP340PI | Users Guide - Page 37
TRENDnet User's Guide 802.1X Setup 802.1X for remote authentication service. TV-IP340PI IP Address Filter Set up a list of clients allow only the clients on the list to access this camera or to reject clients on the - TRENDnet TV-IP340PI | Users Guide - Page 38
TRENDnet User's Guide TV-IP340PI Quality of Service (QoS) Setup traffic prioritization tags the video packets to go through network switches and routers with assigned priority. You can set the Differentiated Services box to enable UPnP connection. Choose Manual or Auto port mapping. Choose the - TRENDnet TV-IP340PI | Users Guide - Page 39
TRENDnet User's Guide Video Settings Video Format Adjust the format of video. TV-IP340PI Video Encoding: Resolution: Choose the video stream you want to modify. H.264 and MJPEG Interval here. The default is 60. Click Save to save the changes © Copyright 2016 TRENDnet. All Rights Reserved. 39 - TRENDnet TV-IP340PI | Users Guide - Page 40
TRENDnet User's Guide Display Settings Adjust video image quality, lightness, and color settings here. Brightness: Contrast: Saturation: Sharpness: Use the slider or enter a number (0‐100) to adjust the image sharpness. Default: 50 © Copyright 2016 TRENDnet. All Rights Reserved. TV-IP340PI 40 - TRENDnet TV-IP340PI | Users Guide - Page 41
TRENDnet User's Guide color video) or night mode (IR enhanced black/white video). You can manually set it to day mode or night mode, adjust by lighting (Auto), light source temporarily. Range: 5‐120 seconds, default: 5 seconds. TV-IP340PI Schedule: Use quick selection or enter the time down below. - TRENDnet TV-IP340PI | Users Guide - Page 42
TRENDnet User's Guide TV-IP340PI Image adjustments Back Light Compensation and Digital Wide‐ Dynamic‐ Range: 0‐100%, default : 100% Click Reset to reset the display adjustments © Copyright 2016 TRENDnet. All Rights Reserved. Display Name: Display Date: Check this box to display the product - TRENDnet TV-IP340PI | Users Guide - Page 43
TRENDnet User's Guide Text Overlay Display extra information on the screen over the image. TV-IP340PI Privacy Mask Create a masking area to keep your privacy. You can create up to to clear all the masking areas. Click Save to save the changes © Copyright 2016 TRENDnet. All Rights Reserved. 43 - TRENDnet TV-IP340PI | Users Guide - Page 44
TRENDnet User's Guide Video Recording TV-IP340PI Edit: Click Edit to edit the recording schedule. The box and then click Save to enable video recording. Click Save to save the changes © Copyright 2016 TRENDnet. All Rights Reserved. 1. Select day of the week you want to edit. 2. Select All Day - TRENDnet TV-IP340PI | Users Guide - Page 45
TRENDnet User's Guide Events Motion Detection Set up how the motion detection event will be triggered and what actions will be triggered. TV-IP340PI © Copyright 2016 TRENDnet. All Rights Reserved. Enable Motion Detection: Enable Motion Tracking: Check this box to enable motion detection. Click - TRENDnet TV-IP340PI | Users Guide - Page 46
TRENDnet User's Guide Draw Area: Click Draw Area button to start drawing. Arming Schedule Edit: Click Edit to edit the recording schedule. The Edit Schedule window will pop up. TV-IP340PI 3. Set the time period and the event you want to trigger the video recording continuous (always recording) - TRENDnet TV-IP340PI | Users Guide - Page 47
TRENDnet User's Guide Video Tampering This is to detect if the camera has been tampered with and surveillance is compromised. You can set up tamper proof notifications to alert the system manager to check the camera. TV-IP340PI Enable Tamper Detection: Draw Area: Sensitivity: Check this box to - TRENDnet TV-IP340PI | Users Guide - Page 48
TRENDnet User's Guide TV-IP340PI 4. Click Select All or the weekday you want to have the same schedule on different day. 5. Click another day can set up your camera to continuously taking snapshots or taking snapshots only when events happening. © Copyright 2016 TRENDnet. All Rights Reserved. 48 - TRENDnet TV-IP340PI | Users Guide - Page 49
TRENDnet User's Guide Continuous Enable: Format: Resolution: Quality: Interval: Check this pictures. Click Save to save the changes Email Set up email accounts for notifications. TV-IP340PI © Copyright 2016 TRENDnet. All Rights Reserved. Sender Sender: Sender's Address: SMTP Server: Enter the - TRENDnet TV-IP340PI | Users Guide - Page 50
to save the changes *Note: Many ISPs does not allow service port 25 going through their network. Other popular ports are 587 and 465. Please consult your email service provider and ISP for detail. Alarm Input Set up alarm input value. © Copyright 2016 TRENDnet. All Rights Reserved. TV-IP340PI 50 - TRENDnet TV-IP340PI | Users Guide - Page 51
TRENDnet User's Guide You can enter the alarm input settings on this page. 1. Choose the alarm input number and the alarm your settings to other alarm inputs. 5. Click Save to save the settings. Alarm Output Set up alarm output value. TV-IP340PI © Copyright 2016 TRENDnet. All Rights Reserved. 51 - TRENDnet TV-IP340PI | Users Guide - Page 52
TRENDnet User's Guide TV-IP340PI You can enter the alarm output settings on this page. 1. Select one alarm output channel in the Alarm Output section, you can also set a name for the alarm output (optional). 2. The Delay time can be set to different durations or manual. 3. Click Arming Schedule to - TRENDnet TV-IP340PI | Users Guide - Page 53
TRENDnet User's Guide TV-IP340PI No: Type: Server Address: File Path: Capacity: File System: User Tip: To create a network storage on your Windows® based system, create a shared folder and then test your set up with another computer. Enter the IP address of the computer here and enter the shared - TRENDnet TV-IP340PI | Users Guide - Page 54
TRENDnet User's Guide Format: Select a network storage files. Please do not modify these files manually. Modifying these files may cause recording and playback problems. Access your recording and system log via not stable. FTP Server © Copyright 2016 TRENDnet. All Rights Reserved. TV-IP340PI 54 - TRENDnet TV-IP340PI | Users Guide - Page 55
TRENDnet User's Guide Enable Snapshot to FTP: Server Address: Port: User Name/Anonymous : Password: Confirm: Directory Structure: Directory: Check this box if you want to store snapshots on the FTP. Enter the FTP server IP address. Enter the service TRENDnet. All Rights Reserved. TV-IP340PI 55 - TRENDnet TV-IP340PI | Users Guide - Page 56
TRENDnet User's Guide TV-IP340PI Regulations Federal Communication Commission Interference Statement This equipment has been tested and used in accordance with the instructions, may cause harmful interference to firmware programmed at the factory to match the intended destination. The firmware - TRENDnet TV-IP340PI | Users Guide - Page 57
TRENDnet User's Guide Europe - EU Declaration of Conformity This device complies with the essential requirements of the Directive 2004/108/EC and 2006/95/EC. The following test y 2006/95/CE TRENDnet TV‐IP340PI © Copyright 2016 TRENDnet. All Rights Reserved. TV-IP340PI Français [French] - TRENDnet TV-IP340PI | Users Guide - Page 58
TRENDnet User's Guide TV-IP340PI Limited Warranty TRENDnet warrants its products against defects in material and workmanship, under normal use and service, for the following lengths of time from the date of purchase. • TV‐IP340PI - 3 Years Warranty If a product does not operate as warranted - TRENDnet TV-IP340PI | Users Guide - Page 59
-
 1
1 -
 2
2 -
 3
3 -
 4
4 -
 5
5 -
 6
6 -
 7
7 -
8
-
9
-
10
-
11
-
12
-
13
-
14
-
15
-
16
-
17
-
18
-
19
-
20
-
21
-
22
-
23
-
24
-
25
-
26
-
27
-
28
-
29
-
30
-
31
-
32
-
33
-
34
-
35
-
36
-
37
-
38
-
39
-
40
-
41
-
42
-
43
-
44
-
45
-
46
-
47
-
48
-
49
-
50
-
51
-
52
-
53
-
54
-
55
-
56
-
57
-
58
-
59
 |
 |
