TRENDnet TV-IP340PI Users Guide - Page 9
Hardware Installation
 |
View all TRENDnet TV-IP340PI manuals
Add to My Manuals
Save this manual to your list of manuals |
Page 9 highlights
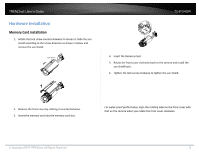
TRENDnet User's Guide Hardware Installation Memory Card Installation 1. Rotate the lock screw counterclockwise to loosen it. Slide the sun shield according to the arrow direction as shown in below and remove the sun shield. Lock Screw TV-IP340PI 4. Insert the Memory Card 5. Rotate the front cover clockwise back to the camera and install the sun shield back. 6. Tighten the lock screw clockwise to tighten the sun shield. 2. Remove the front cover by rotating it counterclockwise. 3. Insert the memory card into the memory card slot. For water‐proof performance, align the rotating label on the front cover with that on the camera when you rotate the front cover clockwise. © Copyright 2016 TRENDnet. All Rights Reserved. 9
-
 1
1 -
2
-
3
-
 4
4 -
 5
5 -
 6
6 -
 7
7 -
 8
8 -
 9
9 -
 10
10 -
 11
11 -
 12
12 -
 13
13 -
 14
14 -
15
-
16
-
17
-
18
-
19
-
20
-
21
-
22
-
23
-
24
-
25
-
26
-
27
-
28
-
29
-
30
-
31
-
32
-
33
-
34
-
35
-
36
-
37
-
38
-
39
-
40
-
41
-
42
-
43
-
44
-
45
-
46
-
47
-
48
-
49
-
50
-
51
-
52
-
53
-
54
-
55
-
56
-
57
-
58
-
59
 |
 |

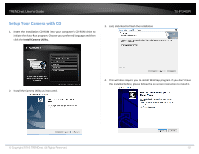
TRENDnet User’s Guide
TV-IP340PI
© Copyright 2016 TRENDnet. All Rights Reserved.
9
Hardware Installation
Memory Card Installation
1.
Rotate the lock screw counterclockwise to loosen it. Slide the sun
shield according to the arrow direction as shown in below and
remove the sun shield.
Lock Screw
2.
Remove the front cover by rotating it counterclockwise.
3.
Insert the memory card into the memory card slot.
4.
Insert the Memory Card
5.
Rotate the front cover clockwise back to the camera and install the
sun shield back.
6.
Tighten the lock screw clockwise to tighten the sun shield.
For water
‐
proof performance, align the rotating label on the front cover with
that on the camera when you rotate the front cover clockwise.