TRENDnet TV-IP340PI Users Guide - Page 11
Zoom and Focus
 |
View all TRENDnet TV-IP340PI manuals
Add to My Manuals
Save this manual to your list of manuals |
Page 11 highlights
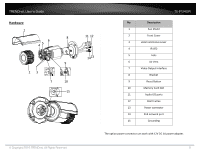
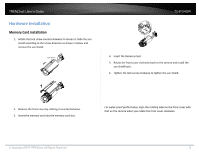
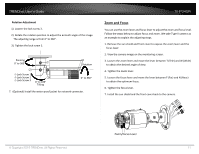
TRENDnet User's Guide Rotation Adjustment 1). Loosen the lock screw 3. 2). Rotate the rotation position to adjust the azimuth angle of the image. The adjusting range is from 0° to 360°. 3). Tighten the lock screw 3. Panning 0° to 360° 1 2 1 Lock Screw 1 2 Lock Screw 2 3 Lock Screw 3 3 0° to 100° Tilting Rotation 0° to 360° 7. (Optional) Install the water‐proof jacket for network connector. TV-IP340PI Zoom and Focus You can use the zoom lever and focus lever to adjust the zoom and focus level. Follow the steps below to adjust focus and zoom. We take Type II camera as an example to explain the adjusting steps. 1. Remove the sun shield and front cover to expose the zoom lever and the focus lever. 2. View the camera image on the monitoring screen. 3. Loosen the zoom lever and move the lever between T (Tele) and W (Wide) to obtain the desired angle of view. 4. Tighten the zoom lever. 5. Loosen the focus lever and move the lever between F (Far) and N (Near) to obtain the optimum focus. 6. Tighten the focus lever. 7. Install the sun shield and the front cover back to the camera. Zoom/Focus Lever © Copyright 2016 TRENDnet. All Rights Reserved. 11
-
 1
1 -
2
-
3
-
4
-
5
-
 6
6 -
 7
7 -
 8
8 -
 9
9 -
 10
10 -
 11
11 -
 12
12 -
 13
13 -
 14
14 -
 15
15 -
 16
16 -
17
-
18
-
19
-
20
-
21
-
22
-
23
-
24
-
25
-
26
-
27
-
28
-
29
-
30
-
31
-
32
-
33
-
34
-
35
-
36
-
37
-
38
-
39
-
40
-
41
-
42
-
43
-
44
-
45
-
46
-
47
-
48
-
49
-
50
-
51
-
52
-
53
-
54
-
55
-
56
-
57
-
58
-
59
 |
 |
