TRENDnet TV-IP400 User's Guide - Page 13
Hardware Installation
 |
UPC - 710931303117
View all TRENDnet TV-IP400 manuals
Add to My Manuals
Save this manual to your list of manuals |
Page 13 highlights
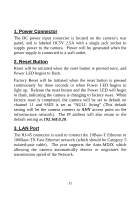
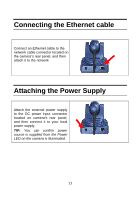
2 HARDWARE INSTALLATION Attaching the Metal Plate X Ceiling screw Screw Screw Wall screw Y Wall screw Y Base of the camera X Ceiling screw To attach the metal clip, remove the two rubber pads under the base of the camera firstly. Place the metal clip onto the camera base, and align the two holes of metal clip with two screw holes on the base. Secure the metal clip to the base with two screws (provided). Then, you can: 1. Install the camera to the ceiling using two ceiling screws (X); or, 2. Install the camera to the wall using two wall screws (Y). 12
-
 1
1 -
2
-
3
-
4
-
5
-
6
-
7
-
 8
8 -
 9
9 -
 10
10 -
 11
11 -
 12
12 -
 13
13 -
 14
14 -
 15
15 -
 16
16 -
 17
17 -
 18
18 -
19
-
20
-
21
-
22
-
23
-
24
-
25
-
26
-
27
-
28
-
29
-
30
-
31
-
32
-
33
-
34
-
35
-
36
-
37
-
38
-
39
-
40
-
41
-
42
-
43
-
44
-
45
-
46
-
47
-
48
-
49
-
50
-
51
-
52
-
53
-
54
-
55
-
56
-
57
-
58
-
59
-
60
-
61
-
62
-
63
-
64
-
65
-
66
-
67
-
68
-
69
-
70
-
71
-
72
-
73
-
74
-
75
-
76
-
77
-
78
-
79
-
80
-
81
-
82
-
83
-
84
-
85
-
86
-
87
-
88
-
89
-
90
-
91
-
92
-
93
-
94
-
95
-
96
-
97
-
98
-
99
-
100
-
101
-
102
-
103
-
104
-
105
-
106
-
107
-
108
-
109
-
110
-
111
-
112
-
113
 |
 |

12
2
H
ARDWARE
I
NSTALLATION
Attaching the Metal Plate
To attach the metal clip, remove the two rubber pads under the
base of the camera firstly.
Place the metal clip onto the camera
base, and align the two holes of metal clip with two screw holes
on the base.
Secure the metal clip to the base with two screws
(provided).
Then, you can:
1.
Install the camera to the ceiling using two ceiling screws (
);
or,
2.
Install the camera to the wall using two wall screws (
).
Base of the camera
Wall screw
Screw
Screw
Ceiling screw
Ceiling screw
Wall screw