TRENDnet TV-IP851WC User's Guide
TRENDnet TV-IP851WC Manual
 |
View all TRENDnet TV-IP851WC manuals
Add to My Manuals
Save this manual to your list of manuals |
TRENDnet TV-IP851WC manual content summary:
- TRENDnet TV-IP851WC | User's Guide - Page 1
TRENDnet User's Guide Cover Page - TRENDnet TV-IP851WC | User's Guide - Page 2
Wireless...29 Network ...30 Cloud Link...31 User ...31 Date/Time ...32 Motion Detection ...32 Upload...33 Day/Night Mode (for TV-IP851WIC 35 Tools ...35 FTP Server Test...36 E-mail Test...36 Restart ...36 Factory Reset ...37 Firmware Upgrade 37 Backup and Restore 37 How to setup/access the camera - TRENDnet TV-IP851WC | User's Guide - Page 3
TRENDnet User's Guide Technical Specifications 41 Troubleshooting 44 Table of Contents © Copyright 2013 TRENDnet. All Rights Reserved. ii - TRENDnet TV-IP851WC | User's Guide - Page 4
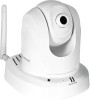
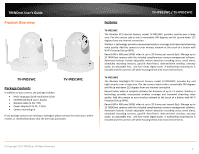
online retailer, or reseller/distributor that the item was purchased. TV-IP851WC / TV-IP851WIC Features TV-IP851WC The Wireless PTZ Internet Camera, model TV-IP851WC, provides security over a large area. Pan the camera side-to-side a remarkable 340 degrees and tilt up-and-down 115 degrees from any - TRENDnet TV-IP851WC | User's Guide - Page 5
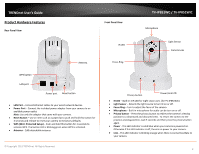
TRENDnet User's Guide Product Hardware Features Rear Panel View Front Panel View IR LED TV-IP851WC / TV-IP851WIC Microphone Light Sensor Camera Lens Antenna Focus Ring WPS button LAN port Power port Reset release to reset your camera to its factory defaults. • WPS (Wi-Fi Protected Setup) - Push - TRENDnet TV-IP851WC | User's Guide - Page 6
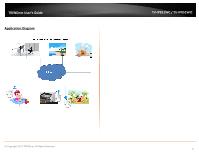
TRENDnet User's Guide Application Diagram TV-IP851WC / TV-IP851WIC © Copyright 2013 TRENDnet. All Rights Reserved. 3 - TRENDnet TV-IP851WC | User's Guide - Page 7
an available port on your network. If you prefer to use the camera on a wireless network, see below for instructions on connecting the power adapter. TV-IP851WC / TV-IP851WIC WPS Connection An alternative method of connecting your camera to your network is by using WPS. WPS is a quick, simple and - TRENDnet TV-IP851WC | User's Guide - Page 8
screw holes on the base of the camera. • Secure the metal plate to the base of the Camera with the two screws provided. • The camera can now be mounted to the ceiling or a wall. See the diagram below for more information. TV-IP851WC / TV-IP851WIC © Copyright 2013 TRENDnet. All Rights Reserved. 5 - TRENDnet TV-IP851WC | User's Guide - Page 9
.com) at the label on the back of the camera. 2. Connect the power cable to the camera. TV-IP851WC / TV-IP851WIC Image B (wired connection) There are two methods to connect to the Internet, wired and wireless. For wireless, follow the instructions from Image A below. For wired, follow the - TRENDnet TV-IP851WC | User's Guide - Page 10
TRENDnet User's Guide TV-IP851WC / TV-IP851WIC Red Mode The Red Mode indicates the camera is connecting to the Internet or local network through a firewall. This mode doesn't offer configuration and management options - just live streaming for 60 seconds. The - TRENDnet TV-IP851WC | User's Guide - Page 11
the installation. TV-IP851WC / TV-IP851WIC 2. The next step references information on the camera itself. Go to your camera and check the details at the back of the device. Click Next to continue, Back to go to the previous screen or Home to return to the Main Menu. 1. This is TRENDnet's Terms of - TRENDnet TV-IP851WC | User's Guide - Page 12
to return to the Main Menu. TV-IP851WC / TV-IP851WIC 6. Connect one end of the network cable to your camera and the other end to your router. Click Next to continue, Back to go to the previous screen or Home to return to the Main Menu. 5. Follow the instructions in the next screen to Power up - TRENDnet TV-IP851WC | User's Guide - Page 13
to the Main Menu. TV-IP851WC / TV-IP851WIC 10. The wizard configures your parameters. 9. Password Settings. Follow the instructions on the screen. Remember to change the password with an 8 bit preset. The default username and password is admin. Tick the Change Password checkbox to enter the new - TRENDnet TV-IP851WC | User's Guide - Page 14
If there is no warning, click Next. TV-IP851WC / TV-IP851WIC Connecting to your TV-IP851WC/TV-IP851WIC with a Mobile App Please refer to the page 19 for mobile apps download through the QR code option. 12. The mobile option allows the user to download the TRENDnet CloudView App in either Apple™ or - TRENDnet TV-IP851WC | User's Guide - Page 15
TRENDnet User's Guide Configure Wireless Settings Using WPS TV-IP851WC / TV-IP851WIC 2. Follow the instructions and click Next to continue. If you wish to go to the previous screen, click Back or Home to return to the main menu. • Find the access point (AP) or wireless router you wish to connect - TRENDnet TV-IP851WC | User's Guide - Page 16
TRENDnet User's Guide TV-IP851WC / TV-IP851WIC 5. Password Settings. Follow the instructions on the screen. The default username and password is admin. Tick the Change Password checkbox to enter the new password details. The password should be between 8 and 16 characters. Click Next to continue, - TRENDnet TV-IP851WC | User's Guide - Page 17
If there is no warning, click Next. TV-IP851WC / TV-IP851WIC Connecting to your TV-IP851WC/TV-IP851WIC with a Mobile App Please refer to the page 19 for mobile apps download through the QR code option. 8. The mobile option allows the user to download the TRENDnet CloudView App in either Apple™ or - TRENDnet TV-IP851WC | User's Guide - Page 18
TRENDnet User's Guide Connecting Wireless Network Manually TV-IP851WC / TV-IP851WIC 1. Follow the instructions in the next screen to Power up the Camera. Click Name and MAC Address of the camera. If you do not see any of your camera(s) in the wizard, click Retry to scan for the camera again. Click - TRENDnet TV-IP851WC | User's Guide - Page 19
TRENDnet User's Guide TV-IP851WC / TV-IP851WIC 5. Password Settings. Follow the instructions on the screen. Remember to change the password with an 8 bit preset. The default username and password is admin. Tick the Change Password checkbox to enter the new password details. The password should be - TRENDnet TV-IP851WC | User's Guide - Page 20
TRENDnet User's Guide 8. The wizard searches for wireless Access Points. TV-IP851WC / TV-IP851WIC 9. Next, you are prompted to disconnect your network cable from the camera/router. Click Next to continue, Back to go to the previous screen or Home to return to the Main Menu. 11. The initial setup - TRENDnet TV-IP851WC | User's Guide - Page 21
are now ready to use your camera. Click Home to the main menu, or Finish to exit. Connecting to your TV-IP851WC/TV-IP851WIC with a Mobile App Please refer to the page 19 for mobile apps download through the QR code option. © Copyright 2013 TRENDnet. All Rights Reserved. TV-IP851WC / TV-IP851WIC 18 - TRENDnet TV-IP851WC | User's Guide - Page 22
's Play store. The QR codes of Apple and Android are presented on the last page of the Install wizard. TV-IP851WC / TV-IP851WIC The app copies the QR link and provides a HTML link to the TRENDnet app. Click on the link. Using your mobile device, in this example it is an Android phone, touch the - TRENDnet TV-IP851WC | User's Guide - Page 23
TRENDnet User's Guide TV-IP851WC / TV-IP851WIC The TRENDnet icon will appear on your android device screen. Download the app, install it and use the app on your mobile device to view the TRENDnet camera. Touch the icon to activate it. © Copyright 2013 TRENDnet. All Rights Reserved. 20 - TRENDnet TV-IP851WC | User's Guide - Page 24
TRENDnet User's Guide Enter the settings and touch the check icon. You are now able to have a live view from your camera. Here is Apple iTunes version TV-IP851WC / TV-IP851WIC Scan the QR Code using one of iOS's QR Code apps. The app automatically creates an HTML link to the iTunes App Store. - TRENDnet TV-IP851WC | User's Guide - Page 25
enter the IP address of your camera (Default IP Address: http://192.168.10.30). To log in, use the User name admin and the password you created in the Setup Wizard. If you did not create a password, the default password is admin. After entering your password, click OK. TV-IP851WC / TV-IP851WIC The - TRENDnet TV-IP851WC | User's Guide - Page 26
TRENDnet User's Guide The Congratulations page appears. Click Login to go to the Login page again. To log in, enter the Username admin and the newly created password. This page only appears at the first time log in. TV-IP851WC / TV-IP851WIC Viewing Video Click VIEW VIDEO | ACTIVEX or VIEW VIDEO | - TRENDnet TV-IP851WC | User's Guide - Page 27
www.java.com) TV-IP851WC / TV-IP851WIC Viewing Camera Settings To view camera settings: 1. Login to the camera 2. Click ADMINISTRATION. The system status screen appears. From the menu on the left side of the screen, select an option under the STATUS heading. . © Copyright 2013 TRENDnet. All Rights - TRENDnet TV-IP851WC | User's Guide - Page 28
TRENDnet User's Guide System This screen shows the Camera Name, Location, Model, Firmware Version, MAC Address, IP Address, Ethernet Link Status, Speed and Duplex type. TV-IP851WC / TV-IP851WIC Audio This screen shows whether audio is enabled and the volume level of the audio. Video This screen - TRENDnet TV-IP851WC | User's Guide - Page 29
TRENDnet User's Guide Network This screen shows various network statistics related to your camera including IP Address, Subnet Mask and Default Gateway. TV-IP851WC / TV-IP851WIC Active Users This screen shows whether there are any active users logged on to the camera viewing live video. Cloud Link - TRENDnet TV-IP851WC | User's Guide - Page 30
TRENDnet User's Guide Configuring Camera Settings The TV-IP851WC/TV-IP851WIC allows you to make configuration changes from anywhere by connecting to the camera using a standard web browser. To configure camera settings: 1. Login to the camera as described in the section Using the web-based - TRENDnet TV-IP851WC | User's Guide - Page 31
TRENDnet User's Guide • Frame Rate (Frames/Sec.): Select the number of frames per to enable anti-flicker. TV-IP851WC / TV-IP851WIC Audio • Audio: Choose whether to Enable or Disable the camera audio feed. • Volume: Select the volume percentage level. © Copyright 2013 TRENDnet. All Rights Reserved. - TRENDnet TV-IP851WC | User's Guide - Page 32
to your PC. This is done using the on-board wireless adapter on the TV-IP851WC or TV-IP851WIC connected to a wireless adapter on the PC. • SSID: Service Set Identifier. This is an identifier for your network. Manually enter the SSID of your wireless network or select it from the drop down menu. You - TRENDnet TV-IP851WC | User's Guide - Page 33
TRENDnet User's Guide Network • IP Address Mode: Choose a method to assign an IP address to your camera. o Fixed IP - If you want to assign a static or fixed IP address to the camera, you may do so here. Your network administrator should be able to provide you with the necessary details to complete - TRENDnet TV-IP851WC | User's Guide - Page 34
TRENDnet User's Guide Cloud Link • Cloud Link: Click the radio button to Enable or Disable cloud server syncing. TV-IP851WC / TV-IP851WIC User • User Access Control: Enable this to allow user accounts to connect to the camera. This option also enable/disable the authentication for direct view. - TRENDnet TV-IP851WC | User's Guide - Page 35
TRENDnet User's Guide Date/Time • Synchronized with Time Server: If you have an Internet time server or have an NTP server designated on your network, you can specify the IP address of it here. Ensure that you select the correct time zone for the camera also. • Set Manually: If you prefer to - TRENDnet TV-IP851WC | User's Guide - Page 36
TRENDnet User's Guide Upload On this screen you can enter details of an FTP Server that you want to upload images from the camera to. • Host Address: The IP address of the FTP Server • Port Number: The port number to connect to the FTP on, default port is 21. • User Name: The user name of the FTP - TRENDnet TV-IP851WC | User's Guide - Page 37
. o Motion Detection: Selecting this option sets the camera to e-mail images upon detection of motion. o Manual Operation: Selecting this option means the user is responsible for taking a snapshot from the camera to e-mail. © Copyright 2013 TRENDnet. All Rights Reserved. TV-IP851WC / TV-IP851WIC 34 - TRENDnet TV-IP851WC | User's Guide - Page 38
TRENDnet User's Guide Day/Night Mode (for TV-IP851WIC) This section lets you configure the Day/Night vision modes on the IP camera. • Auto: The camera automatically detects the level of light and selects night vision or normal mode. • Manual: Night mode can be selected on the view video ActiveX and - TRENDnet TV-IP851WC | User's Guide - Page 39
configuration section. TV-IP851WC / TV-IP851WIC E-mail Test When you have set up an e-mail account in the configuration section, you can use this screen to test that the E-mail settings are correct. Pressing the Test button will make the camera send a test e-mail to the address specified in the - TRENDnet TV-IP851WC | User's Guide - Page 40
its boot up sequence. Note: Factory reset will erase the current configuration settings on the camera. You should back up the settings first if you wish to keep them. See the Backup and Restore section for more information. TV-IP851WC / TV-IP851WIC Firmware Upgrade Click the Browse button and - TRENDnet TV-IP851WC | User's Guide - Page 41
the feature. Then select a DDNS provider from the list. TV-IP851WC / TV-IP851WIC 2. Enter your DDNS's the Host Name, User Name and Password. 3. In the Port Number section, assign an HTTP port of the camera. The default HTTP Port on the camera is 80. The example shows above is using port number - TRENDnet TV-IP851WC | User's Guide - Page 42
TRENDnet User's Guide TV-IP851WC / TV-IP851WIC 7. Camera's login page will appear. Configure DDNS on your router 1. Go to Camera's DDNS Ports Number section, assign a HTTP port for your camera and click Apply. Then click Add to add the application. * Please refer to your router's user's manual - TRENDnet TV-IP851WC | User's Guide - Page 43
The local IP address of your Camera. TV-IP851WC / TV-IP851WIC 6. Open another web browser and enter your DDNS domain and camera's port number. http://yourDomainName:PortNumber 7. The camera login page will appear. Click Add to add the application. * Please refer to your router's user's manual for - TRENDnet TV-IP851WC | User's Guide - Page 44
Push to enable WPS Reset Button Reset to factory default Privacy Button Privacy mode on/off Power Consumption Max 6.1 watts Power Input: 100~240V, 50/60 Hz, 0.5A © Copyright 2012 TRENDnet. All Rights Reserved. TV-IP851WC / TV-IP851WIC Dimension Weight Temperature Humidity Certifications - TRENDnet TV-IP851WC | User's Guide - Page 45
to FTP Real time snapshot HTTP port: 80 (default) Synchronize with NTP server or PC, or set time / date manually TV-IP851WC / TV-IP851WIC TV-IP851WIC Camera General Audio Pan & Tilt Day / Night Hardware Network LED WPS Button Reset Button Privacy Button Power Consumption Sensor: 1/5" CMOS Sensor - TRENDnet TV-IP851WC | User's Guide - Page 46
to 54 Mbps 802.11n: up to 150 Mbps © Copyright 2012 TRENDnet. All Rights Reserved. TV-IP851WC / TV-IP851WIC Security Output Power Receiving Sensitivity Channels Management Accounts Remote Login Backup / Restore Cloud Link Settings Image Video Setting Recording Snapshot Port Settings Time 64/128 - TRENDnet TV-IP851WC | User's Guide - Page 47
when it has been exposed to bright lights such as direct exposure © Copyright 2012 TRENDnet. All Rights Reserved. TV-IP851WC / TV-IP851WIC to sunlight or halogen lights. Reposition the Network Camera into a more shaded area immediately as prolonged exposure to bright lights will damage the - TRENDnet TV-IP851WC | User's Guide - Page 48
instructions, U.S.A. is firmware-limited to test methods have been applied in order to prove presumption of conformity with the essential requirements of the R&TTE Directive 1999/5/EC: © Copyright 2012 TRENDnet. All Rights Reserved. TV-IP851WC / TV-IP851WIC and/or network services. This device may - TRENDnet TV-IP851WC | User's Guide - Page 49
TRENDnet User's Guide Česky [Czech] Dansk [Danish] Deutsch [German] Eesti [Estonian] English Español [Spanish] Greek] Français [French] Italiano [Italian] Latviski [Latvian] TRENDnet tímto prohlašuje, že tento TV-IP851WC / TV-IP851WIC je ve shodě se základními požadavky a dalšími příslušnými - TRENDnet TV-IP851WC | User's Guide - Page 50
TRENDnet User's Guide Limited Warranty TRENDnet warrants its products against defects in material and workmanship, under normal use and service, for the following lengths of time from the date of purchase. TV-IP851WC / TV-IP851WIC - 3 Years Warranty AC/DC Power Adapter, Cooling Fan, and Power Supply - TRENDnet TV-IP851WC | User's Guide - Page 51
-
 1
1 -
 2
2 -
 3
3 -
 4
4 -
 5
5 -
 6
6 -
 7
7 -
8
-
9
-
10
-
11
-
12
-
13
-
14
-
15
-
16
-
17
-
18
-
19
-
20
-
21
-
22
-
23
-
24
-
25
-
26
-
27
-
28
-
29
-
30
-
31
-
32
-
33
-
34
-
35
-
36
-
37
-
38
-
39
-
40
-
41
-
42
-
43
-
44
-
45
-
46
-
47
-
48
-
49
-
50
-
51
 |
 |

TRENDnet User’s Guide
Cover Page