Toshiba 46WX800U User Manual - Page 13
Front panel controls, Back panel connections - 46
 |
View all Toshiba 46WX800U manuals
Add to My Manuals
Save this manual to your list of manuals |
Page 13 highlights
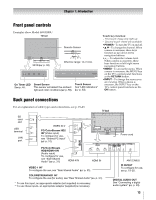
Chapter 1: Introduction Front panel controls Examples show Model 46WX800U. TV front Remote Sensor 3D IR (- p. 32) Effective range: 16.4 ft (5m) On Timer LED Smart Sensor Touch Sensor See p. 46. This sensor will detect the ambient See "LED indications" light and color conditions (- p. 55). (- p. 83). Touch key function: - First touch: these only light up. - Second touch: these are available. • POWER - To turn the TV on and off. • B b - To change the channel. When a menu is onscreen, these keys function as up/down menu navigation buttons. • + - - To adjust the volume level. When a menu is onscreen, these keys function as left/right menu navigation buttons. • MENU - To access the menu. When a menu is onscreen, the MENU key on the TV's control panel functions as the RETURN button. • INPUT - To change the source you are viewing. When a menu is onscreen, the INPUT key on the TV's control panel functions as the OK button. Back panel connections For an explanation of cable types and connections, see p. 15-23. SD card slot USB terminal LAN port VIDEO IN 2 PC/ColorStream HD2 IN* (Video input) To configure for use, see "Shared PC Input" (- p. 31). TV back Power cord PC/ColorStream HD2/HDMI 4 IN (Audio input) To configure for use, see "Side Shared Audio" (- p. 31). HDMI 4 IN HDMI IN VIDEO 1 IN** To configure the use, see "Rear Shared Audio" (- p. 31). COLORSTREAM HD1 IN* To configure the use (for audio), see "Rear Shared Audio" (- p. 31). * To use this input, an appropriate adapter (not supplied) is necessary. ** To use these inputs, an appropriate adapter (supplied) is necessary. ANT/CABLE IR IN/OUT To configure for use, see p. 19-20. DIGITAL AUDIO OUT See "Connecting a digital audio system" (- p. 20). 13
-
 1
1 -
2
-
3
-
4
-
5
-
6
-
7
-
 8
8 -
 9
9 -
 10
10 -
 11
11 -
 12
12 -
 13
13 -
 14
14 -
 15
15 -
 16
16 -
 17
17 -
 18
18 -
19
-
20
-
21
-
22
-
23
-
24
-
25
-
26
-
27
-
28
-
29
-
30
-
31
-
32
-
33
-
34
-
35
-
36
-
37
-
38
-
39
-
40
-
41
-
42
-
43
-
44
-
45
-
46
-
47
-
48
-
49
-
50
-
51
-
52
-
53
-
54
-
55
-
56
-
57
-
58
-
59
-
60
-
61
-
62
-
63
-
64
-
65
-
66
-
67
-
68
-
69
-
70
-
71
-
72
-
73
-
74
-
75
-
76
-
77
-
78
-
79
-
80
-
81
-
82
-
83
-
84
-
85
-
86
-
87
-
88
-
89
-
90
-
91
-
92
-
93
-
94
-
95
-
96
-
97
-
98
-
99
-
100
-
101
-
102
-
103
-
104
-
105
-
106
 |
 |
