Toshiba 65L9300U User Guide - Page 78
Switching to 3D mode, Selecting 3D format from the Quick menu in 3D mode
 |
View all Toshiba 65L9300U manuals
Add to My Manuals
Save this manual to your list of manuals |
Page 78 highlights
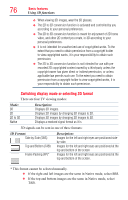
78 Basic features Using 3D functions Switching to 3D mode ❖❖ Set 3D Auto Start to 3D. ❖❖ Press the 3D button and select 3D while viewing 2D mode or Native mode. Input Signal/Switching Display Mode Trigger Type Additional Information Format Source Signal Press 3D Button Select 3D Select 2D to 3D FP 3D Format Signal With 3D Auto Detect Information SBS TAB Without 3D Auto SBS Detect Information TAB 2D Format Signal * Correct 3D image. Selecting 3D format from the Quick menu in 3D mode 1 Press the QUICK button. 2 Select 3D Settings > 3D Format Select. 3 Press the OK button. 4 Press the t/u (arrow) buttons to select Side by Side or Top and Bottom.
-
 1
1 -
2
-
3
-
4
-
5
-
6
-
7
-
8
-
9
-
10
-
11
-
12
-
13
-
14
-
15
-
16
-
17
-
18
-
19
-
20
-
21
-
22
-
23
-
24
-
25
-
26
-
27
-
28
-
29
-
30
-
31
-
32
-
33
-
34
-
35
-
36
-
37
-
38
-
39
-
40
-
41
-
42
-
43
-
44
-
45
-
46
-
47
-
48
-
49
-
50
-
51
-
52
-
53
-
54
-
55
-
56
-
57
-
58
-
59
-
60
-
61
-
62
-
63
-
64
-
65
-
66
-
67
-
68
-
69
-
70
-
71
-
72
-
 73
73 -
 74
74 -
 75
75 -
 76
76 -
 77
77 -
 78
78 -
 79
79 -
 80
80 -
 81
81 -
 82
82 -
 83
83 -
84
-
85
-
86
-
87
-
88
-
89
-
90
-
91
-
92
-
93
-
94
-
95
-
96
-
97
-
98
-
99
-
100
-
101
-
102
-
103
-
104
-
105
-
106
-
107
-
108
-
109
-
110
-
111
-
112
-
113
-
114
-
115
-
116
-
117
-
118
-
119
-
120
-
121
-
122
-
123
-
124
-
125
-
126
-
127
-
128
-
129
-
130
-
131
-
132
-
133
-
134
-
135
-
136
-
137
-
138
-
139
-
140
-
141
-
142
-
143
-
144
-
145
-
146
-
147
-
148
-
149
-
150
-
151
-
152
-
153
-
154
-
155
-
156
-
157
-
158
-
159
-
160
-
161
-
162
-
163
-
164
-
165
-
166
-
167
-
168
-
169
-
170
-
171
-
172
-
173
-
174
-
175
-
176
-
177
-
178
-
179
-
180
-
181
-
182
-
183
-
184
-
185
-
186
-
187
-
188
-
189
-
190
-
191
-
192
-
193
-
194
-
195
-
196
-
197
-
198
-
199
-
200
-
201
-
202
 |
 |

78
Basic features
Using 3D functions
Switching to 3D mode
❖
Set
3D Auto Start
to
3D
.
❖
Press the
3D
button and select
3D
while viewing 2D mode or Native
mode.
Input Signal/Switching Display Mode Trigger
Press 3D Button
Type
Additional Information
Format
Source
Signal
Select 3D
Select 2D to
3D
3D Format
Signal
With 3D Auto Detect
Information
FP
SBS
TAB
Without 3D Auto
Detect Information
SBS
TAB
2D Format Signal
* Correct 3D image.
Selecting 3D format from the Quick menu in 3D mode
1
Press the
QUICK
button.
2
Select
3D Settings
>
3D Format Select
.
3
Press the
OK
button.
4
Press the
t
/
u
(arrow) buttons to select
Side by Side
or
Top and
Bottom
.