Toshiba BDX2000 Owner's Manual - English - Page 49
Software Update - firmware
 |
UPC - 022265003138
View all Toshiba BDX2000 manuals
Add to My Manuals
Save this manual to your list of manuals |
Page 49 highlights
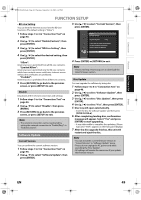
INTRODUCTION CONNECTIONS PLAYBACK FUNCTION SETUP E5PJ1UD_EN.book Page 49 Thursday, September 10, 2009 6:45 PM FUNCTION SETUP • BD-Live Setting You can limit the Internet access from the BD-Live functions. (The default setting is "Allow".) 1 Follow steps 1 to 4 in "Connection Test" on page 46. 2 Use [K / L] to select "Enable(Custom)", then press [ENTER]. 3 Use [K / L] to select "BD-Live Setting", then press [ENTER]. 4 Use [K / L] to select the desired setting, then press [ENTER]. "Allow": Internet access is permitted from all BD-Live contents. "Limited Allow": Internet access is permitted only for BD-Live contents which have content owner certificates. Internet access without the certificates are prohibited. "Prohibit": Internet access is prohibited from all BD-Live contents. 5 Press [RETURN] to go back to the previous screen, or press [SETUP] to exit. Disable Deactivate all the network connection and settings. 1 Follow steps 1 to 4 in "Connection Test" on page 46. 2 Use [K / L] to select "Disable", then press [ENTER]. 3 Press [RETURN] to go back to the previous screen, or press [SETUP] to exit. Note • The network connection can be reactivated by setting the network connection to "Enable(Easy)" or "Enable(Custom)". Software Update Current Version You can confirm the current software version. 1 Follow steps 1 to 3 in "Connection Test" on page 46. 2 Use [K / L] to select "Software Update", then press [ENTER]. 3 Use [K / L] to select "Current Version", then press [ENTER]. Others Current Version Current Version x.xxx If you wish to check latest update or other product information, please check our Website. www.tacp.com 4 Press [ENTER] or [RETURN] to exit. Note • Please visit http://www.tacp.com to download the latest firmware version. Disc Update You can upgrade the software by using disc. 1 Follow steps 1 to 3 in "Connection Test" on page 46. 2 Use [K / L] to select "Software Update", then press [ENTER]. 3 Use [K / L] to select "Disc Update", then press [ENTER]. 4 Use [K / L] to select "Yes", then press [ENTER]. 5 Disc tray will open automatically. • Insert the disc for software update and then press [OPEN/CLOSE A]. 6 After completing loading disc, confirmation message will appear. Select "Yes" and press [ENTER] to start upgrading. • It may take awhile to complete the updating. (Please wait until "100%" appears on the front panel display.) 7 After the disc upgrade finishes, this unit will restart and eject the disc. Note • You can check the current firmware version in "Current Version" in "Software Update" menu. • Please do not unplug the AC power cord while executing the "Disc Update". • All settings will remain the same even if you update the firmware version. OTHERS EN 49
-
 1
1 -
2
-
3
-
4
-
5
-
6
-
7
-
8
-
9
-
10
-
11
-
12
-
13
-
14
-
15
-
16
-
17
-
18
-
19
-
20
-
21
-
22
-
23
-
24
-
25
-
26
-
27
-
28
-
29
-
30
-
31
-
32
-
33
-
34
-
35
-
36
-
37
-
38
-
39
-
40
-
41
-
42
-
43
-
 44
44 -
 45
45 -
 46
46 -
 47
47 -
 48
48 -
 49
49 -
 50
50 -
 51
51 -
 52
52 -
 53
53 -
 54
54 -
55
-
56
-
57
-
58
-
59
-
60
-
61
-
62
-
63
-
64
 |
 |
