Toshiba D-R410 Owner's Manual - English - Page 89
to select HDMI, then
 |
UPC - 022265001356
View all Toshiba D-R410 manuals
Add to My Manuals
Save this manual to your list of manuals |
Page 89 highlights
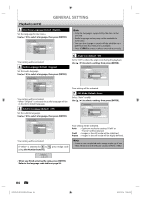
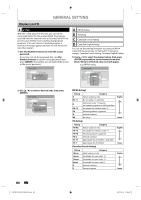
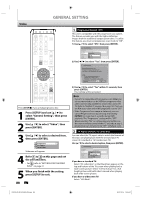
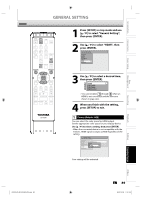
Introduction Connections Basic Setup Disc Management HDMI GENERAL SETTING OPEN/ INPUT CLOSE SELECT HDMI .@/: ABC DEF GHI JKL MNO PQRS TUV SATELLITE WXYZ LINK SPACE TIMER PROG. SETUP DISPLAY AUDIO TOP MENU MENU/LIST CLEAR ENTER RETURN SKIP REV FWD SKIP PAUSE PLAY STOP TIME SLIP 1.3x / 0.8x PLAY INSTANT SKIP REPEAT REC MODE REC ZOOM SE-R0265 1 Press [SETUP] in stop mode and use [K / L] to select "General Setting", then press [ENTER]. 2 Use [K / L] to select "HDMI", then press [ENTER]. General Setting Playback Display Video Recording Clock HDMI Reset All 3 Use [K / L] to select a desired item, then press [ENTER]. 1 Format 2 HDMI Audio 3 RGB Range 4 HDMI Control • You cannot select 1 through 3 when an HDMI is not connected and the items are shown in grey color. 4 When you finish with the setting, press [SETUP] to exit. 1 Format (Default : RGB) You can select the color space for HDMI output. Set the appropriate color space for your display device. Use [K / L] to select a setting, then press [ENTER]. • When the connected device is not compatible with the Y/Cb/Cr, HDMI signal is output as RGB regardless of the setting. General Setting Playback Display Video Recording Clock HDMI Reset All Format Format HDMI Audio RGB Range RGB HDMI CEC YCbCr Your setting will be activated. Recording Playback Editing Function Setup Others E7K7AUD_D-R410KU_EN.indd 89 EN 89 2007/12/18 11:51:03
-
 1
1 -
2
-
3
-
4
-
5
-
6
-
7
-
8
-
9
-
10
-
11
-
12
-
13
-
14
-
15
-
16
-
17
-
18
-
19
-
20
-
21
-
22
-
23
-
24
-
25
-
26
-
27
-
28
-
29
-
30
-
31
-
32
-
33
-
34
-
35
-
36
-
37
-
38
-
39
-
40
-
41
-
42
-
43
-
44
-
45
-
46
-
47
-
48
-
49
-
50
-
51
-
52
-
53
-
54
-
55
-
56
-
57
-
58
-
59
-
60
-
61
-
62
-
63
-
64
-
65
-
66
-
67
-
68
-
69
-
70
-
71
-
72
-
73
-
74
-
75
-
76
-
77
-
78
-
79
-
80
-
81
-
82
-
83
-
 84
84 -
 85
85 -
 86
86 -
 87
87 -
 88
88 -
 89
89 -
 90
90 -
 91
91 -
 92
92 -
 93
93 -
 94
94 -
95
-
96
-
97
-
98
-
99
-
100
-
101
 |
 |
